Overview
This tutorial will demonstrate how to use the scenarios feature. You will learn how to create scenarios, edit object properties and disable objects between scenarios, and run all scenarios in the model.
Before Starting
Before beginning this tutorial:
- Download the Getting Started - Scenarios model to follow along.
- Understand how to make a simple burner fire.
Using Scenarios
The ability to create scenarios is a powerful feature in PyroSim intended to improve user workflow. Scenarios allow the use of a single geometry model to create and run multiple different simulations with different fire and object configurations. For example, when designing design fire scenarios per NFPA 101 section 5.5 (NFPA 2021) up to 8 different scenarios can be required for compliance. The scenarios feature reduces the time and effort required to model and simulate these different scenarios.
Scenarios reduce the amount of hard drive space required to store a large project, reduce the number of PyroSim files to manage/update, and make it easier to run batches of simulations.
This section will teach the basics of scenarios, and walk through a simple demonstration of how to use the Edit Scenarios dialog in PyroSim to create, edit, and activate a scenario.
Opening the Edit Scenarios Dialog
To begin, open Getting Started - Scenarios.psm linked at the top of this tutorial.
To open the Edit Scenarios dialog, click the ![]() Edit Scenarios icon on the main toolbar.
Figure 1 shows the dialog that should appear.
Edit Scenarios icon on the main toolbar.
Figure 1 shows the dialog that should appear.
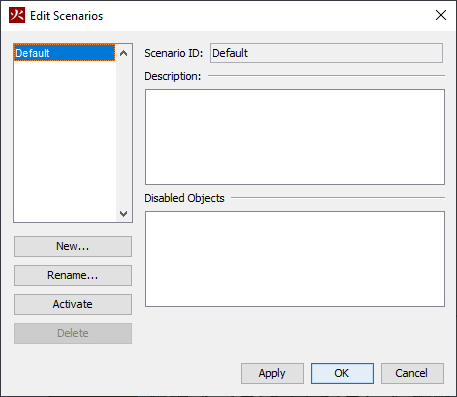
The tree on the left-hand side of the dialog shows all of the scenarios defined in this model. By default, there is only one scenario defined, and it is automatically selected when the dialog is opened for the first time.
At the top of the right-hand side of the dialog, the Scenario ID of the selected scenario is listed and below, the Description for the selected scenario is given. The Description the text field can be edited to help manage and keep notes about the specifics of each scenario.
Below the Description field is the Disabled Objects text box. This text box will list all of the objects that are disabled for the selected scenario. This text box will be covered in more depth later in this tutorial.
Creating New scenarios
To create new scenarios, simply click the New button in the Edit Scenarios dialog. For this example:
- Click New in the Edit Scenarios dialog.
- In the New Scenario dialog, name the scenario
Ground Floor. - In the Based On dropdown, select
Default.
- Click OK.
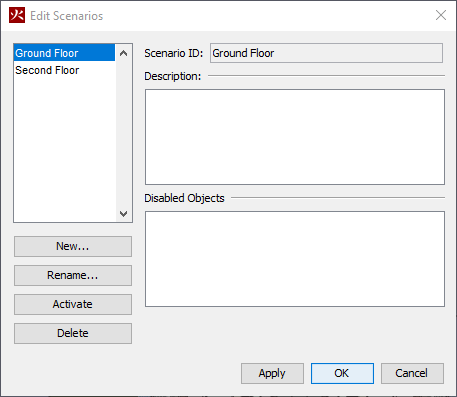
The above steps will have created the Ground Floor scenario in the Edit Scenarios dialog tree.
Repeat steps 1-4, this time naming the new scenario Second Floor.
Once the two new scenarios are created, select the Default scenario, and click Delete.
Now, the Ground Floor and Second Floor scenarios should be the only two scenarios in the tree, shown in Figure 2.
With the Edit Scenarios dialog still open, select the Ground Floor scenario, and then click Activate.
In the PyroSim menu bar, the Ground Floor scenario has been activated in the Active Scenario dropdown, located next to the ![]() Edit Scenarios icon and shown in Figure 3.
The scenario dropdown can be used to select which scenario is active without opening the Edit Scenarios dialog.
Edit Scenarios icon and shown in Figure 3.
The scenario dropdown can be used to select which scenario is active without opening the Edit Scenarios dialog.
In the Description field of the Ground Floor scenario, enter the following description, then click Apply to save the changes:
This scenario is a ground floor hallway fire, with no fire suppression system.
Likewise, in the Description field of the Second Floor scenario, enter the following description, then click Apply to save the changes:
This scenario is a second floor room fire, with a simple fire suppression system.
Editing Scenarios
Now that the new scenarios have been created, it is time to start defining them. The main way that scenarios are defined is through the selectve disabling of objects. The following steps will demonstrate how to disable objects and how to switch between the different scenarios.
Disabling objects
- With the
Ground Floorscenario active, change the model’s floor view to2ndin the Floor View dropdown. This will give a clear visual representation of the effects of the Scenarios feature. - In either the navigation tree or the 3D window, right click on the vent labeled Burner Vent - 2nd.
- In the pop-up menu, click Disable Object(s). Note how the vent disappears from view in the 3D window and is struckthrough in the navigation tree.
- Repeat steps 2-3 with the devices labeled Thermocouple - 2nd, SD - 2nd, and Sprinkler - 2nd.
With the second floor objects disabled, the Ground Floor scenario is now different than the Second Floor scenario.
In the Active Scenario dropdown, switch between the two scenarios.
The second floor objects are still active and visible in the Second Floor scenario, but not in the Ground Floor scenario.
To finalize the two scenarios, switch to the Second Floor Scenario, and disable the Burner Vent - Ground, SD - Ground, and Thermocouple - Ground objects.
Scenario Overview
To get an overview of the two scenarios, open the Edit Scenarios dialog by clicking the ![]() Edit Scenarios icon.
In the scenarios tree, select the
Edit Scenarios icon.
In the scenarios tree, select the Ground Floor scenario.
The Disabled Objects text box, mentioned in Opening the Edit Scenarios Dialog, now shows all of the objects that were disabled in this scenario.
Selecting the Second Floor scenario in the scenario tree will update the list to represent only the objects disabled in the Second Floor scenario.
Updating Object Properties
Currently, scenarios only explicitly track the enabling and disabling of objects.
To modify an object parameter in a scenario, the object must be duplicated, the parameter in the duplicate must be modified, and the original object must be disabled in the scenario.
The following will walk through a brief example of this by adjusting the heat release rate of the fire in the Second Floor scenario.
- With the
Second Floor Scenarioactive, right-click the vent labeled Burner Vent - 2nd. - Click Copy/Move.
- In the Translate dialog, select the Copy mode, then click OK. This should duplicate the vent and create Burner Vent - 2nd01.
- Rename Burner Vent - 2nd01 to Burner Vent 2000 - 2nd.
- Double-click the surface labeled Fire in the navigation tree to open the Edit Surfaces dialog. Note that the Heat Release Rate Per Unit Area (HRRPUA) is \(1000 \frac{kW}{m^2}\).
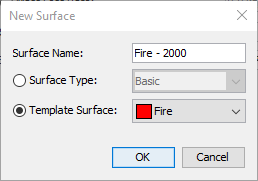
- Click New to create a new surface.
- Name the new surface Fire - 2000, and use the Fire surface as the template surface, as shown in Figure 4.
- In the Heat Release tab of the new surface, set the HRRPUA to \(2000 \frac{kW}{m^2}\), then click OK.
- Double-click the Burner 2000 - 2nd vent, set the surface to the new Fire - 2000 surface, then click OK. Note that this vent has an area of \(1.0 m^2\), resulting in a new heat release rate of \(2000 kW\).
- Right-click the Burner Vent - 2nd vent, and click Disable Object(s).
- Switch to the
Ground Floorscenario. - Right-click the Burner Vent 2000 - 2nd vent, and click Disable Object(s).
The Second Floor scenario now has a new heat release rate of \(2000 kW\) for the fire.
This process can be replicated with any number of other object properties, it is not limited to just HRRPUA or vents.
Running the scenarios
Now that the two scenarios have been created and defined, it is time to run them. Scenarios can be run individually like any other model by switching between scenarios in the Active Scenario dropdown, then running in Serial, Parallel, or Cluster mode, but running individually like this can be time consuming when running a large number of scenarios or when running a large simulation. Running individually like this will also overwrite the same results file every time. This is a good method to preview the results of a single scenario, but not for running the simulations. Instead, use the Export Scenarios feature to run all of the scenarios sequentially.
Exporting the Scenarios batch script
To export the scenarios batch script:
- Click the File button in the menu bar.
- Hover the mouse cursor ove the Export button, then click Export Scenarios in the pop-out menu.
- In the Save dialog, select a location to save the model and the exported batch script, then click OK.
- Once the model and script have been saved (this may take a minute), a new Windows Explorer window will open with the
run_scenarios-Getting_Started_-_Scenarios.batfile highlighted.
This batch script will run all of the scenarios PyroSim just generated and saved. The individual FDS and other configuration files are located inside of folders in the same directory as the batch file.
Viewing and Editing the Batch Script
In the Windows Explorer, right-click the batch script and click Edit. A notepad window should pop-up and show a script similar to the following:
@SETLOCAL
@ECHO off
@ECHO [%~n0] Beginning at %time%

SET PATH=
SET PATH=%PATH%;C:\Program Files\PyroSim 2020\fds
SET PATH=%PATH%;C:\Program Files\PyroSim 2020\fds\mpi
SET PATH=%PATH%;C:\WINDOWS
SET PATH=%PATH%;C:\WINDOWS\system32

SET I_MPI_WAIT_MODE=1
SET OMP_NUM_THREADS=1
SET OMP_STACKSIZE=16M


ECHO [%~n0] Scenario "Ground Floor" beginning at %time%
PUSHD Getting_Started_-_Scenarios-Ground_Floor
runfds.exe mpiexec.exe -n 1 -localonly fds.exe Getting_Started_-_Scenarios.fds
POPD

ECHO [%~n0] Scenario "Second Floor" beginning at %time%
PUSHD Getting_Started_-_Scenarios-Second_Floor
runfds.exe mpiexec.exe -n 1 -localonly fds.exe Getting_Started_-_Scenarios.fds
POPD

ECHO [%~n0] Completed at %time%
pause
The first 11 lines of the batch script set some environment variables for FDS and MPI, and print some output to the shell window when it is run. To learn more about the MPI variables and what they do, see this post.
The rest of the code handles running each scenario. The script moves the working directory into the scenario folders, runs each scenario, then move back to the root directory of the project. The variables in this script can be modified to improve simulation time according to the post above and the FDS User Guide.
By default, the batch file is configured to run each simulation in sequence using a configuration largely identical to PyroSim’s Run Parallel command. It uses the program runfds.exe, which is a convenience application bundled with PyroSim that launches fds.exe with "below normal" operating system priority – a quality of life feature for users that continue using their PC while the simulations are running with negligible performance impact for unattended runs.
Running the batch script
To run the batch script, double click the batch script in the Windows Explorer, or run it via command line.
This will open a new command prompt window and begin the simulations.
When the simulations are complete, view the 3D results by opening the *.smv files in the individual scenario directories created by PyroSim above.
Conclusion
You should now be familiar with how to create scenarios, disable objects and edit properties between scenarios, and run all scenarios in the model.
To download the most recent version of PyroSim, please visit the PyroSim support page and click the link for the current release. If you have any questions or feedback regarding the scenarios feature, please contact support@thunderheadeng.com.
Bibliography
NFPA. 2021. “NFPA 101 - Life Safety Code.” National Fire Protection Association.
Related Tutorials
This tutorial will walk you through modeling and running multiple fire scenarios in a single PyroSim model.
Video tutorial demonstrating how to avoid creating unwanted gaps in the geometry of a Pathfinder model.
Tutorial demonstrating how to make stairs in Pathfinder
Tutorial demonstrating how to distribute the use of stairs and escalators in Pathfinder.
Video tutorial demonstrating how to fix geometry problems related to DWG importation.
In this tutorial we show how to fix three problems that can occur when BIM (Building Information Modeling) or CAD (Computer-Aided Design) models into Pathfinder.
Tutorial demonstrating how to import IFC files to Pathfinder.
Tutorial Demonstrating how to model pressure leakage using Pyrosim