To follow along with this tutorial and test this feature for yourself, download the relevant example files here.
Introduction
For typical building design calculations using the Fire Dynamics Simulator (FDS), a large volume of space will be simulated. To describe this computation volume, one or more subsections of the overall volume are referred to as a "mesh", and defined by a &MESH entry in the input file. In many cases, multiple meshes of different resolutions are required to accurately define the computational domain of the simulation. Most modern computers have multiple "cores" or "threads" per processor, and through the Message Passing Interface (MPI) feature, FDS allows for each mesh to be assigned to a specific thread using the MPI_PROCESS keyword. This feature allows for any number of meshes to be assigned to the same processor simultaneously to improve calculation efficiency.
More information about the MPI_PROCESS and N_THREADS parameters on a MESH record, can be found in section 6.3.3 entitled "multiple Meshes" of the FDS User’s Guide. The most relevant part of that section is quoted below for reference.
Usually in a MPI calculation, each mesh is assigned its own process, and each process its own processor.
However, it is possible to assign more than one mesh to a single process, and it is possible to assign more than one process to a single processor.
Consider a case that involves six meshes:
&MESH ID='mesh1′, IJK=…, XB=…, MPI_PROCESS=0 /
&MESH ID='mesh2′, IJK=…, XB=…, MPI_PROCESS=1 /
&MESH ID='mesh3′, IJK=…, XB=…, MPI_PROCESS=1 /
&MESH ID='mesh4′, IJK=…, XB=…, MPI_PROCESS=2 /
&MESH ID='mesh5′, IJK=…, XB=…, MPI_PROCESS=3 /
&MESH ID='mesh6′, IJK=…, XB=…, MPI_PROCESS=3 /The parameter MPI_PROCESS instructs FDS to assign that particular mesh to the given process. In this case, only four processes are to be started, numbered 0 through 3. Note that the processes need to be invoked in ascending order, starting with 0.
Why would you do this? Suppose you only have four processors available for this job. By starting only four processes instead of six, you can save time because 'mesh2' and 'mesh3' can communicate directly with each other without having to transmit data using MPI calls over the network.
Same goes for 'mesh5' and 'mesh6'. In essence, it is as if these mesh pairs are neighbors and need not send mail to each other via the postal system. The letters can just be walked next door.
Previous versions of PyroSim did not allow for advanced records on the MESH lines. This limitation required the user to export the FDS input file from PyroSim, edit it by hand in a text editor to add the MPI_PROCESS parameters into the MESH records, and then start the FDS simulation from the command line. This process did not take advantage of the simple method of starting and monitoring a simulation through PyroSim.

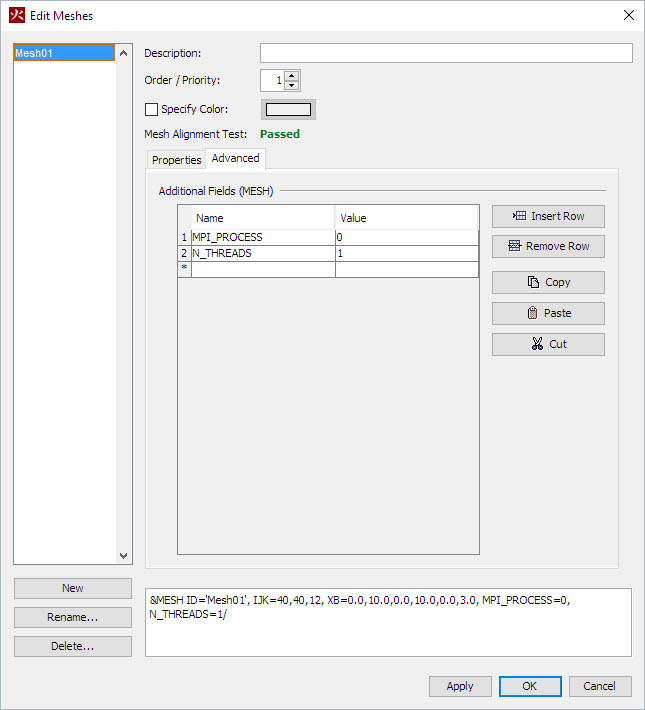
In PyroSim 2015.4.1208 an Additional Fields table was added to an Advanced tab of the Mesh Editing dialog. This new feature allows additional MPI and OpenMP parameters to be added to each MESH line in PyroSim, without the need to export and edit the file by hand and run from the command line.
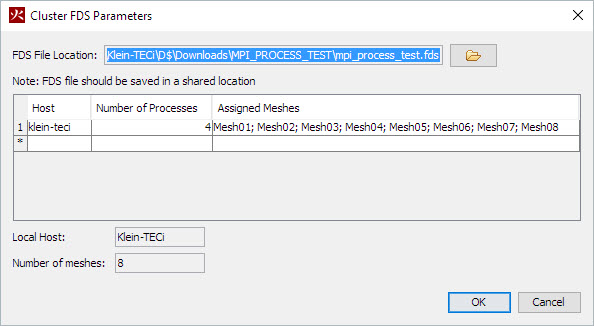
(EDIT Dec. 21, 2015) The Run FDS Parallel option in PyroSim will automatically set the number of MPI processes equal to the number of Meshes in the model. To use the advanced MPI_PROCESS feature in PyroSim, you need control over the total number of MPI processes to start for the simulation. This is best accomplished by using the Run FDS Cluster option instead of Run FDS Parallel. In Figure 2 below, you can see how a single hostname is used for the local computer. Then while you see 8 meshes in the list to the right and in the field below the table, the number of processes for that host is set to the number 4. In this case, 4 processes will be started, and 2 meshes will be assigned to each process as specified in the additional mesh records through the MPI_PROCESS parameter.

Features like this improve the built-in capabilities of PyroSim and save the user time and effort when setting up and running FDS simulations.
To download the most recent version of PyroSim, please visit the the PyroSim Support page and click the link for the current release. If you have any questions, please contact support@thunderheadeng.com
Related Tutorials
This tutorial will walk you through using external 3D CAD geometry in your PyroSim model.
This tutorial will walk you through creating your first ever PyroSim fire model.
(Legacy) Tutorial to experience the fundamental features of PyroSim
Video tutorial demonstrating how to fix geometry problems related to DWG importation.
Tutorial Demonstrating how to model pressure leakage using Pyrosim
Tutorial demonstrating how to model jet fans in Pyrosim.
Video tutorial showing how to reduce the number of navigation mesh polygons to enable larger models and shorter simulation run time.
Tutorial demonstrating how to use PyroSim/FDS to Maximize Solar Panel Convective Cooling.
