Overview
This is the fourth tutorial in our PyroSim Fundamentals tutorial series, intended for new PyroSim users. In this tutorial, we will demonstrate how to add basic material properties to surfaces in your model, as well as how to layer those properties on a surface. By the end of this tutorial, you will have added materials from the PyroSim materials library, added a custom material, and created a layered surface representing an insulated wall.
Before Starting
Before beginning this tutorial:
- Create the prerequisite model in the Importing Geometry tutorial.
- Alternatively, download the complete files for this tutorial: Materials and Layered Surfaces
- Visit the latest version of the PyroSim User Manual for reference throughout this tutorial.
- Download the latest version of the FDS User’s Guide from the NIST FDS-SMV Manuals page.
Materials
Materials in PyroSim are representations of real world material properties, including Density, Conductivity, Emissivity, and Specific Heat. These properties can be used to define the properties of any Surface in FDS. In more complex models Materials can be used to define the solid-phase reaction(s) that occur(s) inside of a solid Material, and even inside of some liquid fuels. Any reactions defined there can even be used to produce other Materials in place of the reacting Material during the simulation.
This is obviously a complex topic. This tutorial will focus on the basics of how to use Materials, and combine them into Layered Surfaces. For more information, read through Section 11.5 Complex Pyrolysis Models in the FDS User Guide (McGrattan et al. 2021, 101)
Adding Materials from the PyroSim Material library
PyroSim comes pre-loaded with Materials gathered from the Verification Analyses provided by NIST with FDS, and cites the source of the reaction in the Description of the Material for your reference. This library is purposefully limited, and the Materials here are more examples than they are validated models. The library should be used as a starting point for you to build your own library of Materials, rather than as a data reference. However, these Materials are good enough for use in simple tutorials and test models.
To begin:
- Extract the
Materials and Layered Surfaceszip file that you downloaded. - Open the
importing_geometry.psmfile in the extracted folder. - In the new PyroSim window, click File > Save As and save the file as
materials_and_layered_surfaces.psm. - Open the Edit Materials dialog by using the Model > Edit Materials action, or by double-clicking the Materials node in the Navigation View.
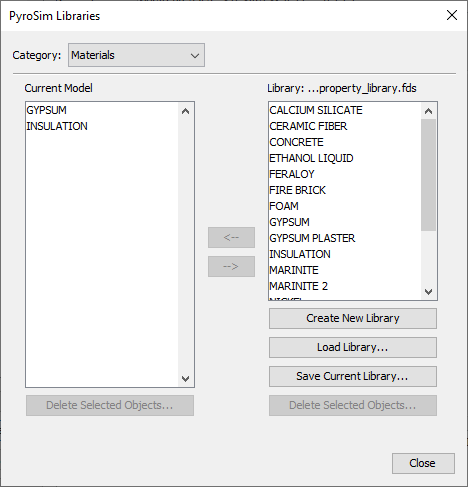
- In the Edit Materials dialog, click Add From Library.
You should now see a similar dialog to the one that you have used to add Reactions to your models. This dialog works in the same way, but with Materials.
- In the right column, select the
GYPSUMandINSULATIONMaterials. - Click the left arrow in the middle of the dialog to add those Materials to the left column.
- Click Close to finish adding the Materials to your model.
Looking at the Thermal Properties tab of the Edit Materials dialog with the GYPSUM material selected, shown in Figure 2, you can see the thermal properties that are defined for this material.
You can find a full breakdown of what these properties are in Section 6.1 of the PyroSim User Manual and in Section 11.3.2: Thermal Properties of the FDS User Guide (McGrattan et al. 2021, 91).
You can also see the citation for this material at the Description at the top of the dialog.
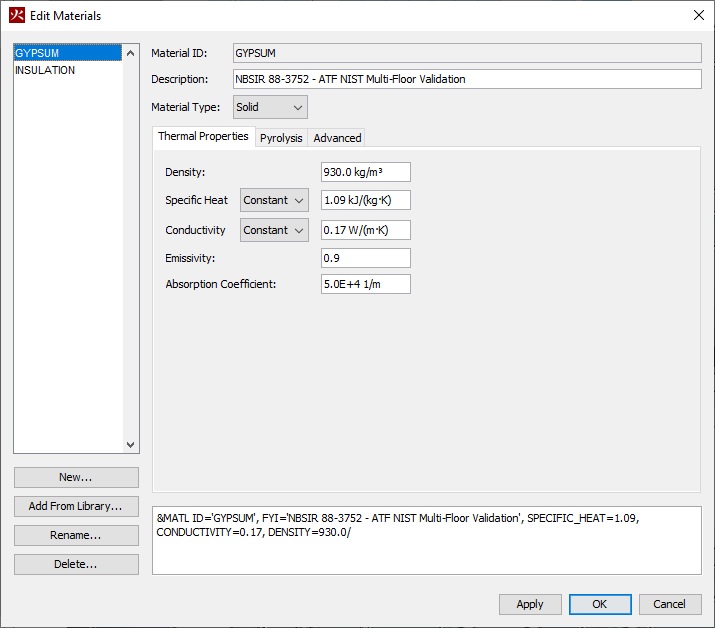
GYPSUM material that you just imported.You have now added a Material to your model from the PyroSim Material Library. It is ready for use in your model.
Defining a custom Material and adding it to the library
You will need to be able to create your own Materials for use in your own models. It would also be nice to store these in a custom library so you can reference them in multiple models without having to recreate them, or so you can create a shared library for coworkers. Thankfully, PyroSim provides this capability. To create your own Material and Library:
- Open a browser window with the University of Maryland Material Thermal Properties Database. This is one of the many databases that we reference on the PyroSim Data References page, accessible through the PyroSim Resources page.
- In the PyroSim Edit Materials dialog, click New to open the New Material dialog.
- In the New Material dialog, create a new Solid Material named
OAK, then click OK. - In the UMD Material Thermal Properties Database, find the first entry for "Oak" under WOODS > ~HARDWOOD~ > Oak.
- Enter the Density, Specific Heat, and Conductivity from the database in to the Thermal Properties tab of the Edit Materials dialog. You may need to reference the top portion of the Database’s page for the column heading. Leave the Emissivity and Absorption Coefficients as they are for now.
- Enter a meaningful description in the Description field for your future reference.
- Click Apply to save your changes.
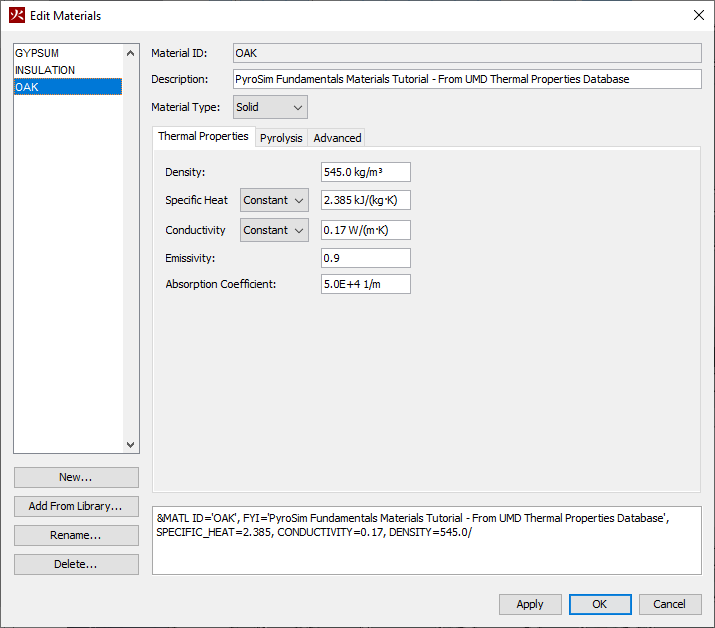
OAK material that you just created.You have now created a custom Material. The only thing left to do now is add it to the library for use in other models. To do this:
- In the Edit Materials dialog, click Add From Library.
- Click Create New Library. This will create a new, blank library file for you.
- In the left column, select the
OAKmaterial you just made. - Click the right-facing arrow in the middle to add it in to the library column on the right.
- Click Save Current Library to bring up the save dialog.
- Save the file with the name
tutorial_library.fds
You can now reference the library file that you just saved using the Load Library button on the PyroSim Libraries dialog in the future. If you save this library file in a shared location, like a company file server, you can also easily share this library file with your coworkers. This would allow you to easily create and use a standard library of materials for your workflows.
Applying a Material to a Surface
Now that you have some Materials defined, the next step is to use them in your model. You do this by applying these Materials to Surfaces. This is relatively straightforward. To do this:
- Double-click the
Door - FrameSurface in the Navigation View. (This Surface was imported as aBasicSurface when you imported the IFC model in the Importing Geometry tutorial.) - Switch the Surface Type to
Layered. - In the Material Layers tab, enter a new row in the Material Layers table.
- Enter a Thickness value of
0.1m, and a Material Composition of1.0 OAK.
- Click OK to save and apply your changes.
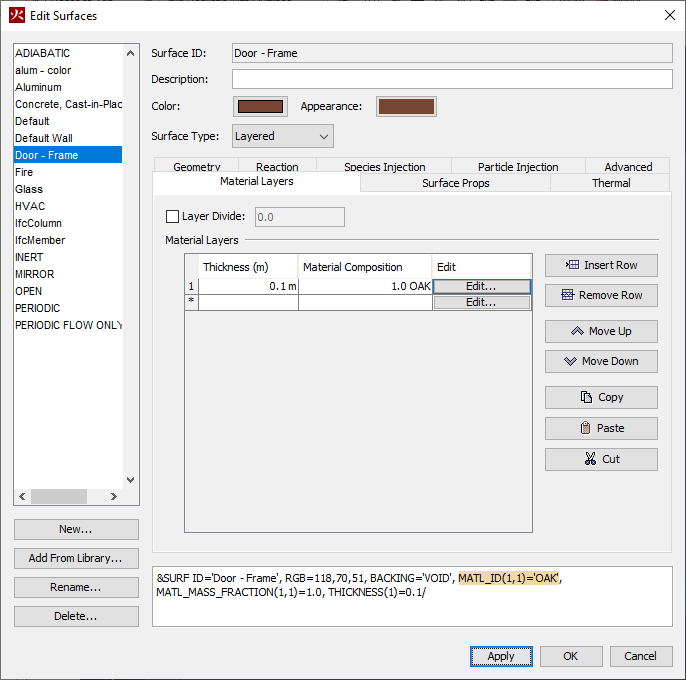
Door - Frame Surface.The Material properties that you entered previously are now applied to every object in your model that uses the Door - Frame Surface.
Applying multiple Materials to a Surface
Building off of single layer Materials, you will now define a Surface with multiple layers of Materials.
Specifically, you will be making a simple model of an insulated interior wall, composed of a layer of gypsum board, a layer of insulation, and another layer of gypsum board.
The process is very similar to the Door - Frame Surface you just modified.
To do this:
- Double-click the
Default WallSurface in the Navigation View. (This Surface was imported from the IFC file just like theDoor - FrameSurface.) - Switch the Surface Type to
Layered. - In the Material Layers tab, enter a new row in the Material Layers table.
- Enter a Thickness value of
0.01mand a Material Composition of1.0 GYPSUM. - Repeat this process with values of
0.09m, 1.0 INSULATIONand another0.01m, 1.0 GYPSUM.
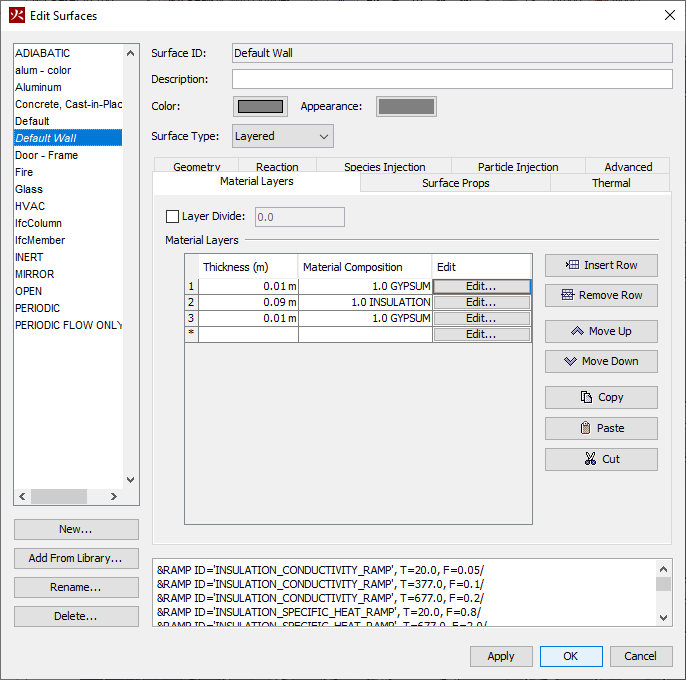
Default Wall Surface.Your Surface should now resemble Figure 5.
This represents a rough model of a standard U.S. interior wall (1/2 inch of Gypsum board on either side of 3 1/2" pine studs) with some insulation added between.
These Material properties are now applied to all objects in the model that use the Default Wall Surface.
Additionally, the heat transfer calculations at this surface will now use this Material layering to calculate thermal resistance and other properties. The Materials are applied in an "outward-in" fashion, meaning that the top row in the Material Layers table is the outermost material in the Normal Direction of the surface, and each row following is applied "underneath" the row above it.
Examining the Differences
To run the simulation and view the results:
- Run the simulation using the
 Run icon.
 - Once the simulation is finished, click the arrow next to the
 Plot Thermal Results icon, and select Plot Device Results.
 - Switch to the
Wall Temperatureplot.
If you look back on the results of the Importing Geometry tutorial, you will find that this Wall Temperature was a constant 20°C.
This is because the Wall Temperature Device in the model is placed against a Default Wall Surface.
Previously, this was just a Basic Surface in PyroSim, which uses the default FDS surface type of INERT.
As you should recall from previous tutorials, this INERT surface is a constant temperature of TMPA, or the Ambient Temperature in our model.
Figure 6 shows that, because you defined the thermal properties of the Default Wall Surface via Materials, this plot is no longer a fixed 20°C.
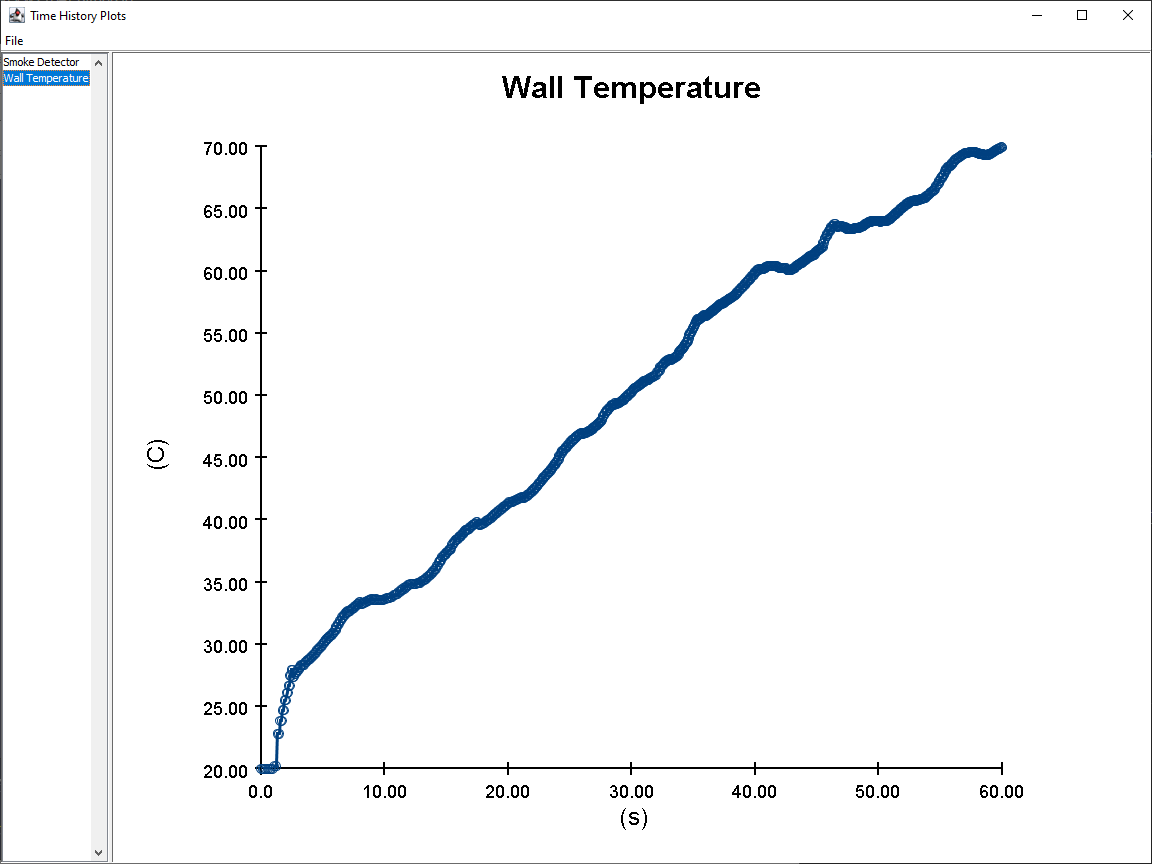
Wall Temperature plot for the model, using the new Default Wall layered Surface.Conclusion
You should now be familiar with creating and using Materials and Layered surfaces in PyroSim.
You can download the complete model files for this tutorial here: Materials and Layered Surfaces.
To download the most recent version of PyroSim, please visit the PyroSim support page and click the link for the current release. Please contact support@thunderheadeng.com with any questions or feedback regarding our products or documentation.
Bibliography
McGrattan, Kevin, Simo Hostikka, Randall McDermott, Jason Floyd, and Marcos Vanella. 2021. Fire Dynamics Simulator User’s Guide, NIST Special Publication 1019. Sixth Edition. National Institute of Standards and Technology, Gaithersburg, Maryland, USA: NIST.
Related Tutorials
This tutorial will walk you through adding additional basic data outputs to your PyroSim model.
This tutorial will walk you through adding some basic fire protection systems to your PyroSim model.
This tutorial will walk you through creating your first ever PyroSim fire model.