Overview
This tutorial will demonstrate how to use Triggers in Pathfinder models. It will walk through how to create Triggers, what the different Trigger awareness types are and what they do, and how to configure the probability that an Occupant will use an Trigger that they are aware of. By the end of this tutorial, the user should be able to use Triggers in their model to roughly mimic an Occupant’s spontaneous decision making.
"Attractors" were introduced in Pathfinder 2021.3 that allowed Occupants to mimic real-world spontaneous decision making. Pathfinder 2023.2 introduced new enhancements to that feature, and with more flexible and expanded capabilities renamed it to "Triggers". This development opens up a wide array of simulation possibilities; such as facilitating information exchange, communicating with first responders, and enabling model-wide alerts. Triggers improve the flexibility and versatility of Pathfinder, empowering users to create more realistic and complex simulations.
Before Starting
Before beginning this tutorial:
- Read through the Triggers section in the User Manual.
- Download triggers_tutorial.zip to follow along.
Introduction
This tutorial, and the model files linked to above, simulates the scenario of a hospital waiting lobby with a set of vending machines. In this scenario, not every Occupant entering the room would interact with this vending machine. However, there may be some Occupants that are feeling hungry that moment or just want to grab a delicious snack while they wait, and decide to purchase something from the vending machine.
In previous versions of Pathfinder, this behavior would most commonly be modeled via a complex chain of Behaviors and behavior changing distributions. Now with Triggers, users can simulate this behavior with a single Trigger object, an associated Behavior, and some related Profile parameters.
The Occupants in this model have one of two Profiles:
- Occupants with the HospitalEmployee Profile are already created at the start of the simulation, and are standing behind the counters in the hospital.
- Occupants with the Default Profile are created with an Occupant Source, and enter the model via the front entrance.
The Occupants created by the Occupant Source are also created with the Patient Behavior. This behavior has Occupants enter the model, enter a Queue for the front desk, interact with the front desk at a Queue Service Point, then make their way to a seating area to wait.
These Occupants will wait between a range of 2 - 5 minutes, then travel further in to the hospital for between 3 - 5 minutes (represented by waiting in a back room).
Some Occupants will enter a Queue for an additional consult and then enter another Queue for payment, while others will proceed directly to the payment Queue. After paying, Occupants will then exit the model.
This tutorial will demonsrate how to add an Trigger to this scenario so that at certain points in the simulation, some Occupants will decide to visit the vending machine and simulate purchasing a snack.
Open the file named triggers_start.pth from the zip file linked above and save it as Triggers.pth.
Creating an Trigger
Placing the Trigger
The first step to creating an Trigger is to first place one in the model.
To place an Trigger:
- Click on the
 Add an Trigger tool.
 - In the Properties Panel, select either Line of Sight or Same Room in the Awareness dropdown. (We will change this type in the next section)
- Click in your model to place the Trigger.
- Rename the new trigger to
Attractor03to be consistent with this example; this name helps to identify the trigger when interpreting results.
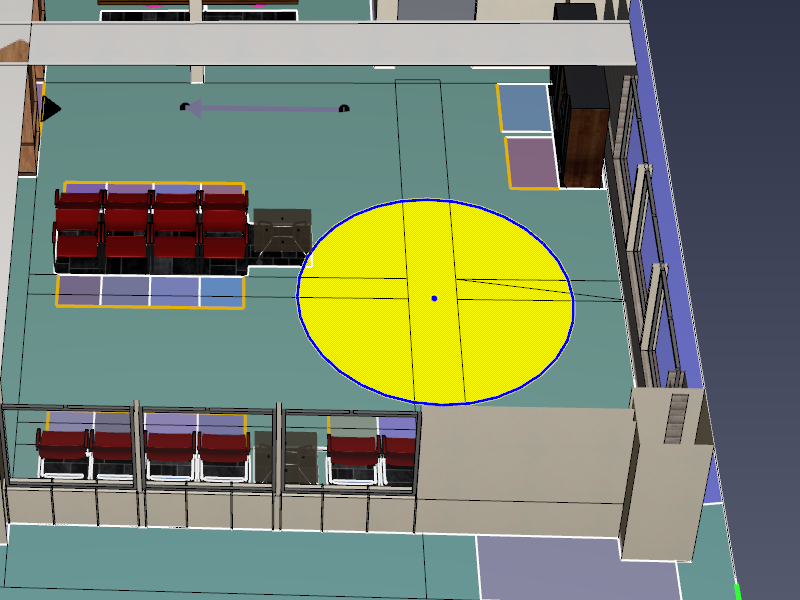
As you can see from Figure 1, Triggers are represented by a point in the model when using the Line of Sight or Same Room awareness types, with Line of Sight also displaying a circle representing the influence range. The other types of Triggers place in a similar manner to these two, however they do not have a visual representation in the model (unless using the <Wait at Trigger> behavior, covered in a later section).
Setting the Trigger Awareness
This section will cover the different Trigger Awareness types, what they mean in practice, and how to use them in a model. After placing an Trigger, the next step is to define the Trigger Awareness, which controls the conditions in which an Occupant will be made aware that an Trigger exists.
To define the Awareness type:
- In the Object Panel, select the Trigger that was just placed.
- In the Properties Panel, click the Awareness dropdown.
There are 4 Awareness types available in this dropdown.
Trigger Properties Section of the Pathfinder User Manual covers all of the Trigger properties and the Awareness types more in depth, but in practice the different Awareness types are useful in the following situations:
- Line of Sight
- Useful when only Occupants within a certain radii of an Trigger should be affected by the Trigger.
- Same Room
- Useful when only Occupants in the same room as the Trigger should be affected by the Trigger.
- Specified Rooms
- Useful when only Occupant in certain rooms should be affected by the Trigger.
- Global
- Useful when all Occupants should be affected by the Trigger. See the Trigger Properties Section of the Pathfinder User Manual for an important note on this selection.
For the purpose of this tutorial, Occupants should only be affected by our vending machine Trigger when they are in specific rooms.
To define this:
- In the Awareness dropdown, select Specified Rooms.
- Click the Rooms hyperlink to open the Rooms Selection Dialog.
- In the Selection Dialog, click the checkbox next to the Main room, then the checkbox next to Show group labels
- In the searchbox of the Selection Dialog, search for "Seats". This should show all of the rooms belonging to the Seats group in the model.
- Click the checkbox at the top of the list to select all of the rooms in the Seats group.
- Check the box next to Display only selected rows to see the entire selection. There should be 25 rooms selected in the model.
- Click OK.
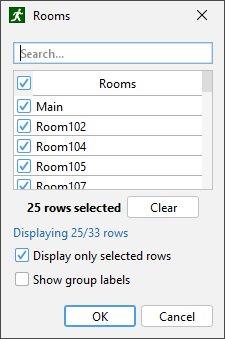
This will limit our Trigger to only affect Occupants that are in the waiting lobby, or that are in the rooms representing the individual waiting chairs in the lobby. Now, any Occupants in these rooms will be aware of the Trigger.
Setting the Trigger Behavior
Occupants are now aware of the Trigger, but what Behavior should they perform when they interact with the Trigger?
At the moment, this Trigger should have the default <Wait at Trigger> Behavior. When interacting with the Trigger, Occupants will go within the Wait Area Radius location of the Trigger (represented by a point in the model), and wait for the Wait Time before continuing their prior Behavior.
This behavior is simple and good for some scenarios, but in others, as in this tutorial, a more complex behavior is needed. Thankfully, any Behavior that can be created in Pathfinder can be the target of an Trigger, such as the GoTo Vending Behavior in this model.
To assign this Behavior to the Trigger:
- Select the Trigger in the Object Panel.
- In the Behavior dropdown, select the GoTo Vending Behavior
That’s it! Now, any Occupant that interacts with the Trigger will now perform the GoTo Vending Behavior.
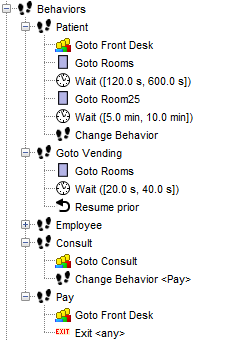
This is a relatively simple Behavior that sends Occupants to one of two specific Rooms, has them wait for a few seconds, then has them resume their prior Behavior. Figure 3 this Behavior and all other behaviors that may now be used by an Occupant with the Default Profile.
Setting the Trigger Probability
The Trigger is almost fully defined.
We have created the Trigger, limited Occupants' awareness of it to specific Rooms, and defined the Behavior that Occupants should use when interacting with it. But how often should Occupants interact with the Trigger when they are aware of it? This is called Trigger probability and is controlled by two sets of parameters in Pathfinder.
Trigger Influence
The first parameter that controls Trigger probability is the Trigger Influence. Trigger Influence controls how influential an Trigger is, the higher the influence; the higher the probability of use (given the same level of Occupant Susceptibility to Triggers.)
Sticking with the vending machine example, a vending machine that is full of everyone’s favorite snacks would be a high-influence Trigger, while a vending machine that is almost empty and only has the snacks nobody likes would be a low-influence Trigger.
To view the Influence for the Trigger in this model:
- Select the Trigger in the Object Panel
Influence should now be visible in the Properies Panel. Trigger Properties Section of the Pathfinder User Manual covers this parameter in more detail, but an important note is that while Influence is represented as a percentage, it does not have a max value of 100%.
Influence can be set above 100% to easily make an Trigger more attractive than all Triggers with the default 100%. In a similar manner, this value can be set to 0% to effectively disable the Trigger.
In this model, leave the Influence value at the default 100%.
Occupant Susceptibility
The second set of parameters that control Trigger probability are an Occupant’s Trigger Susceptibility parameters. These parameters are located in the Movement tab of the Edit Profiles dialog.
To view these parameters in this model:
- In the Object Panel, double-click the Default profile.
- In the Edit Profiles dialog, click the Movement tab.
The Trigger related parameters are located at the bottom of this tab.
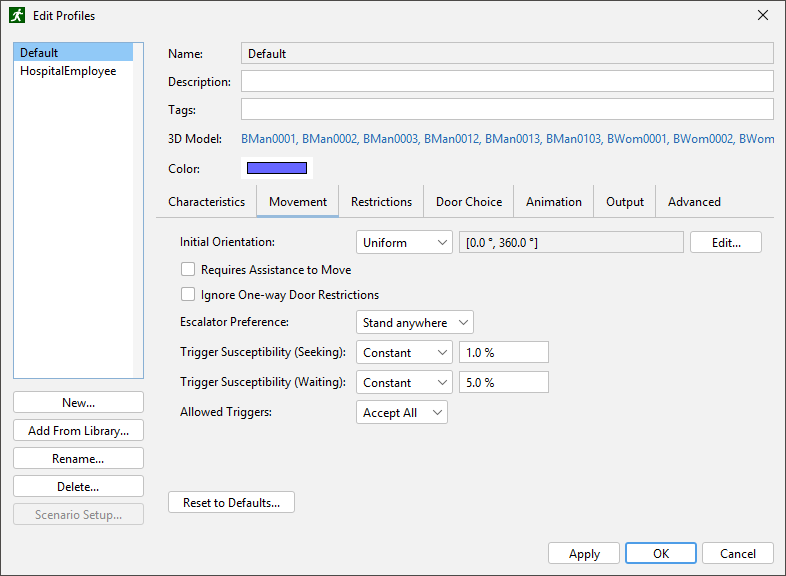
Trigger Susceptibility (Seeking)
The Trigger Susceptibility (Seeking) parameter controls how susceptible an Occupant is to Triggers while they are performing a non-wait action. Unlike the Trigger Influence parameter, this parameter must remain between 0% and 100%.
To set this parameter:
- In the Object Panel, double-click the Default profile.
- In the Edit Profiles dialog, click the Movement tab.
- Select constant in the Trigger Susceptibility (Seeking) dropdown, and enter 1% in the corresponding field.
The math for this parameter is the same as for the Trigger Susceptibility (Waiting) parameter. Now, an Occupant with this profile, that is performing a non-wait action, that is also aware of the Trigger will have a 1% (1% * 100%) probability of interacting with the Trigger.
Trigger Susceptibility (Waiting)
The Trigger Susceptibility (Waiting) parameter is very similar to the Trigger Susceptibility (Seeking) parameter. The only difference is that this parameter only applies to wait actions.
To set this parameter:
- In the Object Panel, double-click the Default profile.
- In the Edit Profiles dialog, click the Movement tab.
- Select constant in the Trigger Susceptibility (Waiting) dropdown, and enter 50% in the corresponding field.
When an Occupant is waiting and is aware of an Trigger, the probability that the Occupant will use the Trigger is given by multiplying the Trigger Influence and the Trigger Susceptibility (Waiting) parameters. In this example, Occupants with the Default profile that are performing the wait action will have a 50% chance of interacting with the Trigger when they are aware of it. This is given by multiplying the 100% (1.00) Trigger Influence by the 50% (0.5) Trigger Susceptibility (Waiting) to yield the Trigger Probability (Waiting) of 50% (0.5)
Allowed Triggers
The simplest of the parameters is the Allowed Triggers parameter. This controls whether an Occupant using this profile is allowed to interact with Triggers at all.
The 3 choices for Allowed Triggers are:
- All
- The Occupant will be able to interact with all Triggers it is aware of.
- None
- The Occupant will not interact with any Triggers in the model.
- From List
- The Occupant will only interact with Triggers that it is aware of that are in the approved list.
For this tutorial, leave Allowed Triggers set to All.
Running the Simulation
Now the Trigger is fully defined!
Click the ![]() Run Simulation icon to run the simulation.
Run Simulation icon to run the simulation.
Results
With the simulation completed, it is now time to go over the Trigger specific Results data that is generated by Pathfinder.
The 3D view
The first thing to do is to verify that Occupants are using the Trigger as intended. This can be done by observing the model in the 3D view.
To do this:
- In the Pathfinder interface, click
 Show Results icon to open the Results Viewer.
The video above shows that the Occupants do in fact interact with the Trigger, and further study of the Results show that the Occupants primarily do this only when they are performing the wait action in the lobby rooms.
Triggers in the Summary Report
The Summary Report file contains information about the simulation geometry, simulation performance, statistics, and usage infromation for each room, stairway, and door. You can read more about the Summary Report in the Pathfinder User Manual. With the addition of Triggers, this file also now includes information about Trigger Usage Time.
To view this information:
- Open the Triggers_summary.txt file
- Find the Trigger Usage Times section

This section lists all Triggers present in the model. Each entry lists the Trigger’s usage count, minimum usage time (with related Occupant), maximum usage time (with related Occupant), and average usage time (with standard deviation). There are also two additional entries titled no triggers and all triggers. The no triggers entry lists data for any Occupants that did not use any Triggers, and the all atractors entry lists data that summarizes the use of all Triggers in the model.
Triggers in the Occupant Summary file
The Occupant Summary file provides statistics about each Occupant in the simulation. You can read more about the Occupant Summary file in Section 14.7 of the Pathfinder User Manual. With the addition of Triggers, two additional columns are added to this file. To view this data:
- Open the Triggers_Occupant.csv file
- Find the num triggers used and trigger time(s) columns
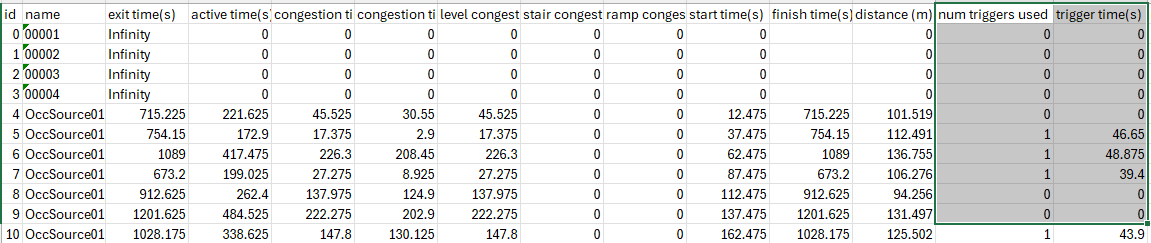
Figure 6 shows the new num triggers used and trigger time(s) columns. The num triggers used column lists the number of Triggers that an Occupant used during the simulation, and the triggers time(s) lists the total amount of time that the Occupant spent performing and Trigger behavior.
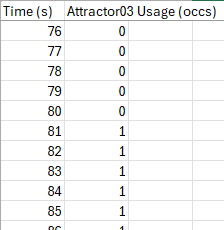
The Trigger History file
With the addition of Triggers, a new Trigger History file was added to the Pathfinder output. This file lists the usage of Triggers over time. Each column (except the Time column) represents a single Trigger in the model. The data in each row represent the number of people using the Trigger at the given time step. Read more about Trigger History in the Pathfinder User Manual.
To view this file:
- Open the Triggers_triggers.csv file
Screenshot of the Triggers_triggers.csv file, showing the usage of Triggers over time.
The Attractor03 Usage (occs) column indicates the number of occupants influenced by the trigger over time.
Conclusion
Users should now know how to create Triggers, understand the different Trigger awareness types and what they do, understand how to configure the probability that an Occupant will use an Trigger, and know how to view the new Results created by the Triggers.
To download the most recent version of Pathfinder, please visit the most recent Pathfinder Release Notes. Please contact support@thunderheadeng.com with any questions or feedback regarding our products or documentation.
Related Tutorials
Tutorial demonstrating how to model Occupants that respsond to Triggers to shop.
Tutorial demonstrating how to model occupants that respond to Triggers to evacuate in a small conceptual model.
This tutorial teaches the user how to create simple Queues in Pathfinder.
This tutorial teaches the user how to create circulation movement using Queues in an example cafeteria model.
Update to a Pathfinder subway station passenger movement, using queues and triggers to simulate standard circulation, then an emergency evacuation.
Video tutorial demonstarting how to assign exit goals to percentages of the occupant population.
Tutorial demonstrating how to have occupants evacuate using familiar paths.