Overview
This tutorial will demonstrate the basics of how to use Queues in Pathfinder models. This will cover the creation of Queues, all basic Queue components, modification of Queue specific parameters, and creation and usage of Queue groups. By the end of this tutorial, the user should be able to use Queues in their model to control how their Occupants wait in lines during non-evacuation scenarios.
Before Starting
Before beginning this tutorial:
- Download Simple_Queues.zip to follow along.
- Read through the Queues section in the User Manual.
Introduction
In non-evacuation Occupant models, it is useful to simulate how Occupants would move through lines while waiting for something. This is a common scenario, with examples including: ticketing / security checkpoints outside of events, checkout lines inside a supermarket, and others. In older versions of Pathfinder, the best way to model this type of scenario was to create individual rooms with one-way doors and a system of complex behaviors to represent Queues, as done in the Subway Station Passenger Movement Tutorial. Since Pathfinder 2021.2, this modeling process is much easier because of the Queues object.
The Simple Queues - Final model in Simple_Queues.zip represents an example of a ticketing checkpoint outside an event.
Occupants will enter from the left of the model via an Occupant Source.
20 Occupants will enter over a period of 10 seconds, move through the checkpoint, then leave through the right exit.
This tutorial demonstrates how to funnel Occupants through a set of Queues, have them interact with a booth attendant, and then proceed to exit the model.
A Simple Single Queue
Creating a Queue
This section will cover how to create a single Queue to funnel Occupants through the checkpoint in the Simple_Queues model. By the end of this section, the user should understand the basic structure of Queues in Pathfinder, as well as how to create a Queue and how to move Occupants through a Queue.
Creating a Queue Object
To begin:
- Open the Simple_Queues.pth model.
- Switch the view to the top-down 2D view.
- Create a Queue Object by clicking Model > New Queue, or right-clicking the Queues entry in the Navigation View and click New Queue in the context menu.
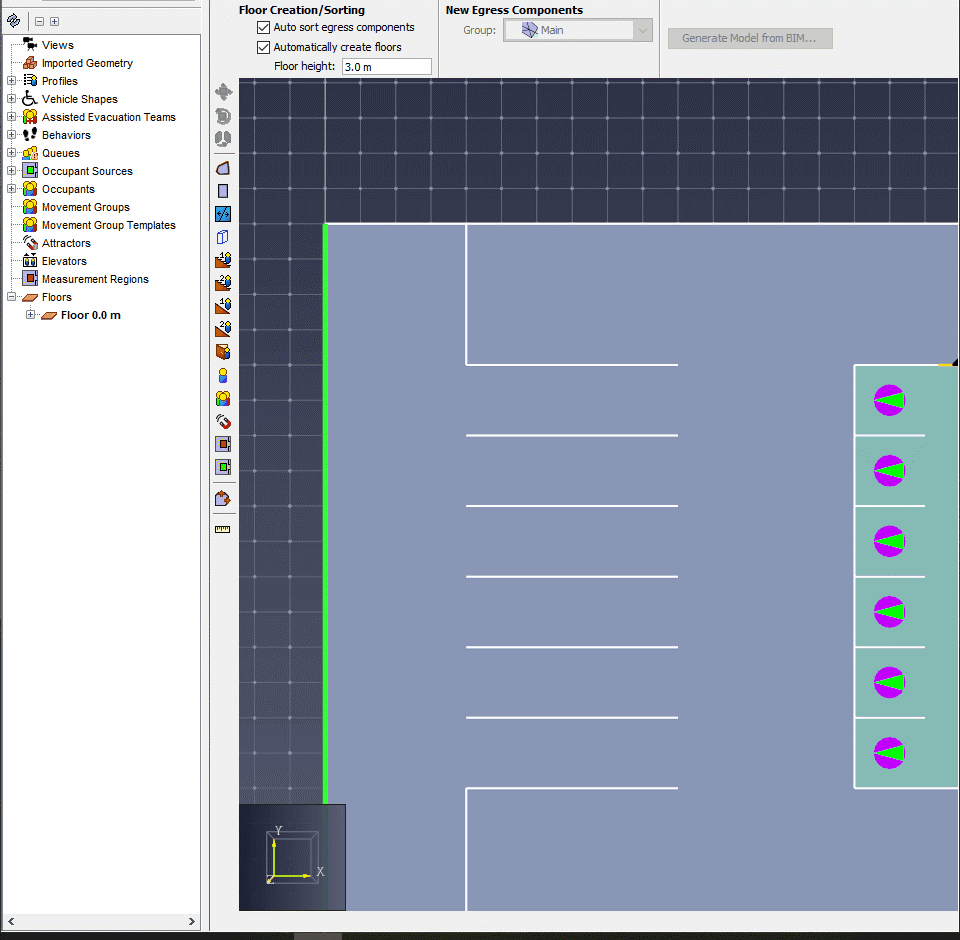
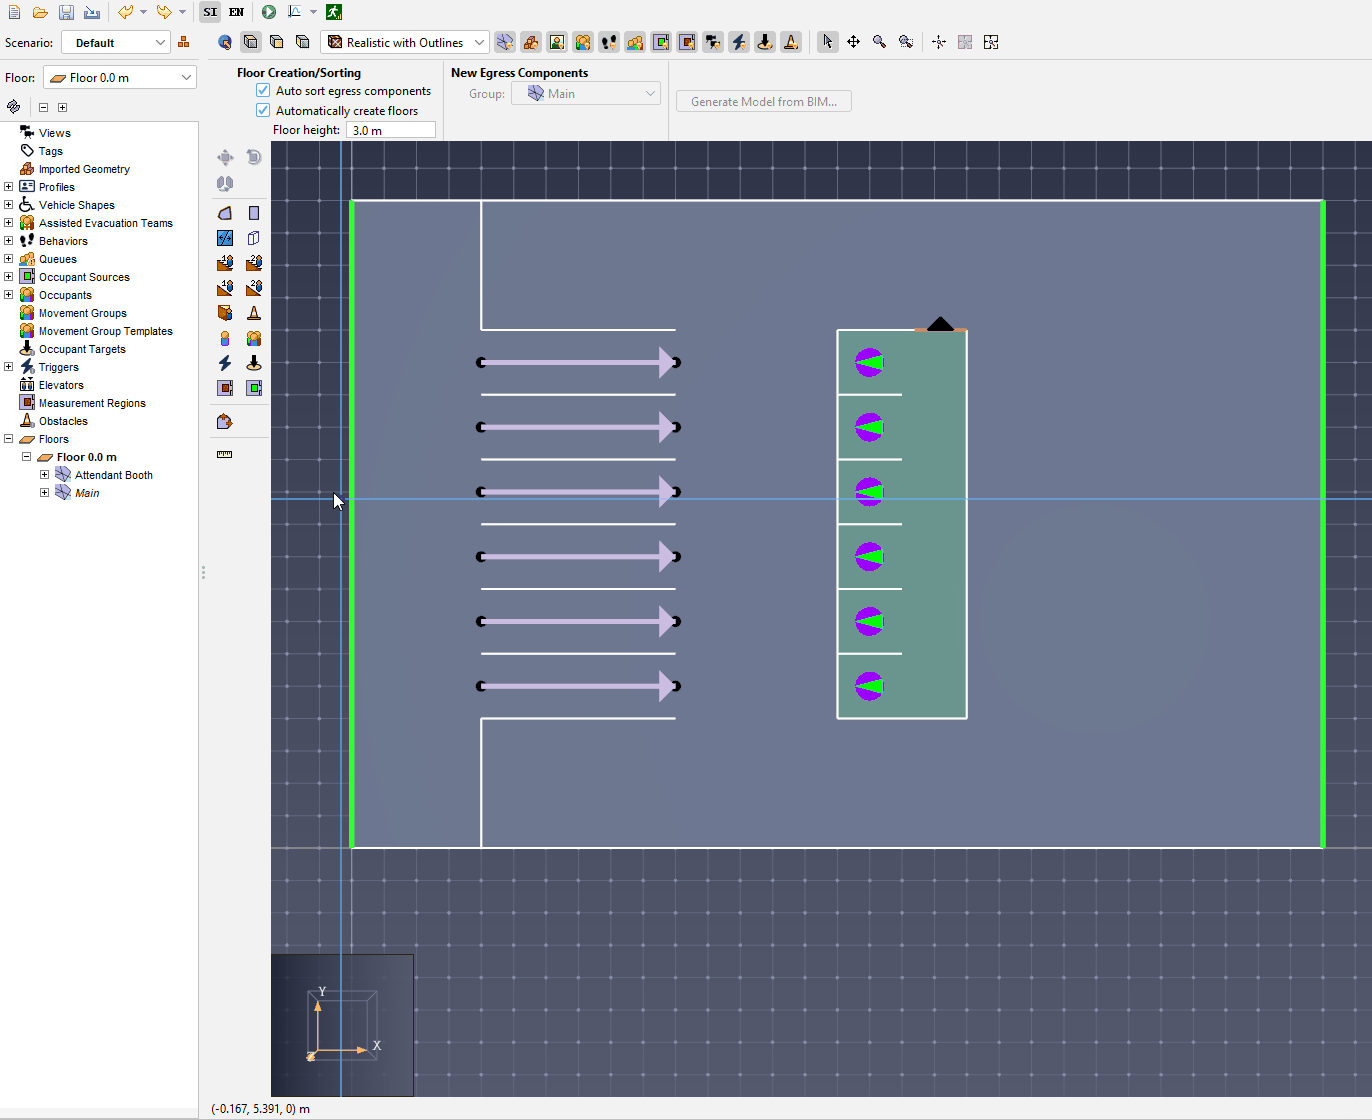
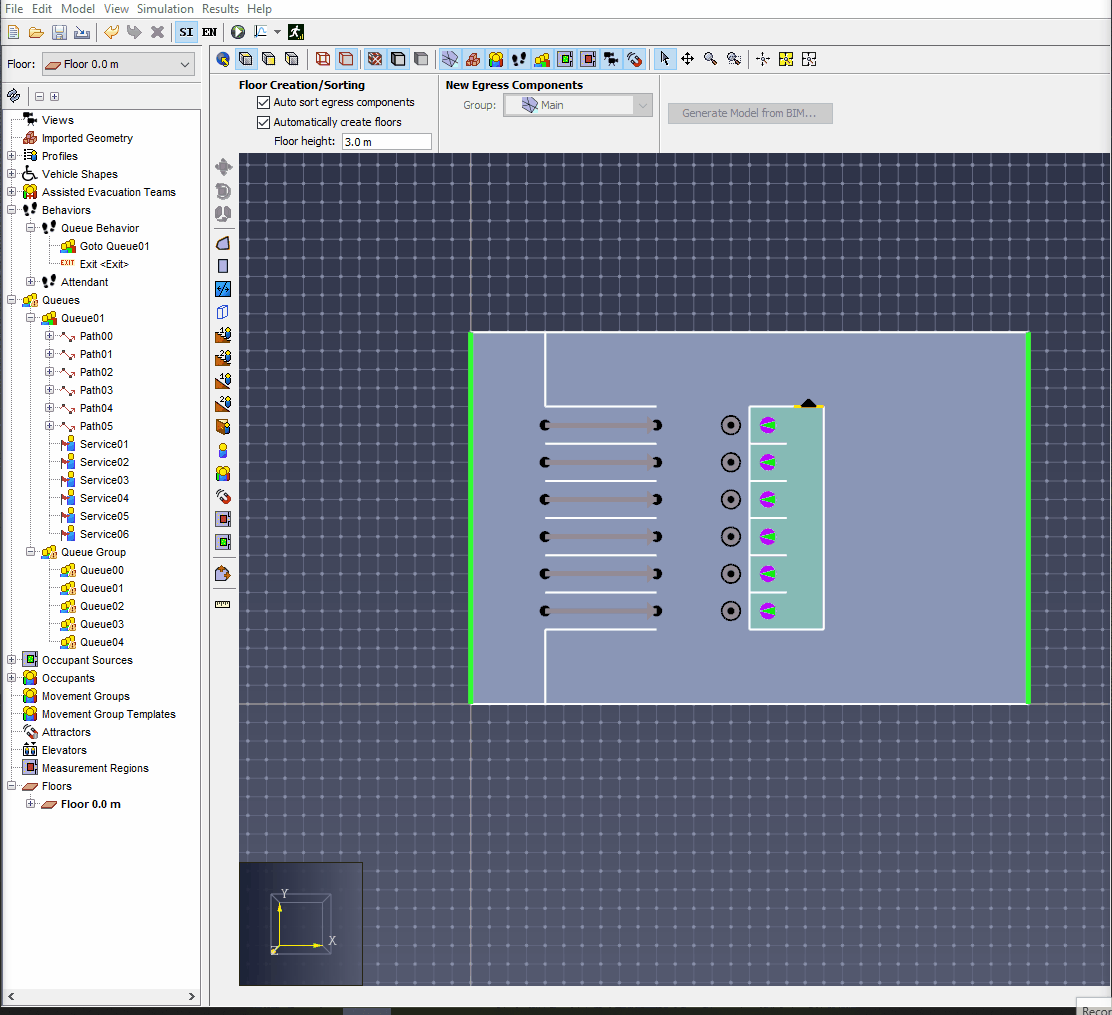
There should now be a new Queue object under the Queues entry in the Navigation View. There should also be a warning on this new Queue Object, shown in Figure 2. This warning is shown because on its own, the Queues Object is not enough to define Occupant movement.

Queues are made up of a series of Queue Paths and Service Points. Paths define how Occupants will line up and wait in the Queues, while Service Points define what an Occupant will interact with after they move through the Queue. Each Queue can have multiple Paths and Service Points, however each Queue requires at least one of each, else the warning mentioned in Figure 2 will be shown.
Creating a Queue Path
The next step in fully defining this Queue is to create a Path. To create a Path:
- Select the Queue Object in the Navigation View
- In the Queues Property Panel above the 3D Window, click the arrow in the Add Element dropdown, and select Queue Path.
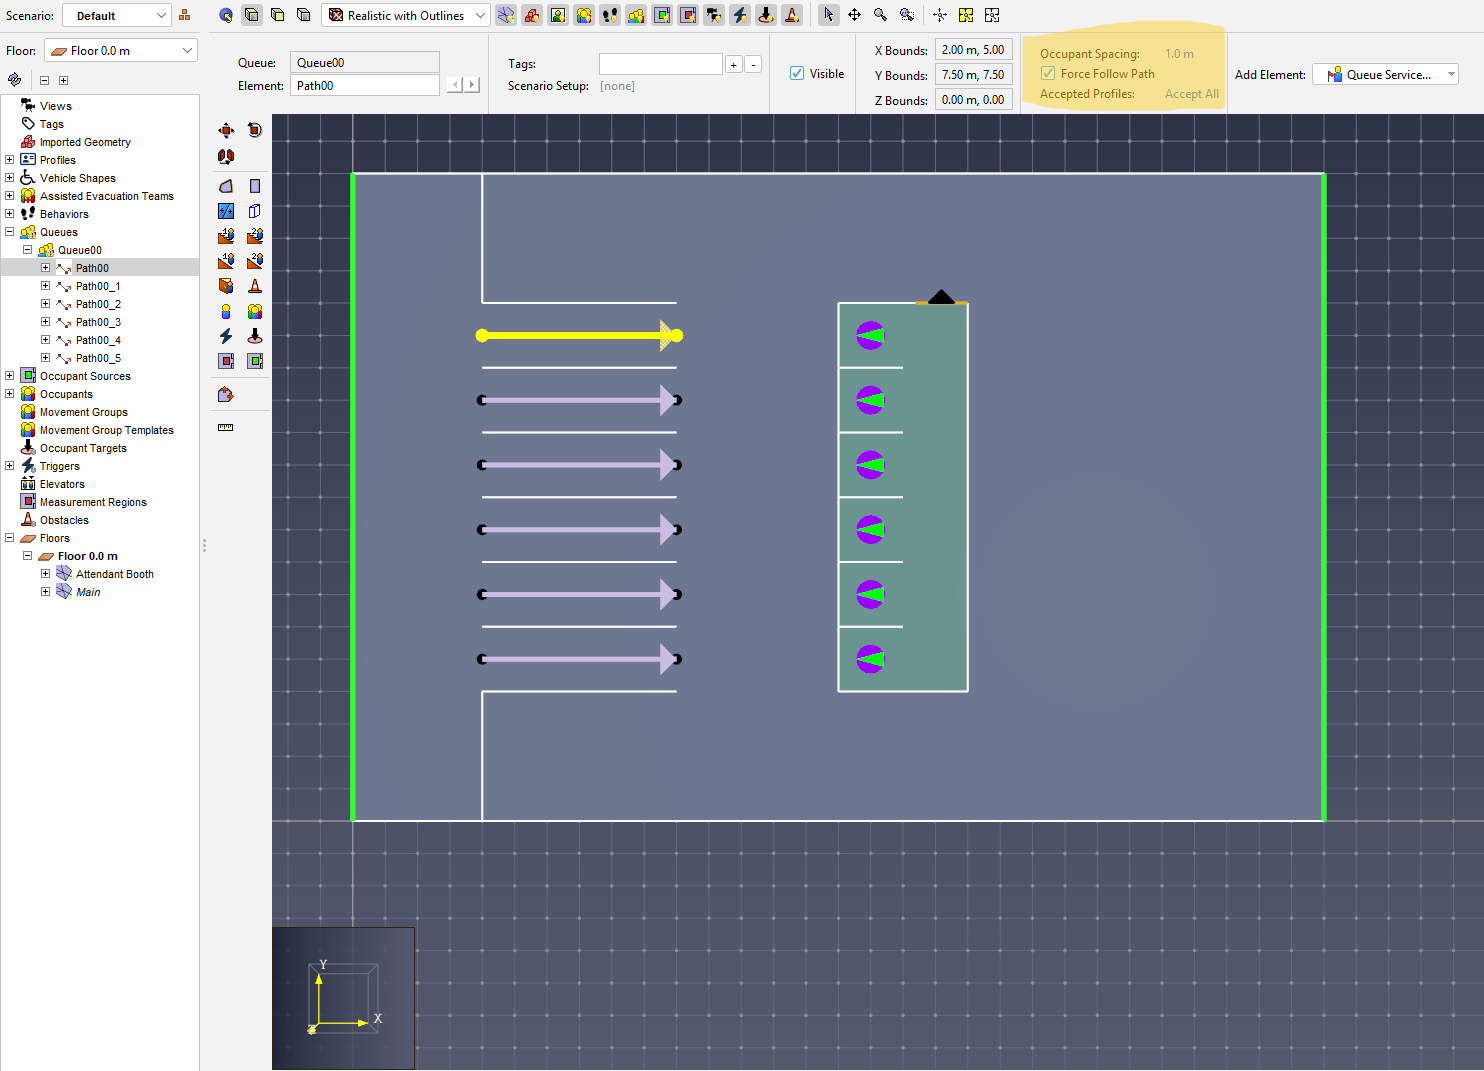
- In the Path Creation Property Panel, select Draw from Path Exit, then draw a path in the top Queueing area shown in Figure 3. Right-click will create the path as drawn, or you can click the Create button in the property panel.
- Repeat the above steps to create paths in each of the 6 Queueing locations. Alternatively, you can copy the initial Queue five times with the Move/Copy tool.
There should now be 6 Paths associated with the Queue object. Each Path has a few parameters associated with it, highlighted in Figure 4. Occupant Spacing determines how closely occupants will stand together in the Path. Force Follow Path, if checked, will force occupants to follow along the entire path from beginning node to end node (regardless if the Path is empty of other occupants). If it is left unchecked and the line of waiting Occupants is not all the way to the end of the Path, new Occupants joining the line will move directly to the end of the waiting line rather than walk to the start node, then along the entire Path. Accepted Profiles specifies which selection of profiles will be in the queue, similar to its to usage in Room Properties.
For this tutorial:
- Select all 6 Paths in the model.
- Check the box next to Force Follow Path in the property panel.
With the Paths created, the next step is to define what Occupants do when they reach the end of the line.
Creating a Service Point
Now that the Paths are created, it’s time to define how the Occupants move up to the attendant booth to get a ticket after they move through a Path. This is done by creating Service Points. To create a Service Point:
- Select the Queue in the Navigation View.
- Click the arrow in the Add Element dropdown, then select Queue Service.
- Click in the model to create a Service Point in front of the first Path.
- Repeat the steps above to create a Service Point in front of all 6 Paths.
Now, any Occupants that move through any of the 6 Paths will move to a Service Point after they reach the end of their Path and a Service Point is unoccupied.
When they reach the Service Point, they will wait for a set period of time.
This wait time is controlled by the Service Time parameter in the property panel.
For this tutorial, leave the Service Time set to its default 5.0s.
At this point, the Queue is fully defined and Occupants that are sent to it will move through one of the Paths and be served at one of the Service Points. The next step is to actually send Occupants through the Queue.
Moving Occupants through a Queue
Creating the Occupant Behavior
Moving Occupants through a Queue is done via the Behavior system, specifically through a new Goto Queues action. To send Occupants through this Queue:
- In the Navigation View, select the Goto Any Exit behavior.
- Rename this behavior to Queue Behavior.
- Click the arrow next to the Add Action dropdown, and select Goto Queues.
- In the update Property Panel, click the link next to Queue, and select the new Queue that was just created. Note that in this example, only one Queue is selected. If multiple Queues are selected, the Occupant will select and move through only one of the Queues before continuing to the next Behavior Action.
Now, any Occupants that are assigned the Queue Behavior will move through one of the Paths and be served at one of the Service Points before moving towards the exit.
Examining the Results
The model is now complete!
Click the ![]() Run Simulation icon to run the simulation.
In the Results window, click the
Run Simulation icon to run the simulation.
In the Results window, click the ![]() play button to view how Occupants move through the model.
play button to view how Occupants move through the model.
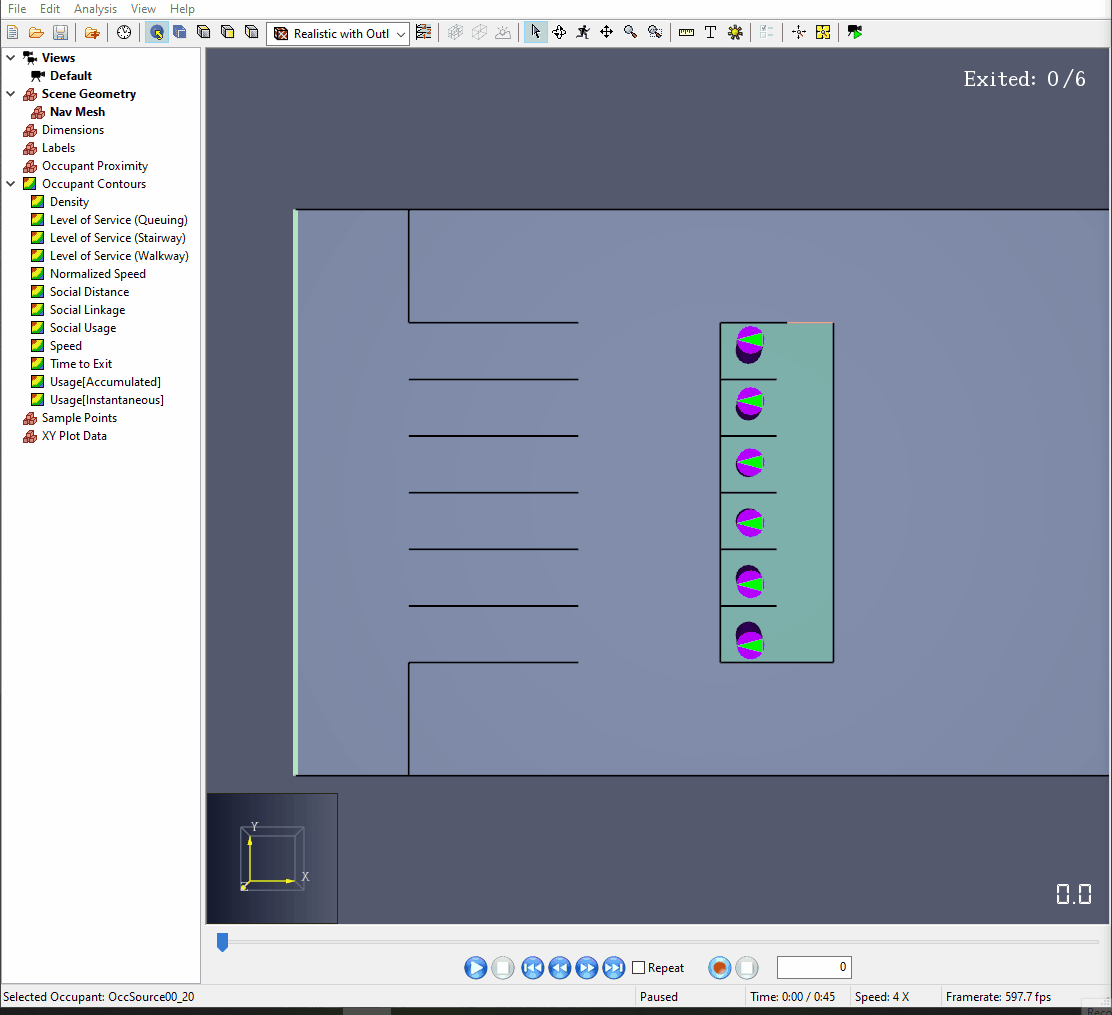
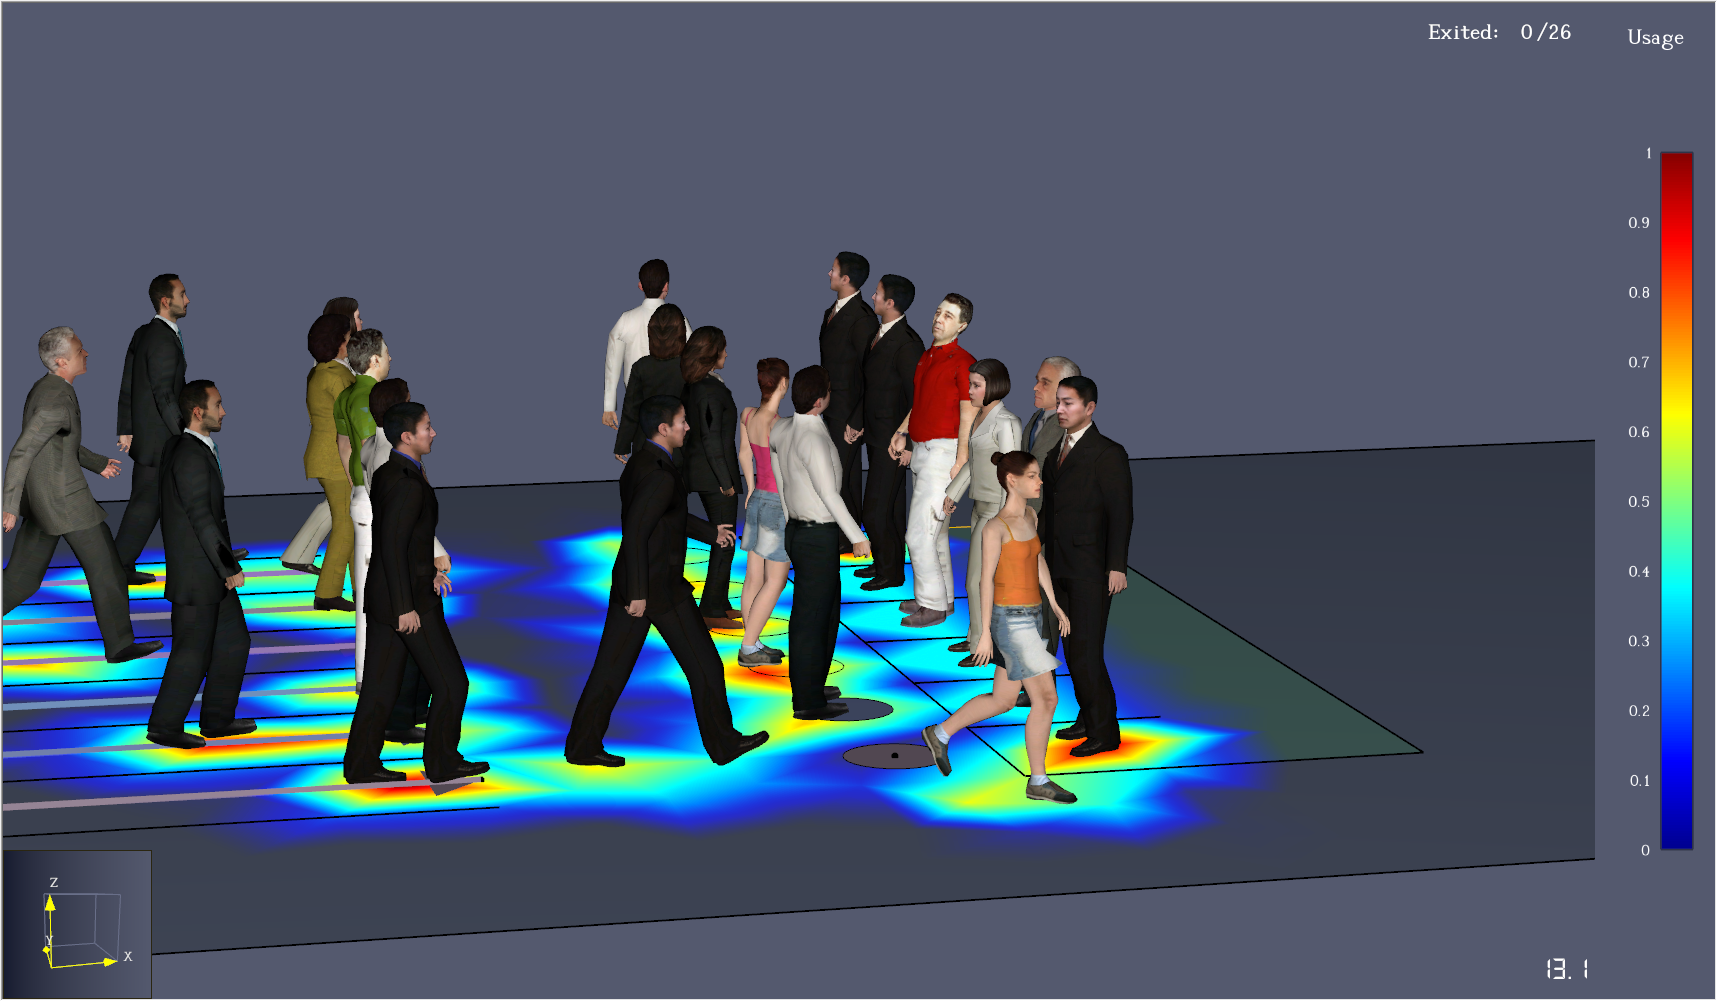
As you can see in Figure 7, Occupants move through the Paths, wait until a Service Point is available, move to the Service Point, "interact" with the booth attendant for 5.0s, then move to the exit.
In this simulation, most Occupants will move from the Path to the Service Point directly in front of that Path, however this particular configuration can lead to some undesired behavior where Occupants will seem to cut across other Paths to get to a Service Point. This is shown in Figure 7 where the last Occupant (highlighted) cuts from the top path to a Service point in another line. The next section will cover Queues Groups which, among other things, resolves this issue.
Queue Groups
Creating a Queue Group
This section will cover creation of Queue Groups. Queue Groups are simply collections of Queues, created to allow for further customization of Occupant interaction with Queues.
Creating the Queue Group
To create a Queue Group:
- Right-click the Queues entry in the Navigation View.
- Select New Group Node in the context menu.
- In the Create Group Node dialog, click OK.
Adding Queues to the Queue Group
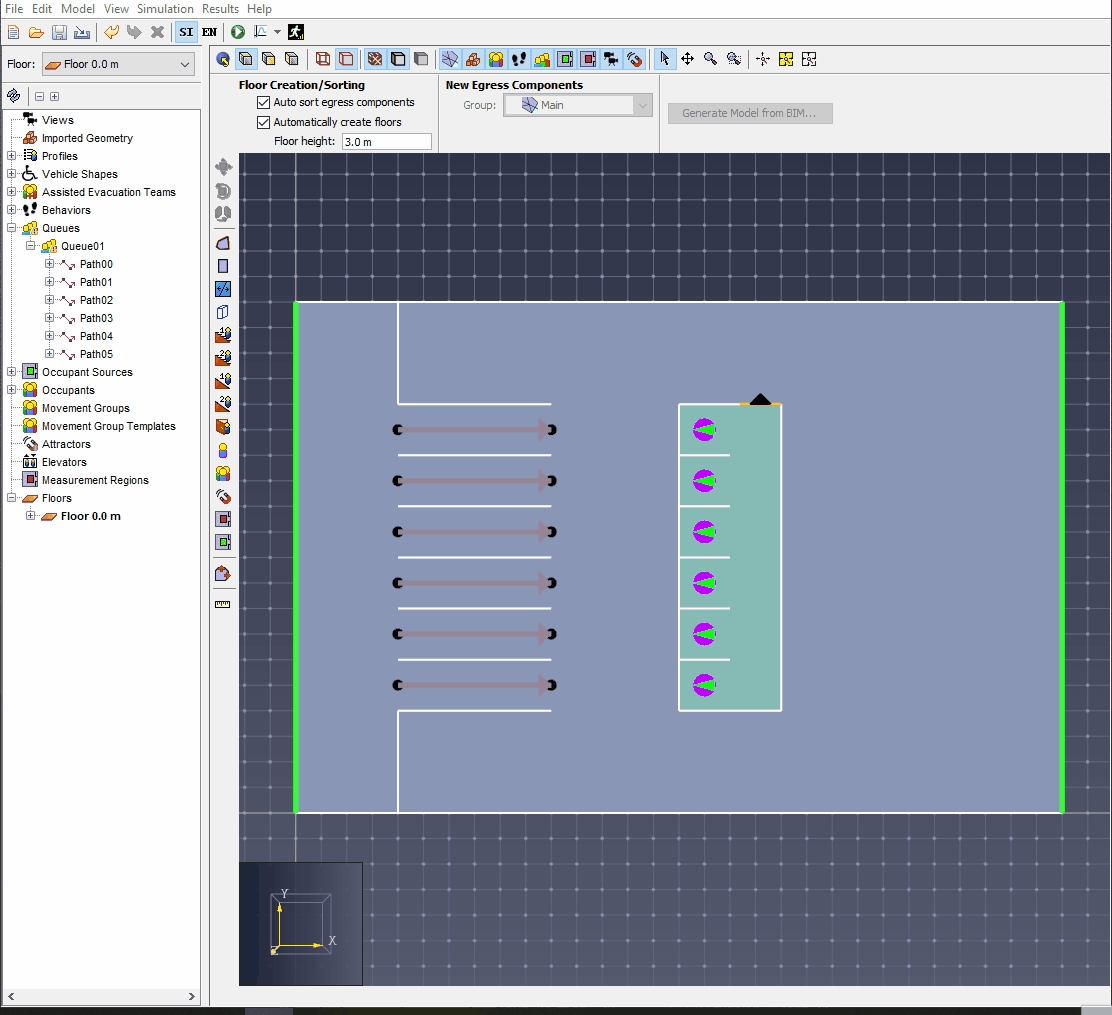
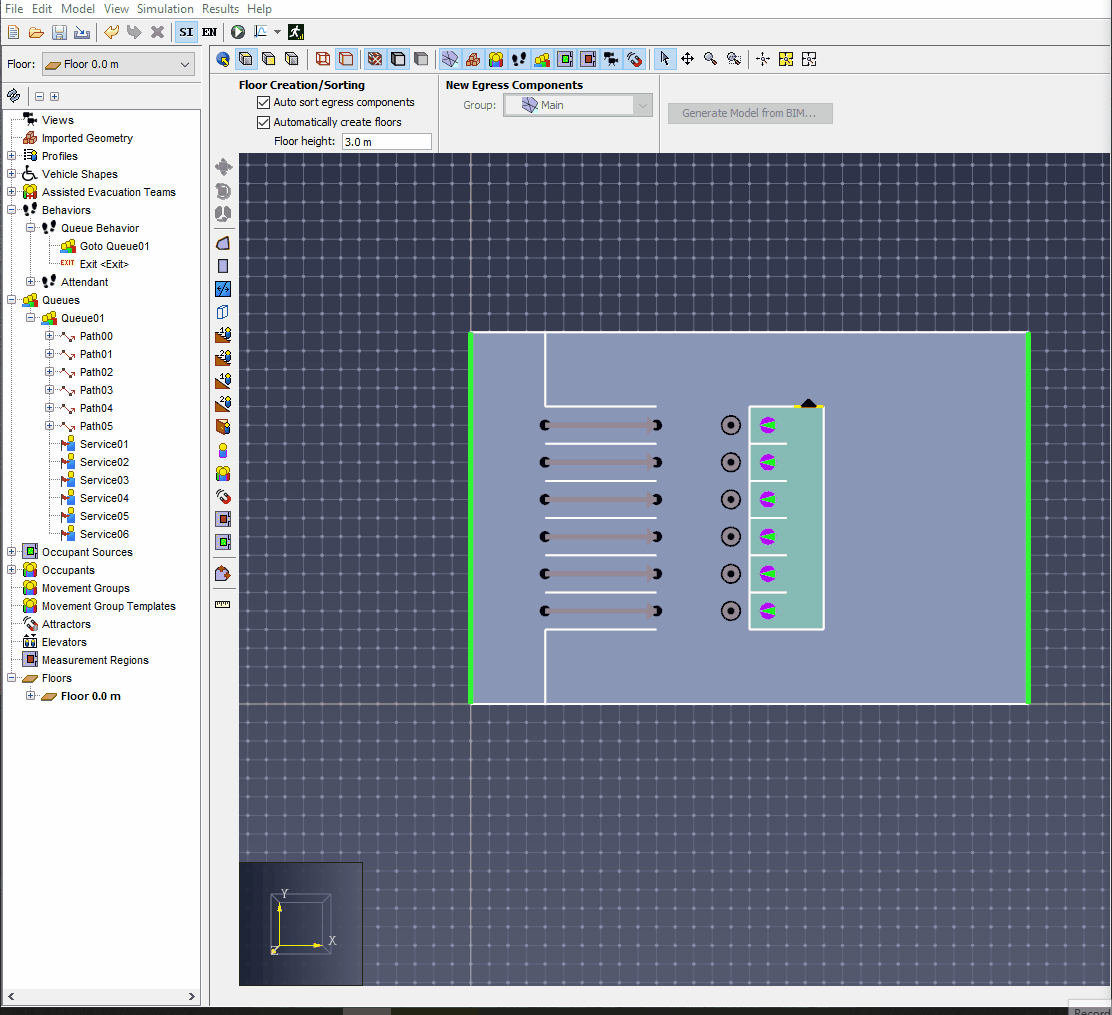
Creating new Queues inside this Queue Group is the same as Creating a Queue. If you have existing Queues, you can move them inside this Queue Group by dragging them into the group in the Navigation View. For this tutorial, create 5 new Queues in the Queue Group, drag one path and service point in to each of them, then move the remaining Queue in to the Queue Group. To do this:
- Right-Click the Queue Group and click Add a Queue to create a new Queue in the Queue group.
- Repeat Step 1, 4 more times until there are a total of 5 Queues in the Queue Group.
- In the standalone Queue, select a Path and its related Service Point.
- Drag the Path and Service Point in to one of the Queues in the Queue Group.
- Repeat steps 3 and 4 for 4 more of the remaining Path / Service Point pairs.
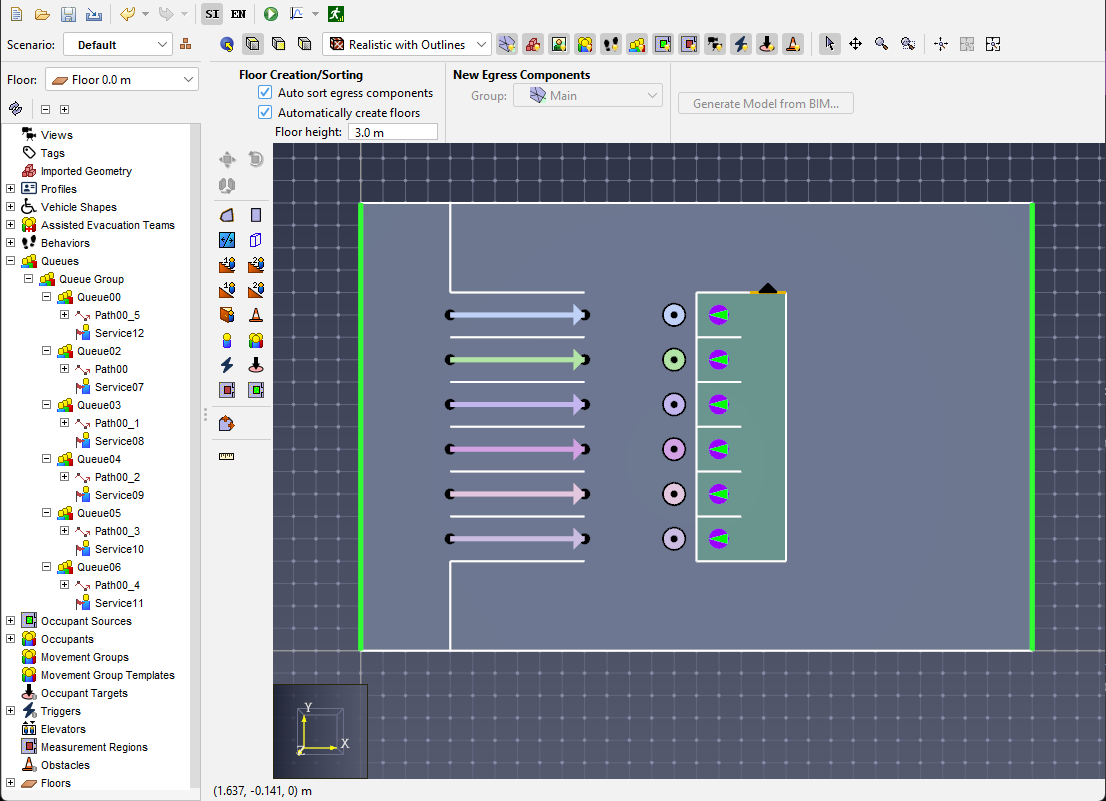
- Once the model resembles Figure 11, move the original Queue inside of the Queue Group.
Moving Occupants through a Queue Group
Creating the Occupant Behavior
Moving Occupant through a Queue Group is similar to moving them through a single Queue. To move Occupants through a Queue Group:
- Select the Goto Queue action made in Creating the Occupant Behavior.
- Click the link next to Queue in the property panel.
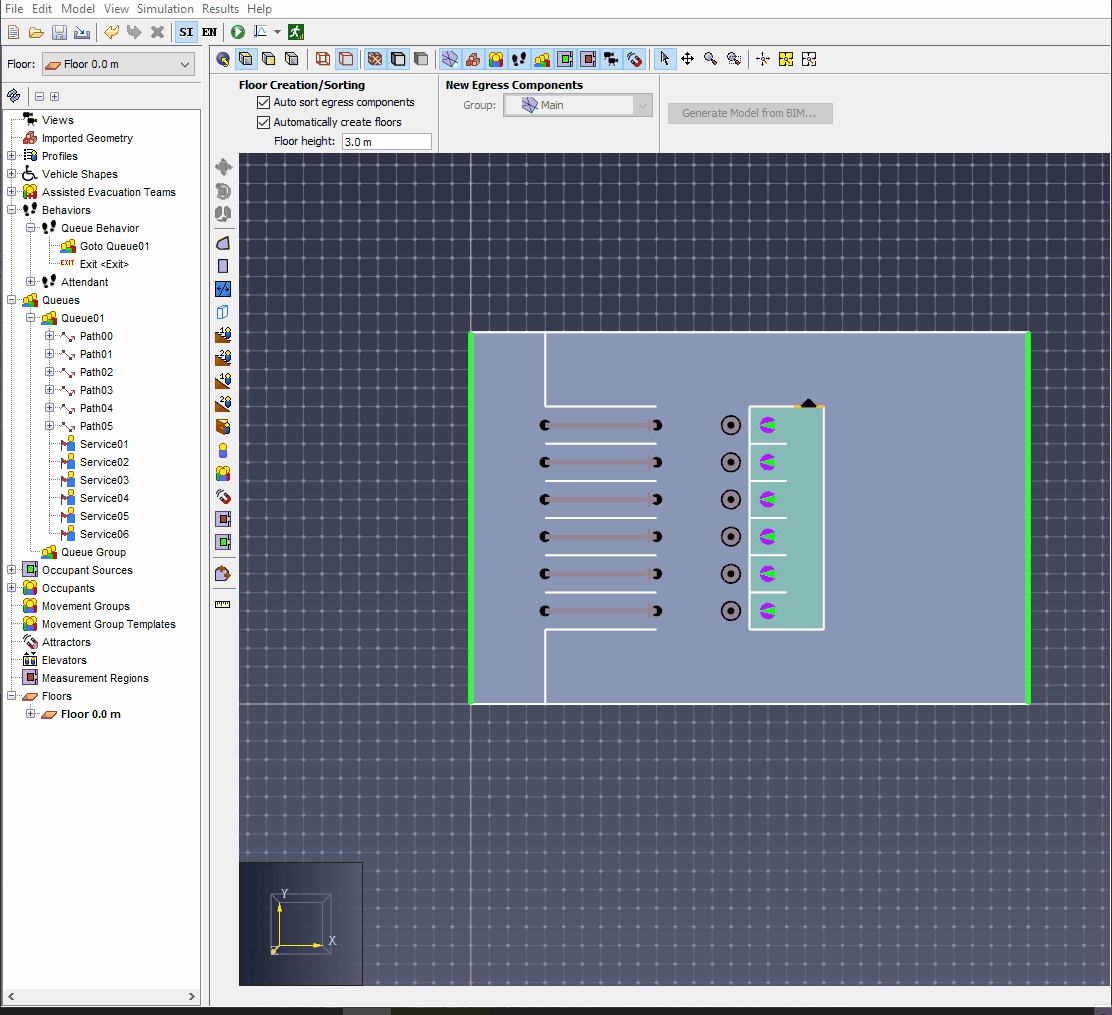
Notice that the original Queue is still selected, but it is now inside of the Queue Group, shown in Figure 12.
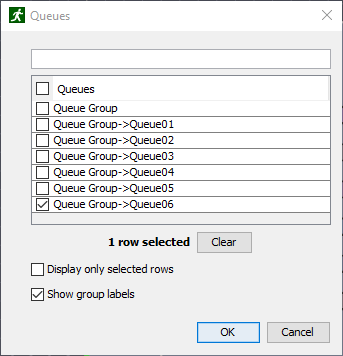
- In the Selection dialog, click Clear.
- Click the checkbox next to Queue Group.
- Click OK.
Now, Occupants will move through any of the Queues in the Queue Group. However, unlike the prior Queue, Occupants will move through a Path and only travel to its associated Service Point. This is useful to prevent the crossover behavior observed in Figure 7 when sending Occupants to any of a group of Queues.
Examining the Results
The Queue Group is now configured.
Click the ![]() Run Simulation icon to run the simulation.
In the Results window, click the play button to view how Occupants move through the model.
Run Simulation icon to run the simulation.
In the Results window, click the play button to view how Occupants move through the model.
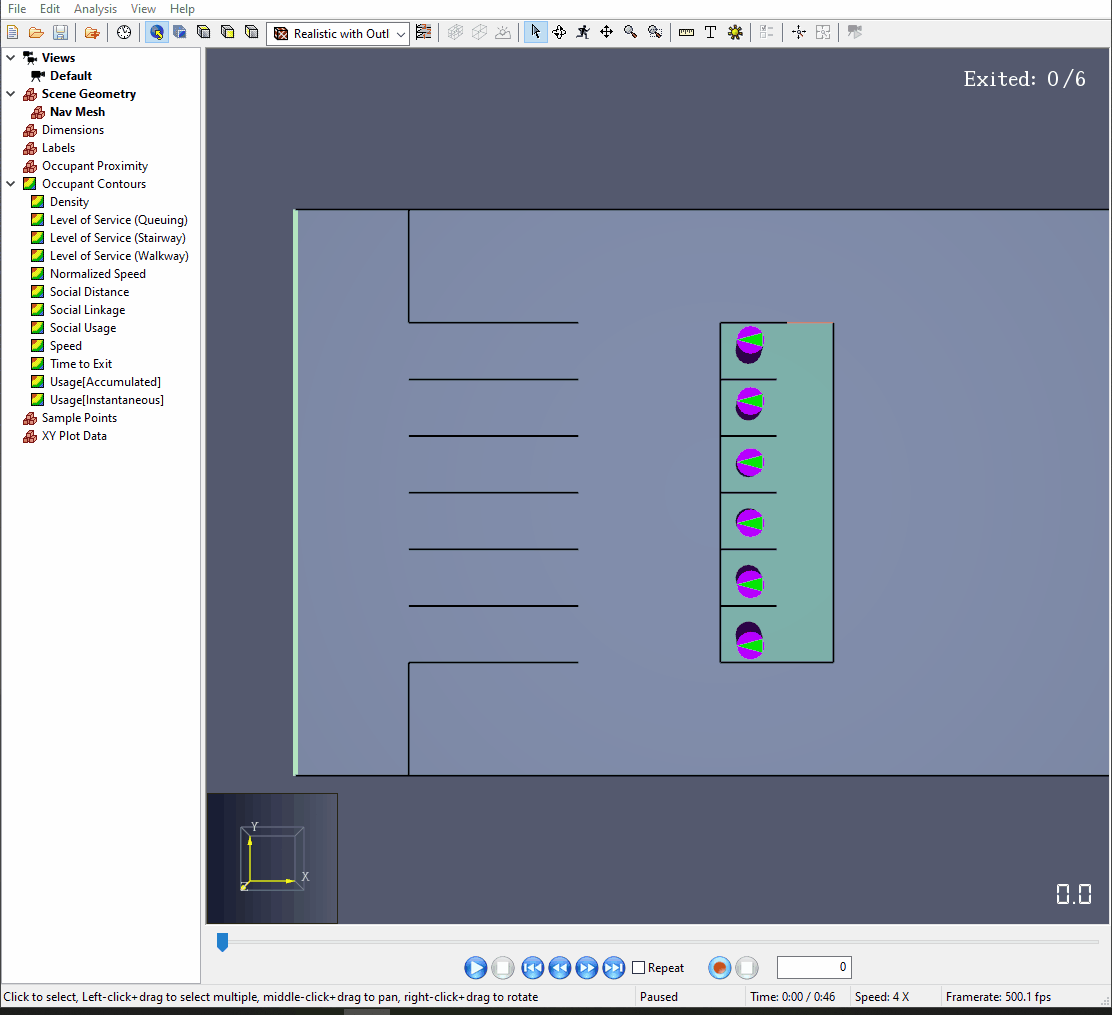
With the Queue Group, the crossover behavior observed with the last Occupant is now corrected.
Conclusion
Users should now be familiar with how to create Queues, Queue Groups, Paths, and Service Points, and should also be familiar with how to send Occupants to Queues and Queue Groups with the Goto Queue Behavior action.
Queues is a powerful new feature for non-evacuation movement simulation in Pathfinder. If you create an interesting model using Queues, we would love to see it! Send it to support@thunderheadeng.com, and we may include it in a future post about work being done using Queues.
To download the most recent version of Pathfinder, please visit the Pathfinder support page and click the link for the current release. Please contact support@thunderheadeng.com with any questions or feedback regarding our products or documentation.
Related Tutorials
This tutorial teaches the user how to create Triggers in Pathfinder models.
This tutorial teaches the user how to create circulation movement using Queues in an example cafeteria model.
Update to a Pathfinder subway station passenger movement, using queues and triggers to simulate standard circulation, then an emergency evacuation.
Tutorial demonstrating how to model passenger movement in a large subway station.