Overview
In this example, we show how triggers can be used to simulate shopping. The model simulates a walkway with shops on the side. As people walk past they are attracted to enter each shop. This is modeled using triggers. This description assumes the user is familiar with basic use of Pathfinder.
In this example, we show how Triggers can simulate shopping movement. The model simulates a walkway with shops on the side. As people walk past, the Triggers attract them to enter each shop. This tutorial assumes the user is familiar with basic use of Pathfinder.
Before Starting
Before beginning this tutorial:
- Read through the Triggers section in the User Manual.
- Download shopping_triggers.pth to follow along.
Example
As shown in Figure 2, the passageway is 5 m wide and each store is 5x5 m. People enter, walk through the passageway, and exit.
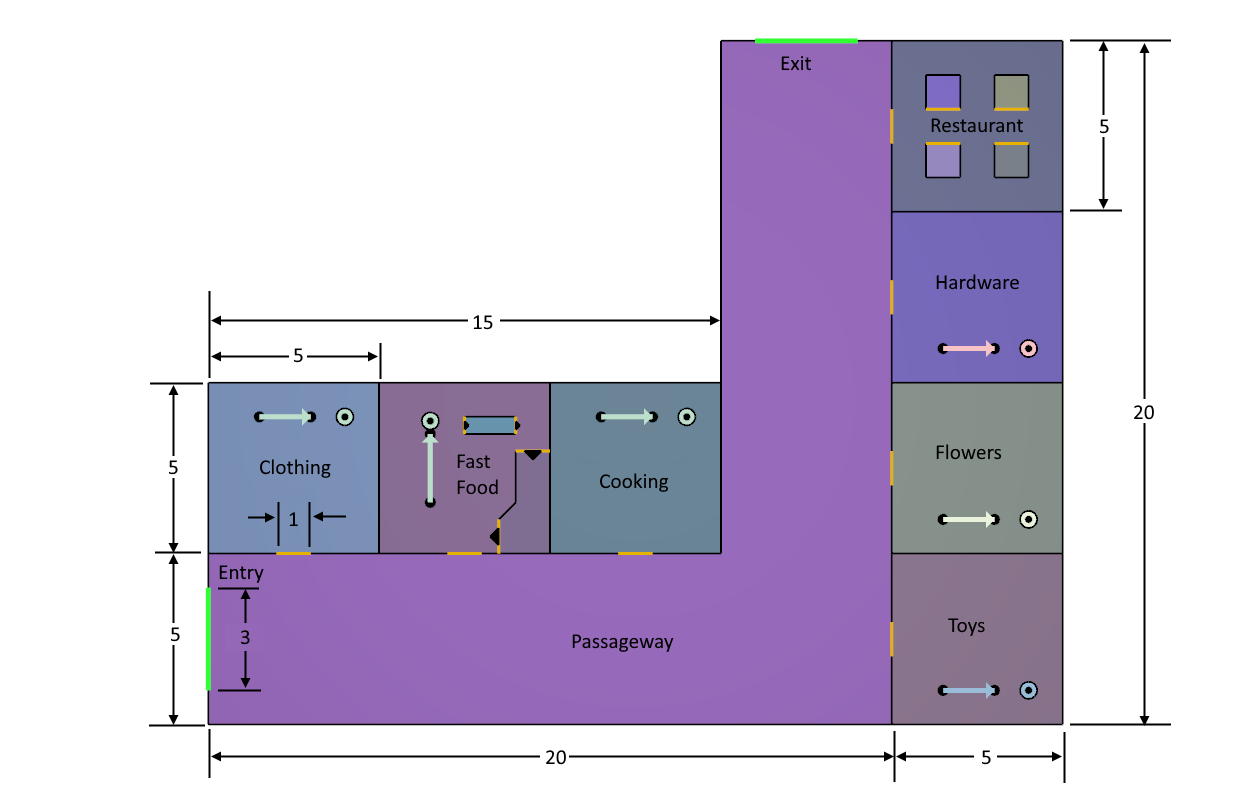
Triggers are located in the passageway. These attract Occupants to enter the adjacent stores.
Example Geometry
Make the model as shown in Figure 2.
- Draw the geometry, including the Doors. Example Geometry
- Name each Room.
- Name the Entry and Exit Doors.
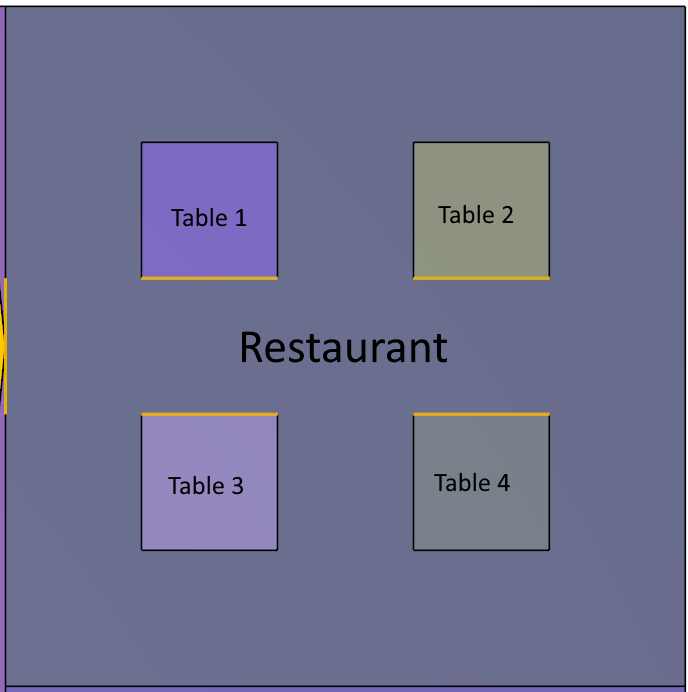
- The Restaurant has four 1 m2 Rooms that represent tables, see Figure 4.
Queues
- Add Queues for all stores except the restaurant as shown in Figure 2. Each Queue name should match the store name. The Service Time at all Queues (except Fast Food) is 60 seconds.
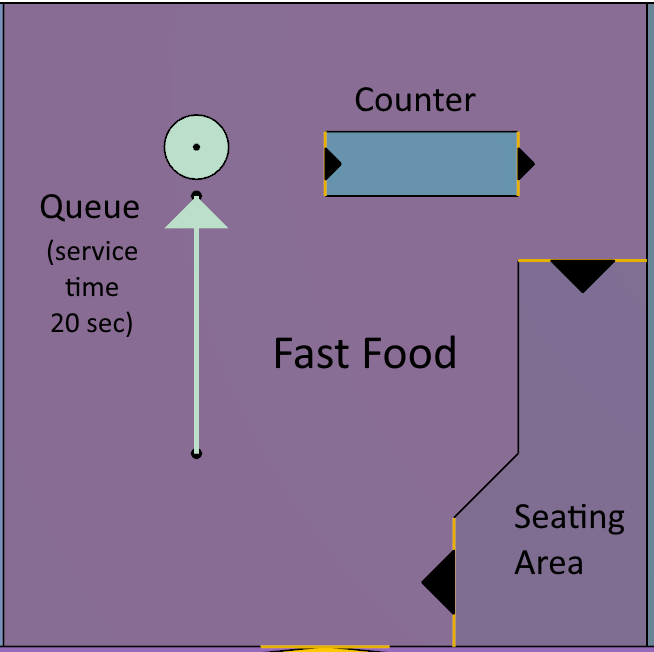
- The Fast Food store has a Queue, a counter, and a seating area that the Occupants move through before exiting, see Figure 5. The Fast Food Queue has a service time of 20 seconds.
Obviously, the Service Times and restaurant wait times are not realistic. You can change them to more realistic numbers.
Profiles
Triggers interact with Occupant Profiles and Behaviors, so we start by creating Profiles with the attributes we want. For this model, we want to change the colors of the Occupants to show what they are doing:
- Shopping - The Occupant is walking in the passageway and may respond to a Trigger to enter a store. The color will be green.
- Browse - The Occupant enters a store, and is browsing. They will not purchase an item. The color will be blue.
- Buy - The Occupant enters a store and will enter the Queue to purchase something. The color will be red.
Currently, Occupants are set to switch Behaviors to browse or buy instantaneously when responding to the Trigger; nobody changes Behavior to browse, then changes Behavior to buy. This could be changed by including a second set of Triggers inside the shops, and a second Behavior change, with certain Behavior immunity settings.
To set these Profiles
- Double-click Profiles in the Navigation panel.
- Select the Default Profile and rename the Profile to Shopping.
- Change the Color to green.
- Click the Movement tab and change the Trigger Susceptibility (Seeking) to 20%. This means that if the Occupant is walking through the passageway, they have a 20% probability of responding to a Trigger. For this model, the Trigger Susceptibility (Waiting) is not used.
- Now click New and make a new Profile named Browse, based on the Shopping Profile.
- Change the color to blue.
- Again click New and make a new Profile named Buy, based on the Shopping Profile.
- Change the color to red.
- Click OK to close the Edit Profiles dialog.
Behaviors
When an Occupant responds to a Trigger, they can change their Behavior. In this example, the Occupants enter the store associated with the Trigger and may browse or buy an item.
Make a Shopping Behavior
The Shopping Behavior is the "normal" Behavior in this model. When shopping the Occupants are moving in the passageway from the entrance to the Exit Door.
- Double-click the Goto Any Exit Behavior.
- Change the name to Shopping.
- Click the Exit Action and for the allowable Exits, select the Exit Door in the model.
Make Clothing Behaviors
We make three Behaviors to control how the Occupant responds to a Clothing Trigger. We make the Buy Clothing and Browse Clothing Behaviors first, then the Clothing Behavior that reference the buy and browse Behaviors.
The Buy Clothing Behavior
- Double-click Behaviors in the Navigation panel.
- Make a new Behavior named Buy Clothing.
- Add a Change Profile Action and set to 100% Buy. This change in Profile changes the color of the Occupant so that we can follow this in the results.
- Add a Goto Queues Action and select the Clothing Queue. In this Action, the Occupant goes to the Queue Path and waits for service.
- Add a Change Profile Action and set to 100% Shopping. This change in Profile changes the color of the Occupant back to the shopping state.
- Add a Change Behavior Action. Set the Target Behaviors to 100% Shopping. The Occupant leaves the shop and continues in the Passageway Room towards the Exit Door.
The Browse Clothing Behavior
- Double-click Behaviors in the Navigation panel.
- Make a new Behavior named Browse Clothing.
- Add a Change Profile Action and set to 100% Browse. This change in Profile changes the color of the Occupant so that we can follow this in the results.
- Add a Wait Action and set the wait time to 5 seconds.
- Add a Change Profile Action and set to 100% Shopping. This change in Profile changes the color of the Occupant back to the shopping state.
- Add a Change Behavior Action. Set the Target Behaviors to 100% Shopping. The Occupant then leaves the shop and continues in the Passageway Room towards the Exit.
Now we have two specific Clothing Behaviors in the shop: some Occupants buy something and some just browse. We set up a "decision" between the two options by adding a general Clothing Behavior.
The Clothing Behavior
This is the first Behavior for all Occupants that respond to the Clothing Trigger.
- Double-click Behaviors in the Navigation panel.
- Make a new Behavior named Clothing.
- Add a Goto Rooms Action and select the Room as Clothing. In this Action, the Occupant enters the shop.
- Add a Change Behavior Action and set the Target Behaviors to 75% Browse Clothing and 25% Buy Clothing.
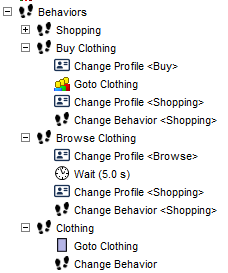
Figure 6 shows the three Clothing Behaviors and the default Shopping Behavior.
Repeat for All Other Stores Except Fast Food and Restaurant
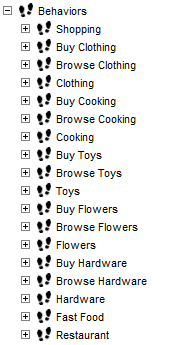
Repeat this pattern for all shops, except Fast Food and Restaurant. When finished, your Behaviors should look as shown in Figure 7.
You can also copy Behaviors in the Navigation panel with CTRL+C and CTRL+V.
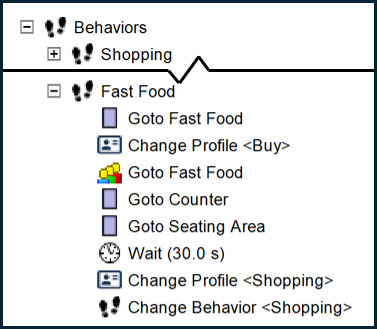
Behavior for Fast Food
Every Occupant who enters the Fast Food store buys something. They: go to the Fast Food Queue, enter the Fast Food counter, go the Seating Area, wait 30 seconds, and switch back to the Shopping Profile (and the Shopping Behavior).
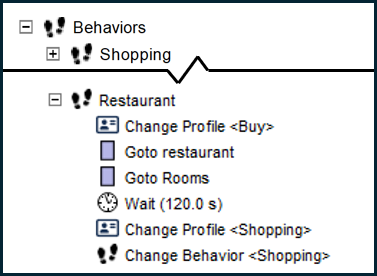
Behavior for the Restaurant
Restaurant does not have a Queue. Instead, every Occupant who enters the shop dines. They: go to one of the four tables, wait there for 120 seconds, and switch back to the Shopping Profile (and the Shopping Behavior).
This approach creates situations where Occupants join eachother at Table 1. A more advanced approach is available for Circulation Movement in a Cafeteria Using Queues.
Triggers
The Triggers are located in front of each store. As an Occupant enters the Trigger region, there is a 20% probability that they respond to the Trigger (as set in the Shopping Profile).
The Clothing Trigger
- In the drawing toolbar, select the Add a Trigger tool.
- Place the Trigger in front of the clothing store.
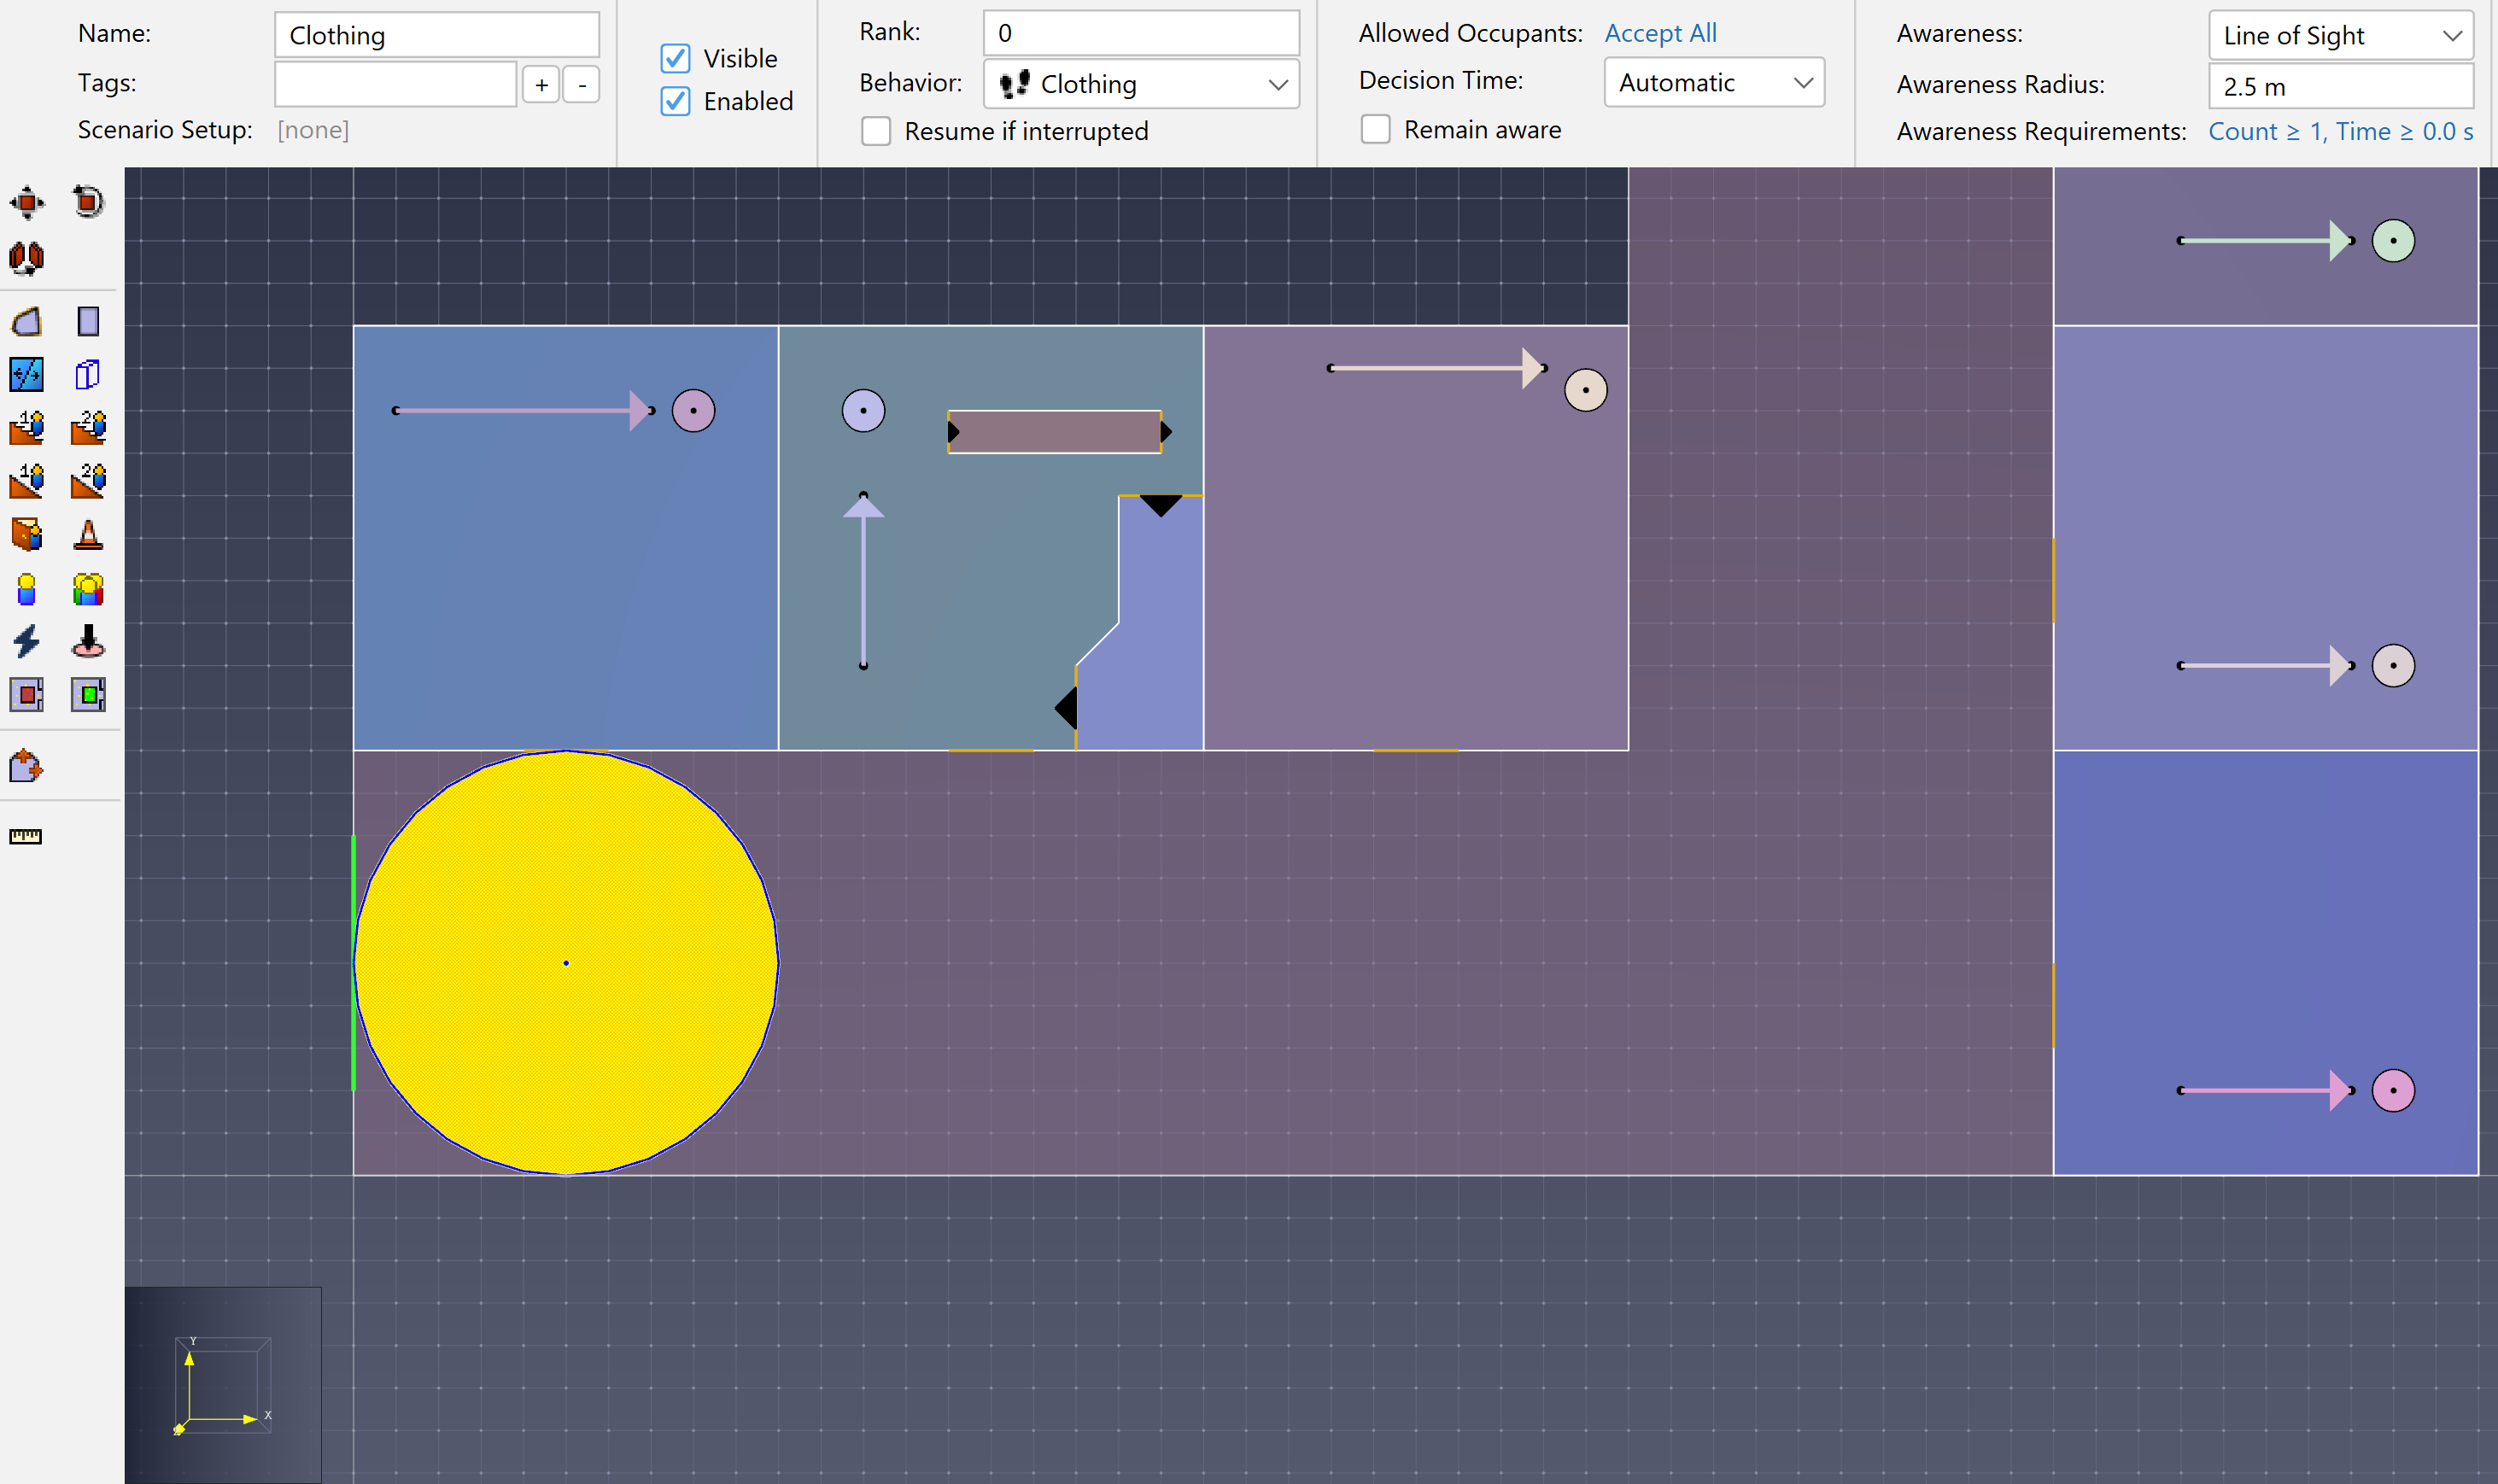
- Change the Name to Clothing.
- Change the Behavior to Clothing. This is the Behavior that is applied to the Occupant when they respond to the Trigger.
- Change the Awareness Radius to 2.5 m. Leave the other properties set to default values.
The Clothing Trigger should look as shown below.
The Other Triggers
Repeat the previous steps for each Trigger for all stores. It may be useful to change the opacity of the Passageway Room to place each Trigger object using the Snap Grid.
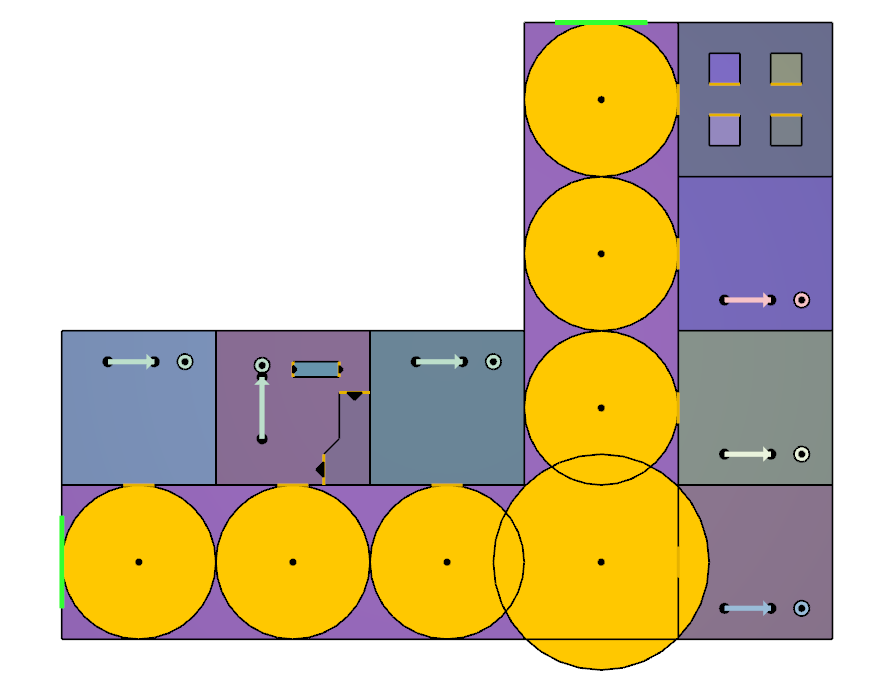
As in Figure 3, the Toys Trigger has a radius of 3.5 m. The store sits on the outer corner of the curve and shopping Occupants walk close to the inner corner; a bigger radius compensates to ensure they are exposed to the Toys Trigger.
We want to reduce the number of Occupants that respond to the Restaurant Trigger.
- Select the Restaurant Trigger.
- In the Properties panel, select the hyperlink Influence setting to open the Edit Influence dialog.
- Set the Initial Value to 25%. The probability an Occupant enters the Restaurant is now 5% (20% in the Shopping Profile x 25% in the Restaurant Trigger).
Occupant Sources
- Right-click the Entry Door and select Add Occupant Source.
- Set the Flow Rate to Constant and enter 0.2 pers/s. One Occupant arrives every 5 seconds.
- Set the Profile to Shopping. This sets the color.
- Set the Behavior to Shopping. The people have the shopping Behavior, so they enter and move toward the specified exit.
Run the Simulation
- In the Simulation menu, click Simulation Parameters.
- Set the End Time to 1200 seconds.
- Click Run Simulation.
View Results
Edit the results visualization to show Occupant Paths
- In the toolbar, click the View menu
- Click Show Occupant Paths.
- Save the visualization settings.
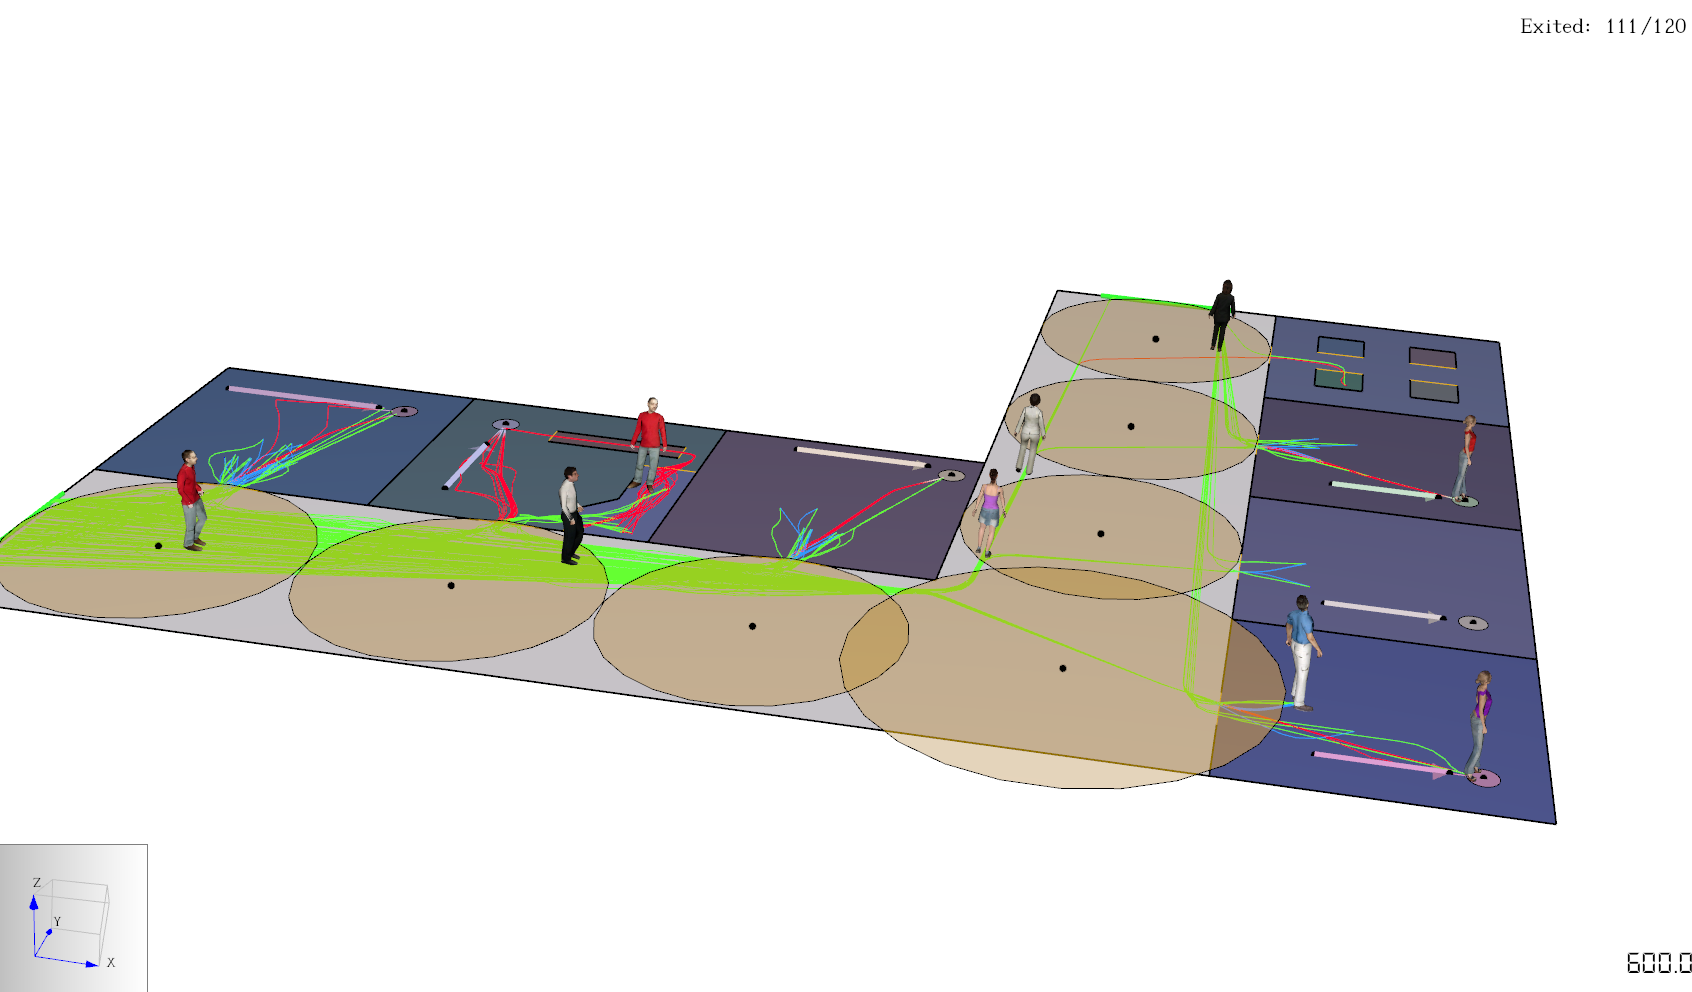
Figure 11 shows the results at 600 seconds. The display includes the Occupant Paths with colors corresponding to the Profile types.
Conclusion
In this tutorial, we demonstrated how to use Pathfinder to simulate movement in a sample mall with Queues, Triggers, Behaviors, and Profiles. We also used the Occupant Path coloring feature to visualize results.
To download the most recent version of Pathfinder, please visit the Pathfinder Download page If you have any questions, please contact support@thunderheadeng.com.
Related Tutorials
Tutorial demonstrating how to model occupants that respond to Triggers to evacuate in a small conceptual model.
Update to a Pathfinder subway station passenger movement, using queues and triggers to simulate standard circulation, then an emergency evacuation.
Tutorial demonstrating how to model passenger movement in a large subway station.
This tutorial teaches the user how to create Triggers in Pathfinder models.
Video tutorial demonstarting how to assign exit goals to percentages of the occupant population.
Tutorial demonstrating how to distribute the use of stairs and escalators in Pathfinder.
Tutorial demonstrating how to have occupants evacuate using familiar paths.
This tutorial teaches the user how to create circulation movement using Queues in an example cafeteria model.