Overview
This tutorial is intended for users of the Thunderhead Results Viewer that require more complex or repetitive post-processing than what is available in the standard Results UI. It will demonstrate the basics of how to use the Results Scripting Engine. You will learn how to use the Results Scripting Engine to load custom user scripts, run them, and view any generated visualizations in the Results UI.
Before Starting
Before beginning this tutorial:
- Download the
thengGetting Started Files to follow along. - Download and Install Python 3.11 or higher.
- Install the
thengPython package by following the installation instructions in thethengdocs. - Read through the User Scripts section in the Pathfinder Results User Manual.
- Work through the
thengGetting Started Guide to familiarize yourself with the scripting API used in this tutorial. - Review the rest of the
thengPython package docs.
Introduction
The Results Scripting Engine allows Results to run user-developed Python scripts for specialized post-processing of simulation data.
These scripts can create any number of complex visualizations.
For simplicity’s sake, this tutorial will only cover the basics of loading and running scripts, and viewing any visualizations created by the script.
More advanced scripts can be created and executed using the same steps laid out below, using any combination of Python packages, including the theng package provided by Thunderhead Engineering.
Using the Results Scripting Engine
Using the Results Scripting Engine is very straightforward.
These steps will show you the basics of using this new feature by using the theng Getting Started Files you downloaded above as an example.
Loading a Script
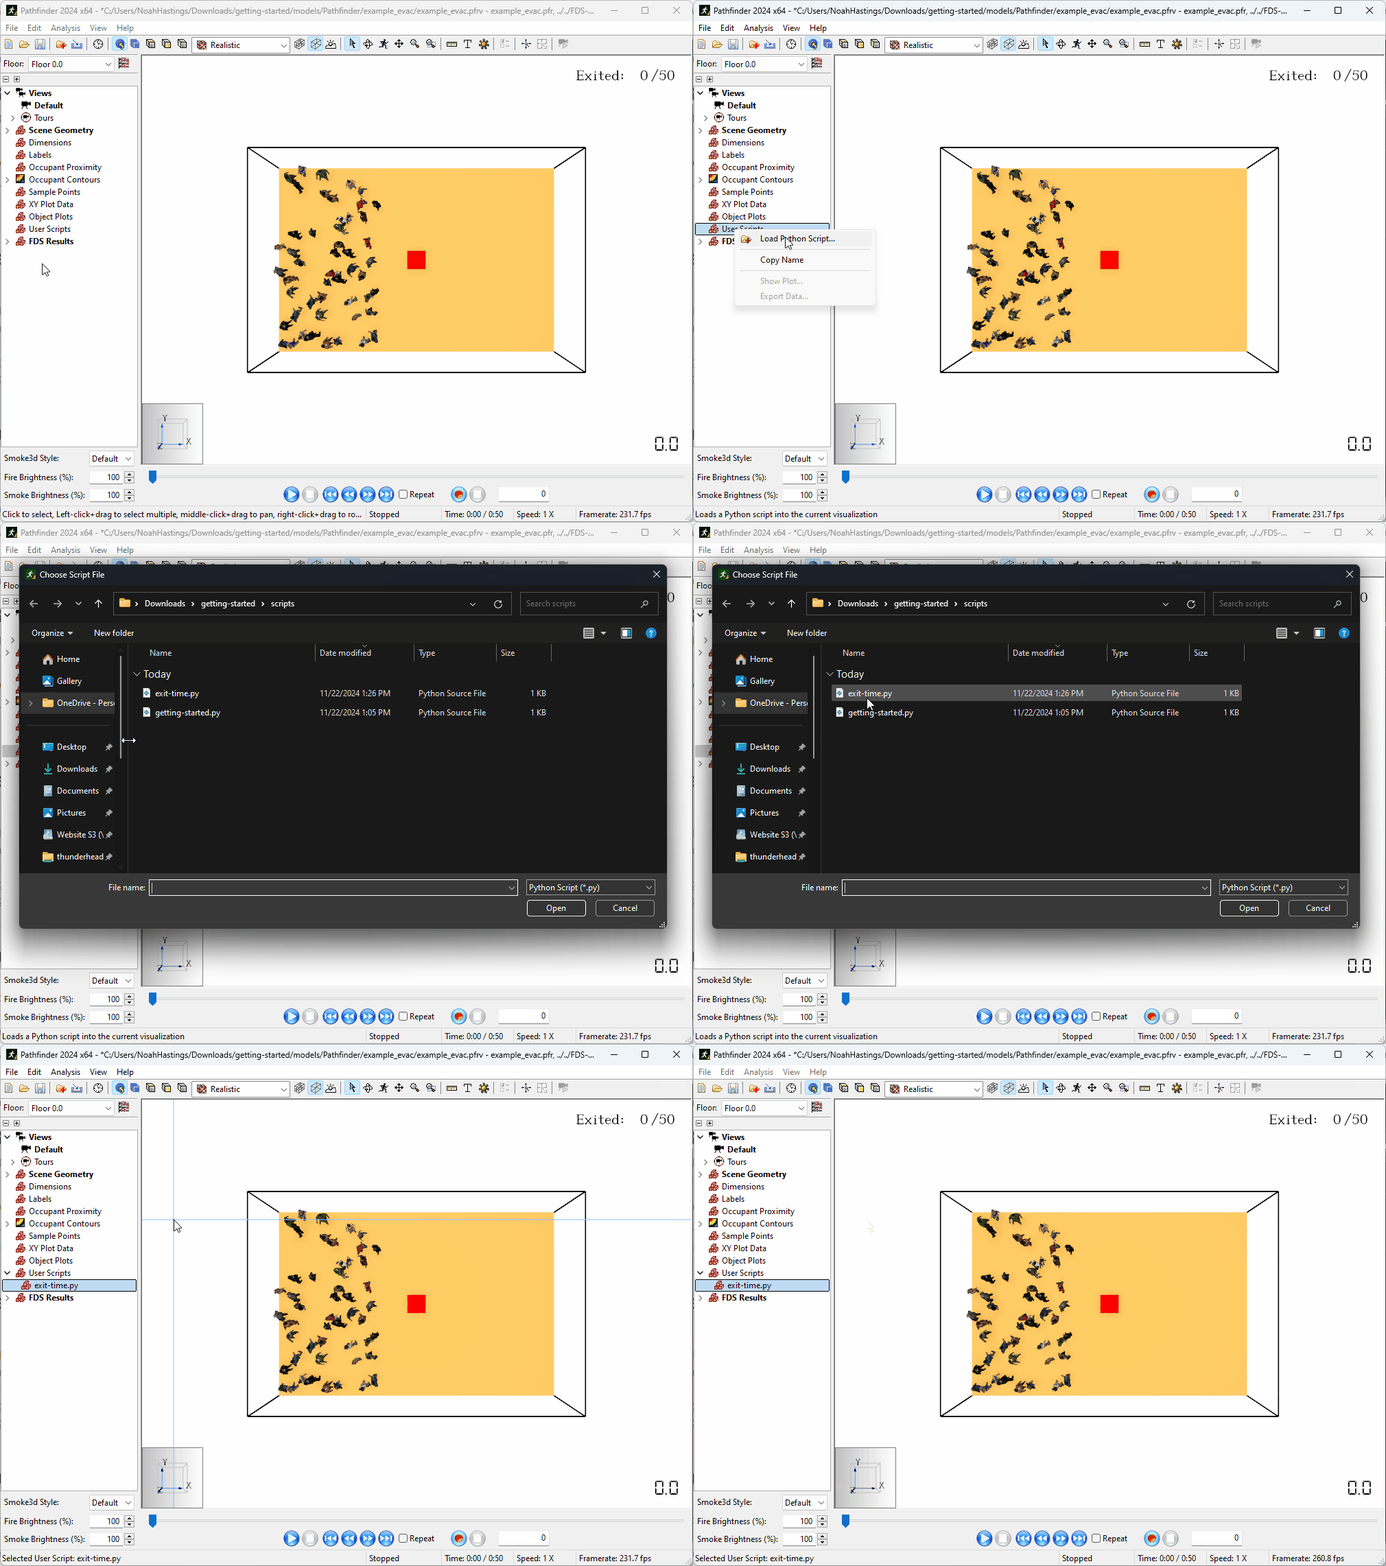
The first step to using the Results Scripting Engine is to load a written script in to the Results Visualization. To load a script in to a Results Visualization:
- Locate and open the
example_evac.pfrvvisualization file created as part of your work through thethengGetting Started Guide. It should be ingetting-started/models/Pathfinder/example_evac. - Locate the User Scripts entry of the Results Tree.
- Right-click the User Scripts entry of the Results Tree.
- Click Load Python Script.
- In the File Dialog that opens, find the
exit-time.pyscript. It should be ingetting-started/scripts. - Select the
exit-time.pyscript and click Open.

The script should now be loaded in as a new entry in the User Scripts section of the Result Tree.
Running Scripts
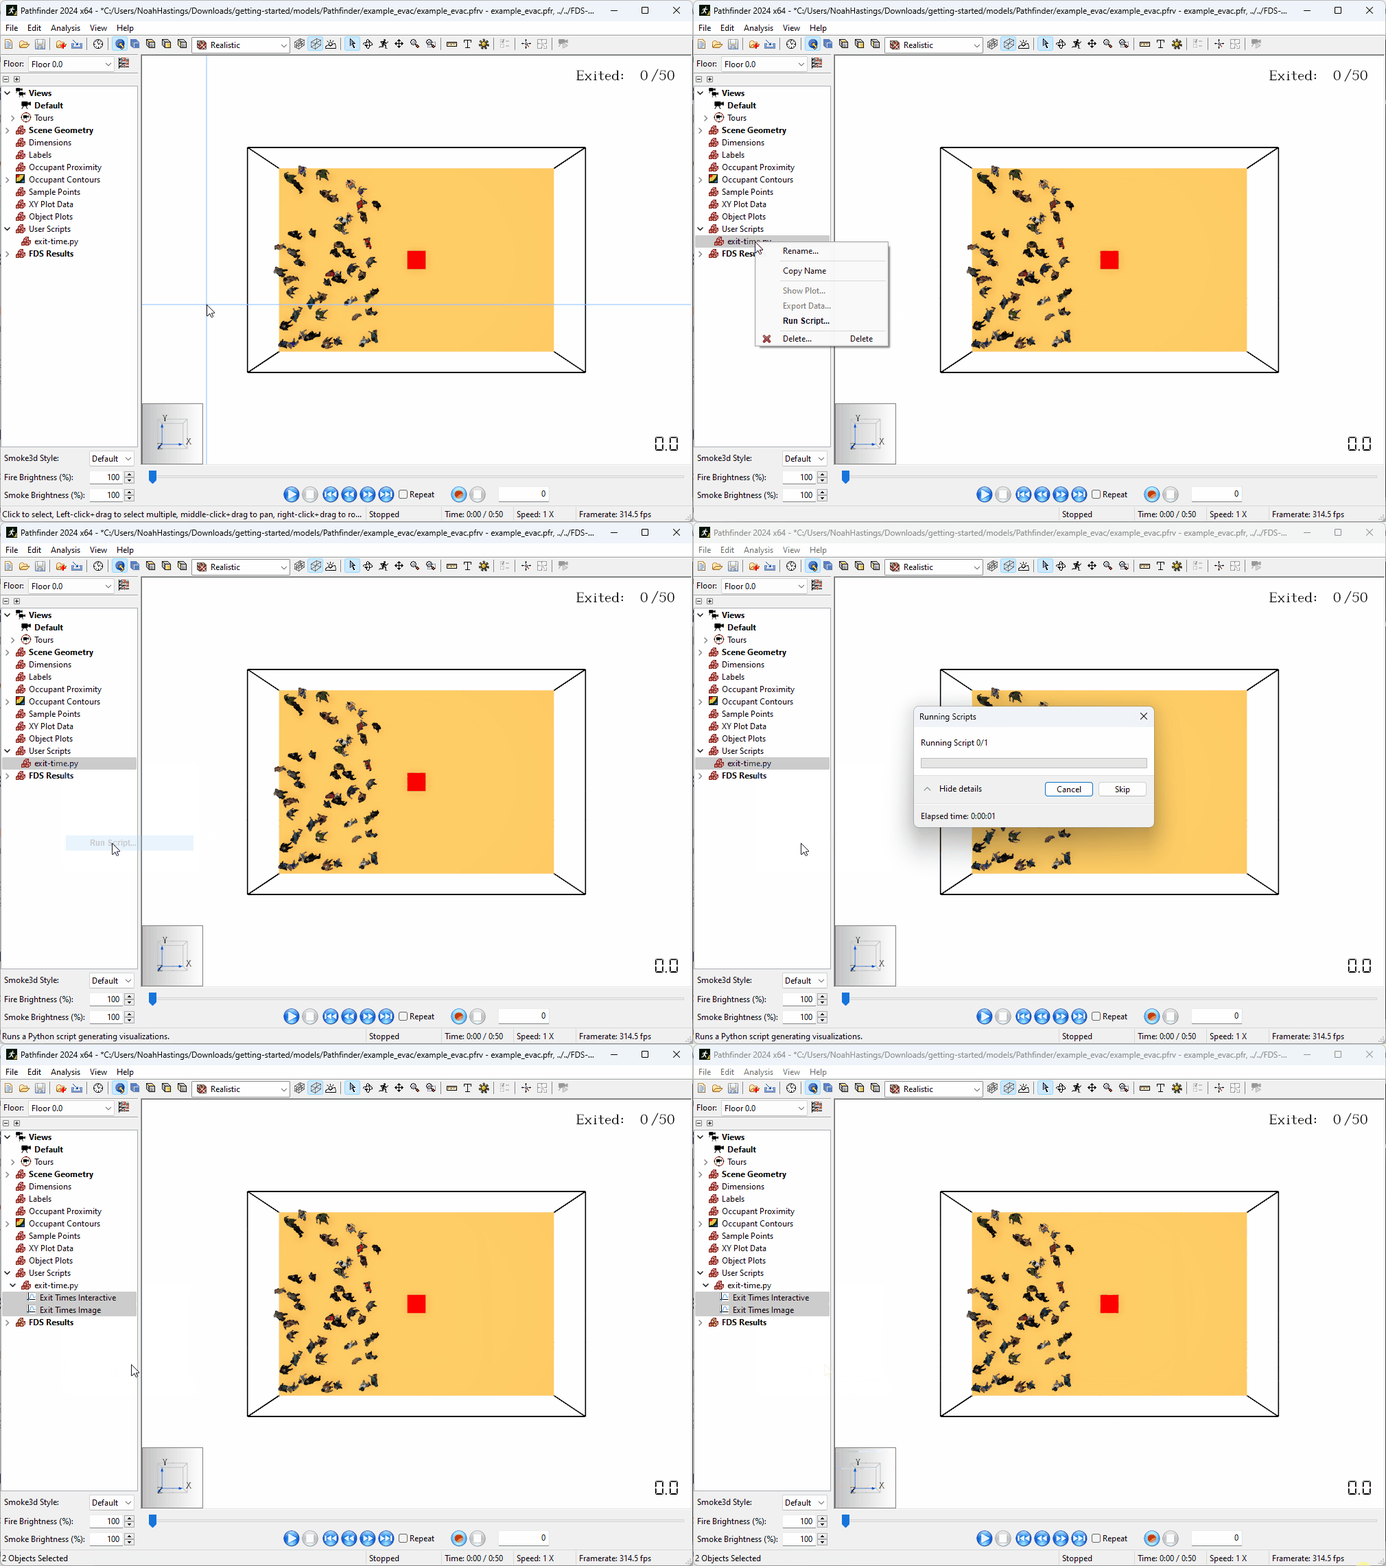
Running Scripts in the Thunderhead Results Viewer is just as simple as loading a script. Scripts can be run in 3 ways:
- Double-click the script entry in the Results Tree
- Right-click the script and select Run Script
- Select multiple scripts in the Results tree, then right-click and select Run Script to run multiple scripts
Try this now using the script you loaded in the previous step.

Viewing Visualizations
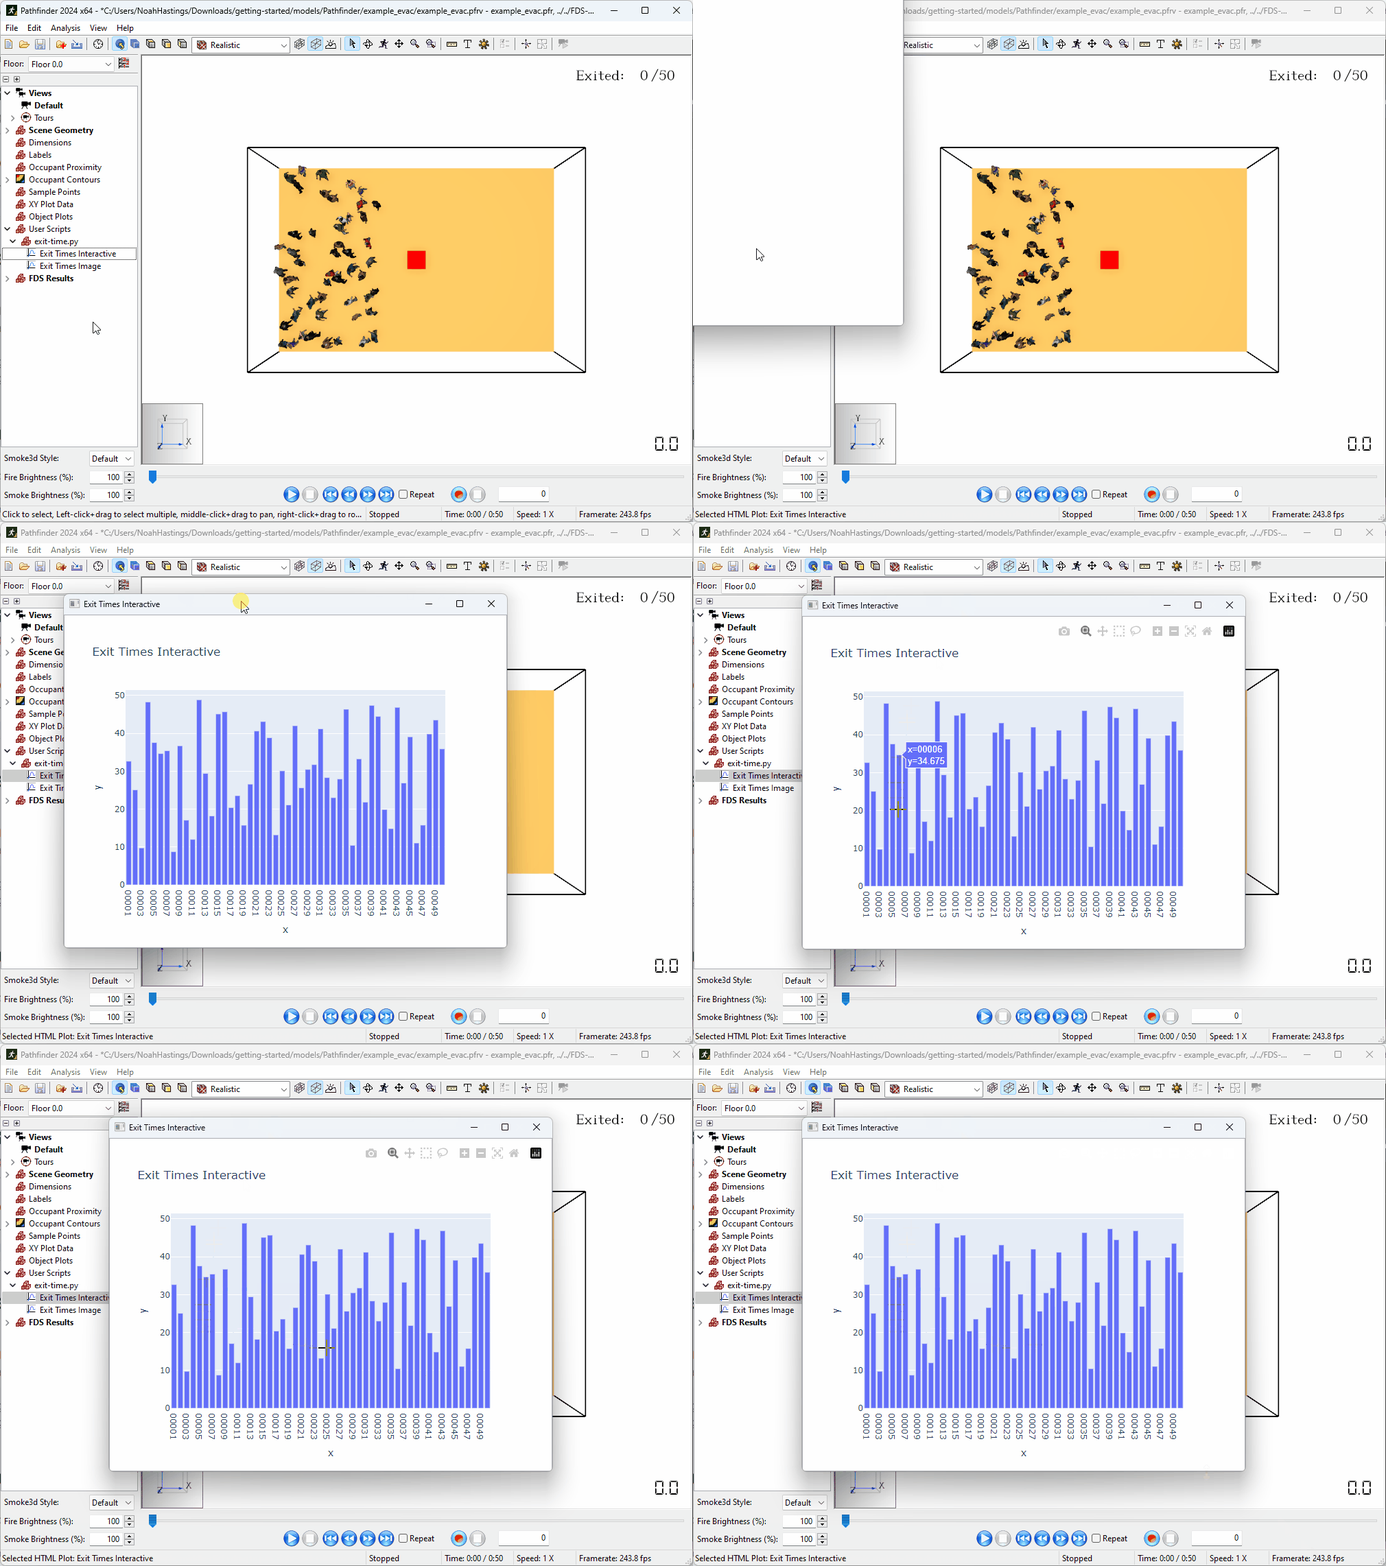
After running the script, you should notice a new entry in the Results Tree. This script created a pair of visualizations of simulation data and communicated information about those visualizations automatically to the Results Scripting Engine. The Results Viewer then automatically created references to those visualizations and associates them with the script that created them. You can view these visualizations in the Results UI in 2 ways:
- Double-clicking the new visualizations entries in the Results Tree
- Double-clicking the User Scripts entry in the Results Tree to show all visualizations created by User Scripts
This will open the visualizations in a new window for user review.
Note how one of the visualizations created by the exit-time.py script is interactive.
This is not a special feature of the Results Scripting Engine, but rather of the plotly plotting library used in the script.
The Results Viewer simply loads the HTML file generated by plotly, which has interactive elements built in to it.
You can create and load any HTML file that you want from a user script, and view it in the Results Viewer.

Conclusion
You should now be familiar with how to load, run, and view the results of scripts using the new Results Scripting Engine. Hopefully you also have an appreciation of how versatile this tool can be for your workflows.
To download the most recent version of Pathfinder that includes this new feature, please visit the Pathfinder support page and click the link for the current release. Please contact support@thunderheadeng.com with any questions or feedback regarding our products or documentation.
Related Tutorials
This tutorial teaches the user the basics of how to use the Results Scripting Engine, allowing complex post-processing and visualization of simulation results.
This Feature Demo shows how to remove a handle and edit room geometry in Pathfinder.
Video tutorial demonstrating how to avoid creating unwanted gaps in the geometry of a Pathfinder model.
Tutorial demonstrating how to make stairs in Pathfinder
Video tutorial demonstrating how to fix geometry problems related to DWG importation.
In this tutorial we show how to fix three problems that can occur when BIM (Building Information Modeling) or CAD (Computer-Aided Design) models into Pathfinder.
Tutorial demonstrating how to import IFC files to Pathfinder.
Tutorial Demonstrating how to model pressure leakage using Pyrosim
