Overview
This tutorial will demonstrate how to use Triggers when modeling an evacuation in Pathfinder. It will cover Trigger creation, how to configure Profiles to be influenced by Triggers, and configuring Behaviors to determine how occupants respond to Triggers.
Before Starting
Before beginning this tutorial:
- Download the Triggers.zip files to follow along.
- Read through the Triggers section in the User Manual.
Introduction
Triggers are communications that can change an occupant’s behavior. They are quite flexible. In this example we simulate an evacuation, but they can also be used to model optional choices an occupant might make to enter a store, get food, or use the toilet. Triggers use data from the occupant’s Profile and Behavior, so there are several interacting parts that must be defined to obtain the desired response. In the sections below, we will describe the details used in this example.
The purpose of this tutorial model is to simulate an evacuation scenario where:
- All occupants within 5 m of the incident begin to run towards the exits.
- Some occupants within 20 m of the incident also run towards the exits.
- As they run, they notify occupants they meet who are within a 1 m radius. These newly notified occupants decide if they will also run towards the exits. If they choose to run, they will notify others they meet.
- After a global announcement 50 seconds after the incident, everyone runs towards the exits.
Geometry
The problem geometry is shown below. The two large rooms measure 10 m x 30 m and are connected by a short hallway. 300 people are randomly located in the model. There are two exits. The trigger is indicated by the orange circle that has a 5 m radius. There is a second trigger with a 20 m radius that is not shown in this figure.
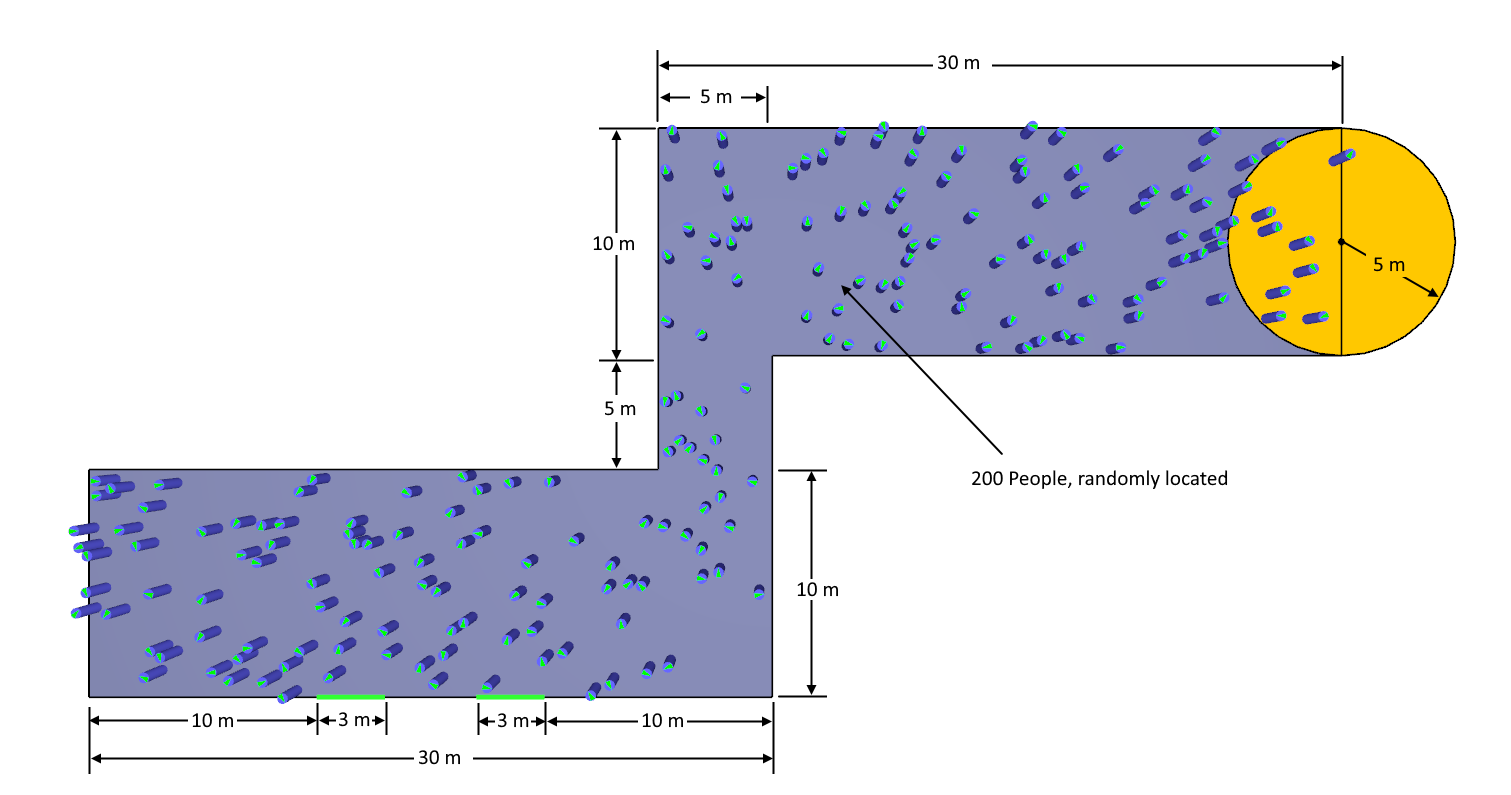
Draw the geometry of the model. Add the doors and name them Exit 1 and Exit 2. Add 200 occupants.
Profiles
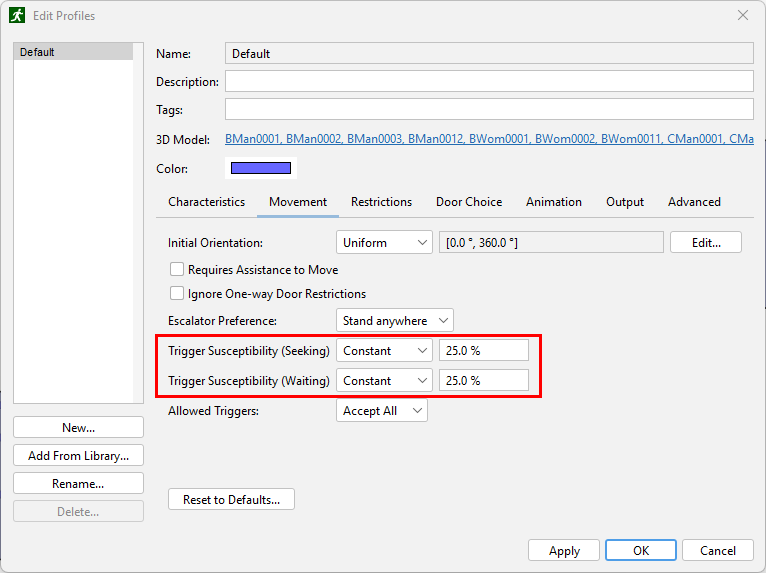
In this simulation, we will modify the default profile by changing the Trigger Susceptibility, that is the probability that an occupant will respond to a trigger they receive.
Select the Default profile. On the Movement tab, change the Trigger Susceptibility (Seeking) to 25% and the Trigger Susceptibility (Waiting) to 25%. The seeking susceptibility applies when an occupant is actively moving towards a goal (such as an exit), the waiting susceptibility applies when an occupant is waiting. By setting the susceptibility to these values, there is a 25% chance that an occupant will respond to a trigger.
We will use this to simulate communication between someone running to the exit and a person who is standing still. If an occupant is waiting and they are close to someone who is running to an exit, there will be a 25% chance that they will respond to the trigger and also start to run. If multiple occupants run past, each one will be a separate trigger, so if an occupant is triggered several times, it is almost certain they will begin to run also. As described later, if we want everyone to leave, the trigger can ignore the susceptibility.
Behaviors
In this model, we want three behaviors:
- Wait - A behavior where occupants are standing still and waiting. After a certain time, they will proceed to an exit.
- Evacuate and Warn - A behavior where occupants are running toward an exit and warn other occupants they meet.
- Evacuate - A behavior where an occupant is running towards an exit.
At this point in making the model we will just make placeholders for the behaviors. This will allow us to reference a behavior when creating triggers, but the behaviors can also reference triggers, so we will return later and complete the definition of the behaviors. For now just make placeholders:
- Rename the default Goto Any Exit behavior as Wait.
- Create a behavior named Evacuate and Warn. Do not make any other changes to the behavior.
- Create a behavior named Evacuate. Do not make any other changes to the behavior.
Triggers
First we will add the placed triggers. These are the triggers that are associated with a fixed location in the model.
Trigger for occupants near the incident
- In the drawing toolbar, select the Add a Trigger tool.
- Click on the center of the top right edge of the model to add the trigger (see location in Figure 1).
Edit the properties of the trigger to define a trigger that acts immediately and affects occupants within 5 m.
- Change the Name to Incident.
- Change the Behavior to Evacuate and Warn. This is the behavior that will be used by any occupant that responds to this trigger.
- Change the Decision Time to Specific Time with a value of 0.0 s. This means that occupant will respond to the trigger at time 0.0 seconds (the beginning of the simulation).
- Change the Awareness Radius to 5.0 m. This means that anyone within a radius of 5 m and who can see the trigger point will receive the trigger.
- Click the Ignore Occupant Susceptibility checkbox. This means that all occupants who receive this trigger will respond to the trigger. Remember that in the Profile we set the susceptibility to 25%. If we did not select the checkbox, most occupants would ignore the trigger. This option overrides the value in the profile and effectively sets it to 100%.
Trigger for occupants further away from the incident
Now add a second trigger at the same location that will have a larger radius. Within this radius, only some occupants will immediately start to run to the exits.
- In the drawing toolbar, select the Add a Trigger tool.
- Click on the center of the top right edge of the model to add the trigger.
Edit the properties of the trigger to define a trigger that acts immediately and affects occupants within 20 m.
- Change the Name to Incident Weak.
- Change the Behavior to Evacuate and Warn.
- Change the Decision Time to Specific Time with a value of 0.0 s.
- Change the Awareness Radius to 20.0 m.
Trigger that is a general announcement to evacuate
Now add a third trigger that will be a global announcement to evacuate.
- In the drawing toolbar, select the Add a Trigger tool.
- Click on the center of the top right edge of the model to add the trigger (or any location in the model).
Edit the properties of the trigger to define a trigger that acts at 30 s and affects all occupants.
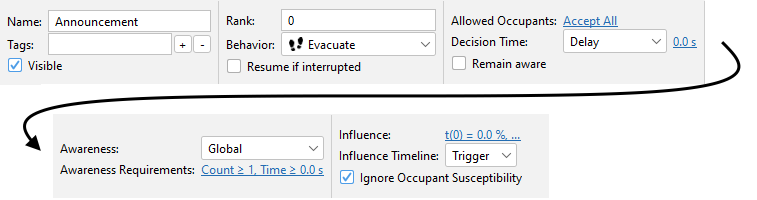
- Change the Name to Announcement.
- Change the Behavior to Evacuate.
- Change the Decision Time to Delay with a value of 0.0 s. This means that the occupant will make the decision immediately on receiving the trigger.
- Change the Awareness to Global. This means the trigger will be broadcast to all occupants.
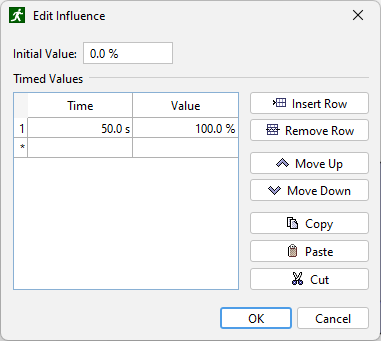
- For Influence, click the value. In the Edit Influence table, as seen in Figure 4, set the Initial Value to 0.0% and in the table set the Time to 50.0 s and the Value to 100%. This means the trigger will initially be zero (off), but at 50 seconds the trigger will be active.
- Click the Ignore Occupant Susceptibility checkbox. This means that all occupants who receive this trigger will respond to the trigger.
Trigger template for communication between occupants
Next we create a trigger template. This is a type of trigger that can be created during the simulation. We will use it to model communication between the occupants running to the exit and those standing and waiting.
- In the Model menu, click New Trigger Template.
Edit the properties of the trigger to define a trigger that acts immediately and affects occupants within 20 m.
- Change the Name to Warn Others.
- Change the Behavior to Evacuate and Warn.
- Change the Decision Time to Delay with a value of 0.0 s.
- Change the Awareness Radius to 1.0 m.
Return to modify behaviors
Now that we have completed the triggers, let us go back and modify the behaviors.
The Wait behavior
- Select the Wait behavior.
- Add an Action to Wait for 100 seconds.
The Evacuate and Warn behavior
- Select the Evacuate and Warn behavior.
- Add an Action to Change Profile Property and set the Speed to 2.0 m/s.
- Add an Action to a Create Trigger.
- Click to the right of Triggers and select Warn Others.
- Click Create.
The Evacuate behavior
- Select the Evacuate behavior.
- Add an Action to Change Profile Property and set the Speed to 2.0 m/s.
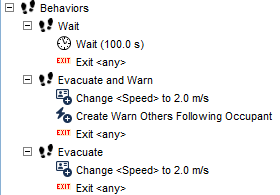
The available behaviors should now appear as in Figure 5.
Run Simulation
Run the simulation.
View Results
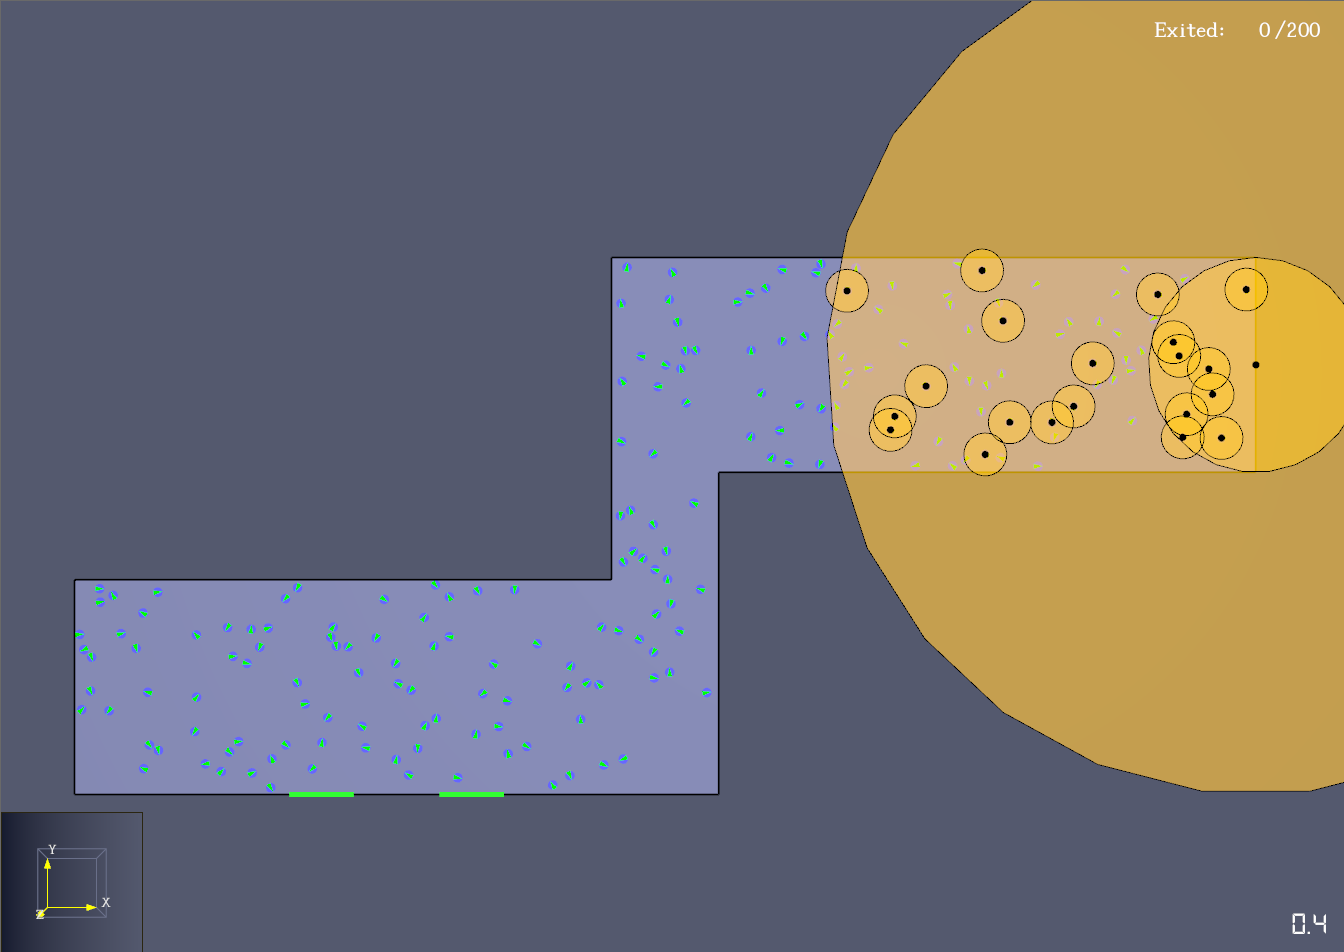
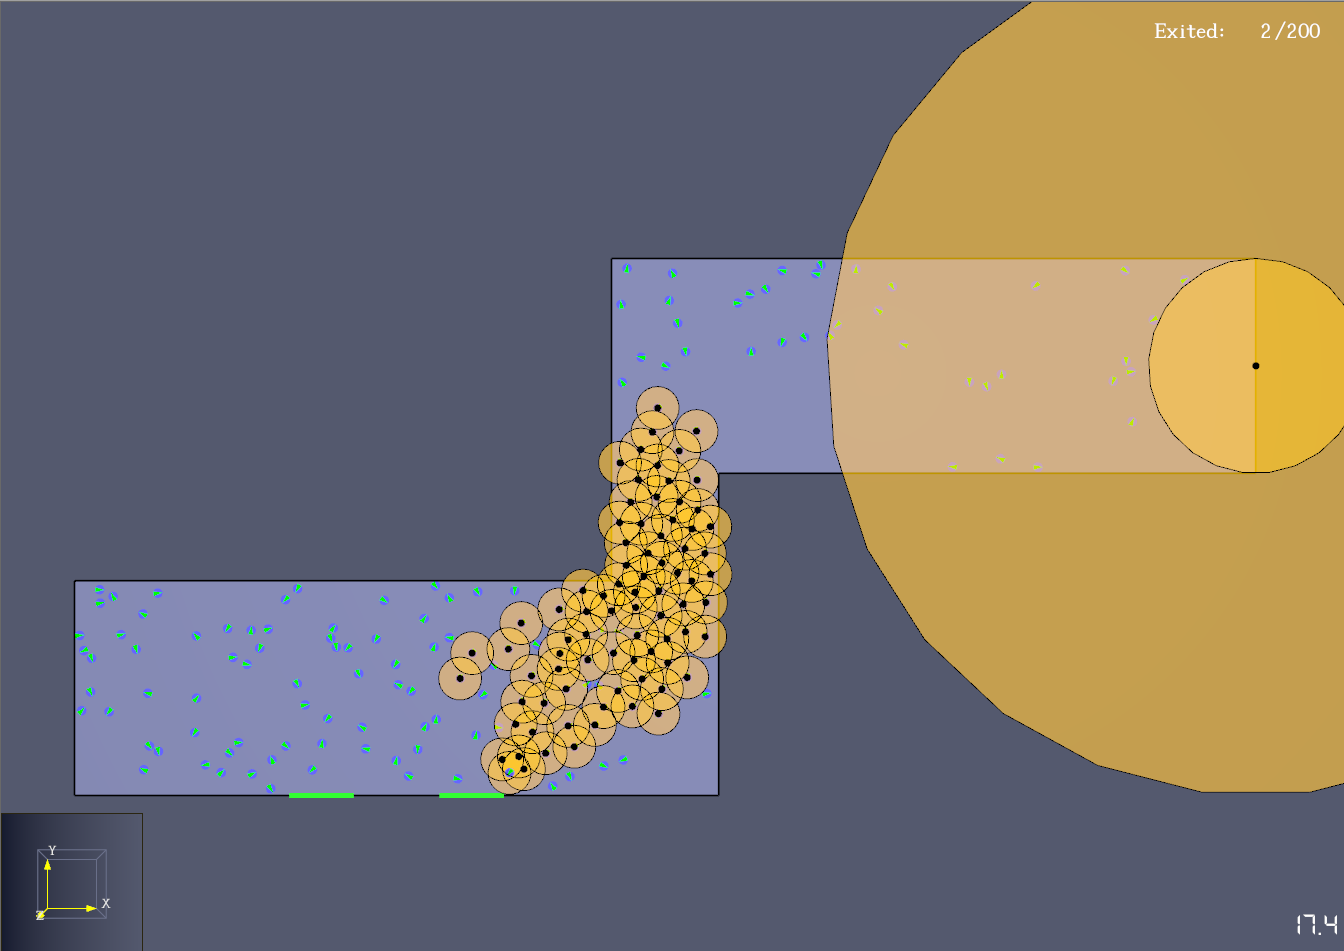
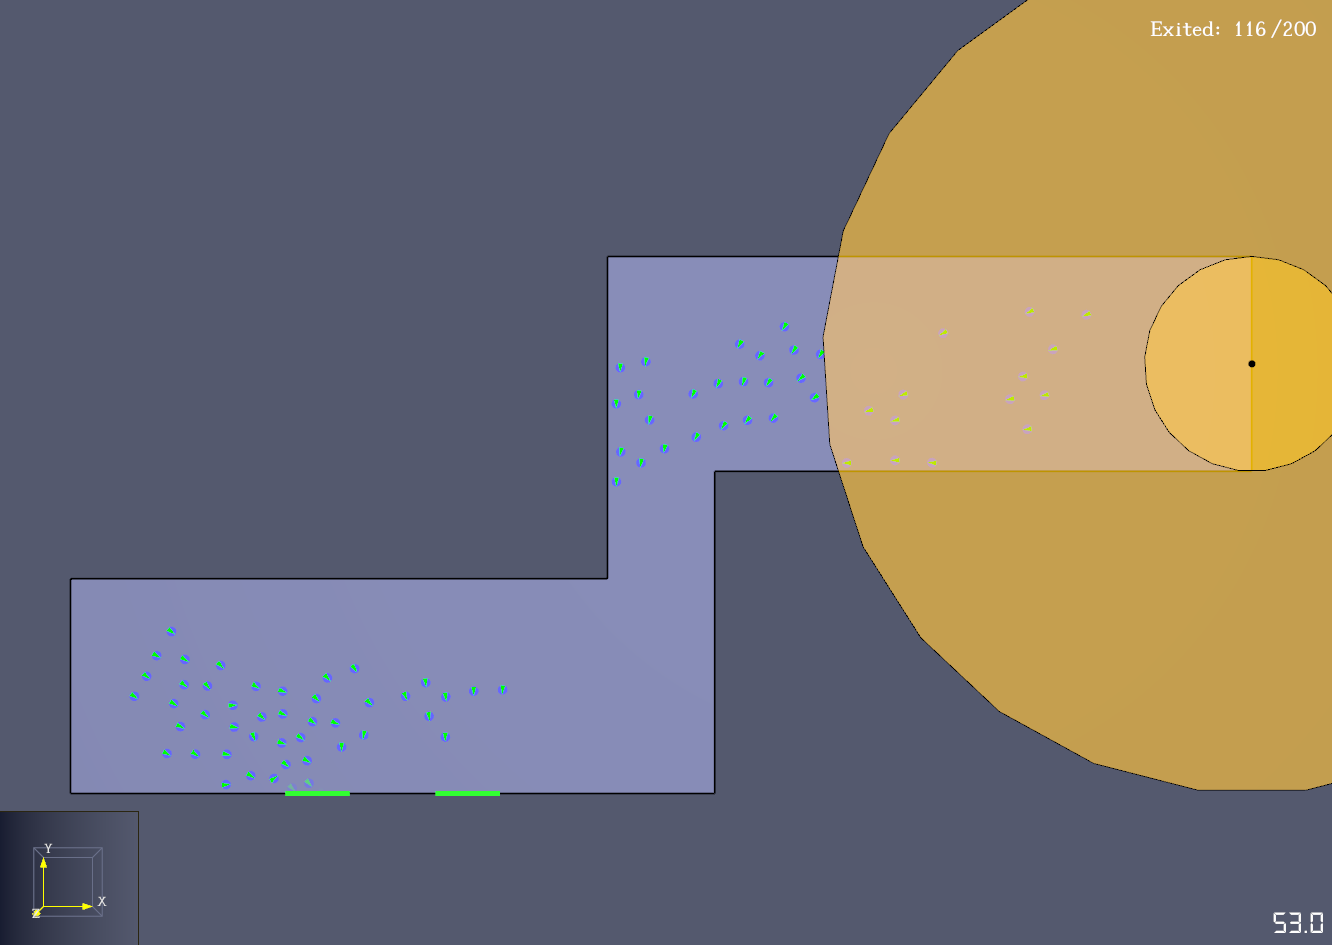
The following figures show key events in the simulation timeline.
Related Tutorials
Tutorial demonstrating how to model occupants that respond to Triggers to shop.
Update to a Pathfinder tutorial about simulating movement in a subway station, and uses triggers to simulate an emergency evacuation.
Video tutorial demonstrating the difference in evacuation times when occupant flow is properly balanced.
Tutorial demonstrating how to distribute the use of stairs and escalators in Pathfinder.
Tutorial demonstrating how to model passenger movement in a subway.
This tutorial teaches the user how to create Triggers in Pathfinder models.
Video tutorial demonstarting how to assign exit goals to percentages of the occupant population.
Tutorial demonstrating how to have occupants evacuate using familiar paths.