This video demonstrates the steps followed in this tutorial to create a multi-floor stairwell with landings between each floor.
Introduction
This example represents an outer section of a dormitory wing with 30 persons randomly distributed inside. The persons will move through their respective halls and down a stairway to exit the model.
Create Floor Geometry
To select Metric measurements:
- On the View menu, click Units and select SI.
To specify snap grid spacing:
- On the View menu, click Edit Snap Grid.
- In the Snap grid spacing box, type
1.0 m. - Click OK.
To create the room with a hallway:
- In the View toolbar, click Top View
 .
. In the Tools toolbar, click Add a Rectangular Room
 .
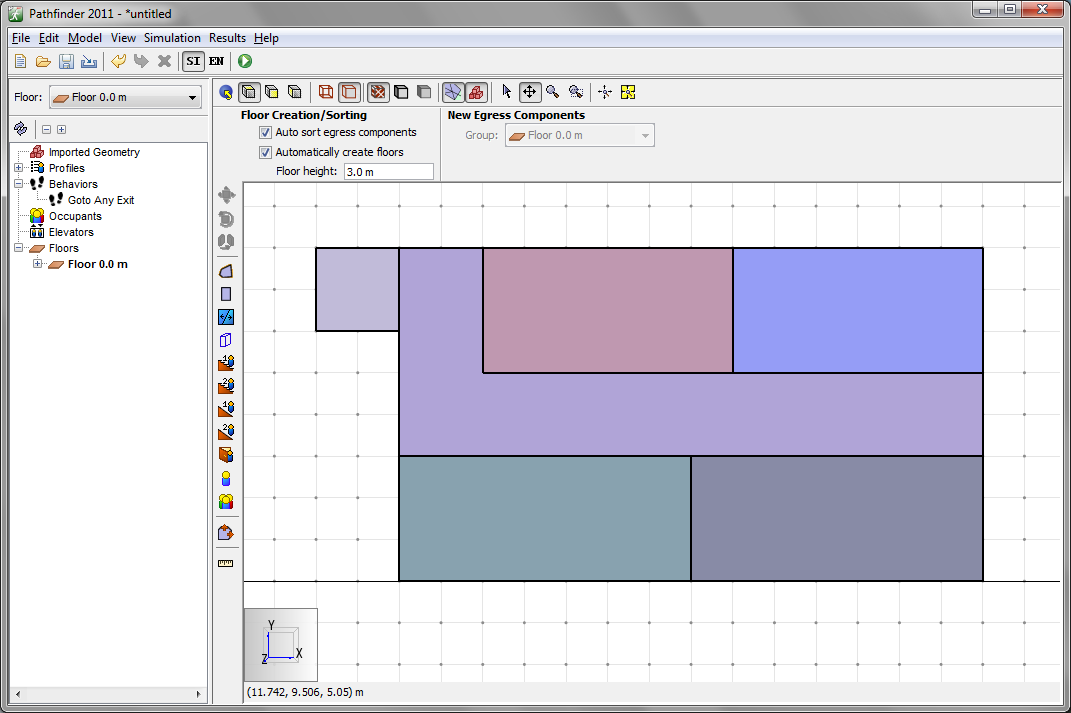
.- We will make a large room and then subdivide it.
To add the first room, click and drag from point
(4,0)to point(18,8). Create four additional rooms from
(4,0)to(11,3),(11,0)to(18,3),(6,5)to(12,8), and(12,5)to(18,8).- Create the base of the stairwell by drawing a rectangular room from
(2,6)to(4,8).
To quickly make the second and third floors, we will copy the ground floor. For convenience and to help organize our model, we first create two new floors. To create the second floor:
- In the Floor options (located above the Tree View), click <Add New>.
- Type
4 mfor the height of the new floor, then click OK. - In the Tree View, click to select Floor 0.0 m.
- In the tools toolbar, click Copy/Move Objects
 .
Select Copy Mode.
In the Copies box, type
.
Select Copy Mode.
In the Copies box, type 1. In the Move Z box, type4.0. Click Copy/Move. - The second and third floors have larger landings than the first floor.
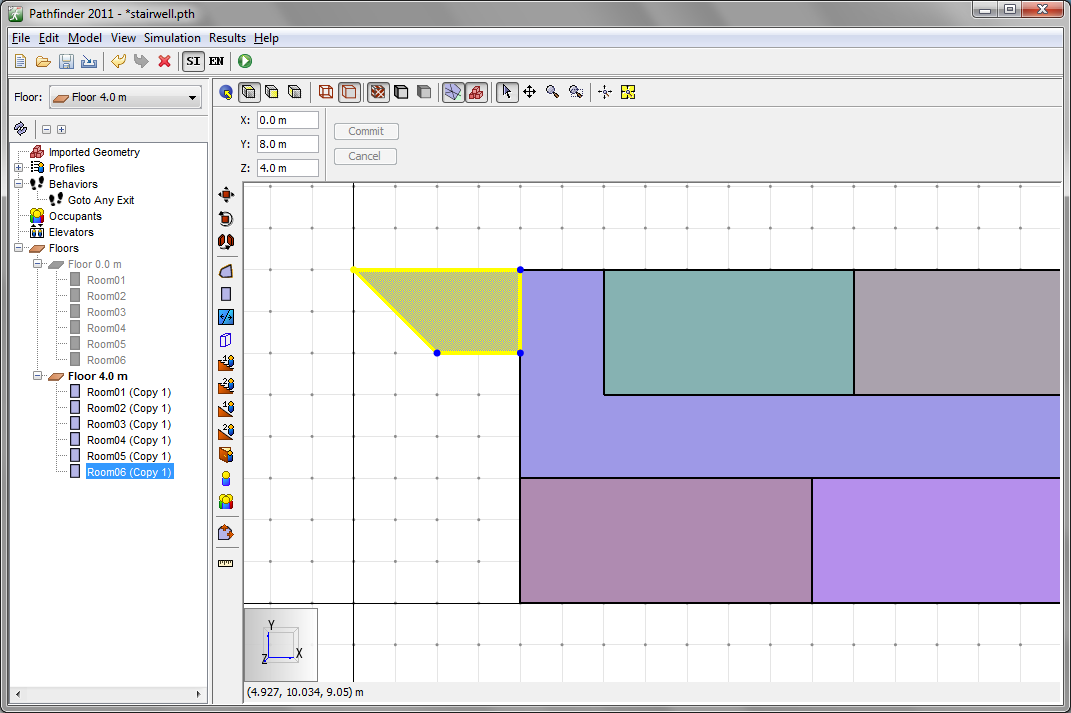
To edit the size of the second floor landing, right-click Floor 4.0 m and click Set as Active Floor.
Using Select/Edit Objects
 , select the landing of the second floor.
Click and drag the top left handle (blue dot on the room) to
, select the landing of the second floor.
Click and drag the top left handle (blue dot on the room) to 0,8and the bottom left handle to0,6.
To create the third floor:
- In the Floor options (located above the Tree View), click <Add New>.
- Type
8 mfor the height of the new floor, then click OK. - In the Tree View, click to select Floor 4.0 m.
- In the tools toolbar, click Copy/Move Objects .
Select Copy Mode.
In the Copies box, type
1. In the Move Z box, type4.0. Click Copy/Move. - Because we copied the second floor, we do not need to edit the landing of the third floor.
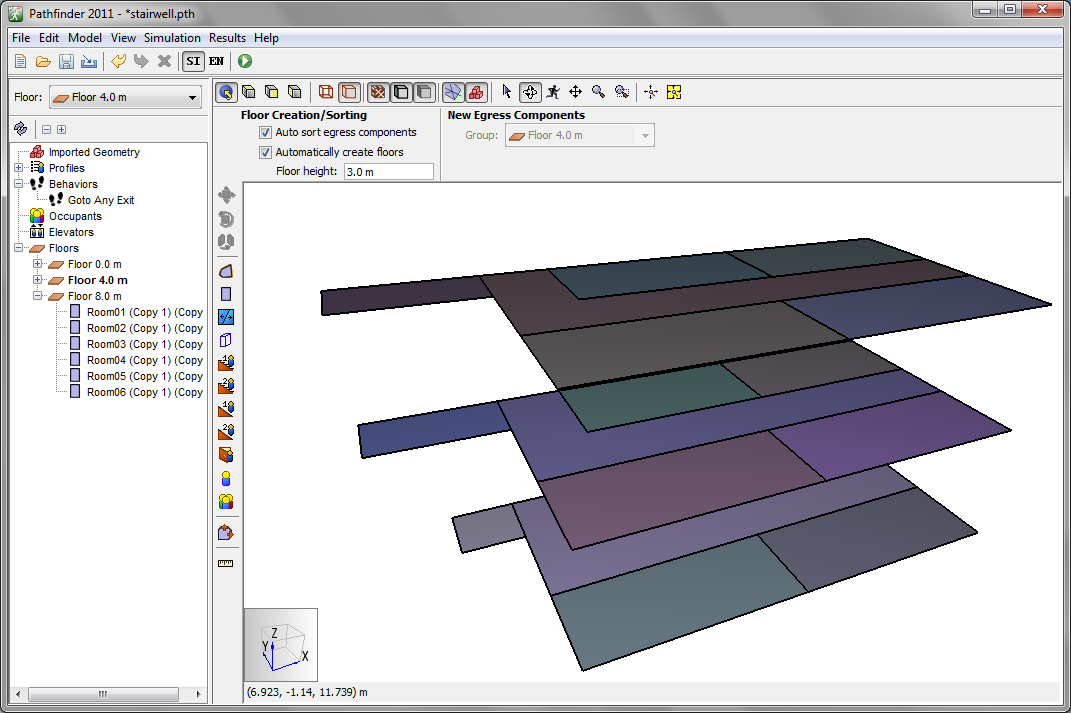
To show the entire model:
- Click the Floor pulldown menu located above the Tree View and select <Show All>.
- Click the Perspective View
 .
. - Click Reset All
 and then spin the model.
The model should look similar to Figure 3.
and then spin the model.
The model should look similar to Figure 3.
Add Landing
Before adding stairs, we add landings between floors. To add the landing between the first and second floors:
- In the Floor options (located above the Tree View), click <Add New>.
- Type
2 mfor the height of the new floor. - In the New Floor dialog box, check Set as active floor. This hides all other floors and causes newly created geometry to be added to the new floor. Click OK.
- In the View toolbar, click Top View .
- In the Tools toolbar, click Add a Rectangular Room .
Create a rectangular landing from
(0, 0)to(4, 2).
Repeat to add a second landing at 6.0 m. After adding a second landing, your model should resemble Figure 4.
Add Stairs
To create the stairs, we will use the stair tool that adds a stair between existing floors. To simplify placing the stairs, we will display only the floors of interest when adding the stairs. To add the first stairs:
- In the Tree View, hold the CTRL key and select Floor 0.0 m and Floor 2.0 m.
- Release the CTRL key and right-click on either of the selected floors. From the context menu, select Filter. Only the first floor and the first landing will be displayed.
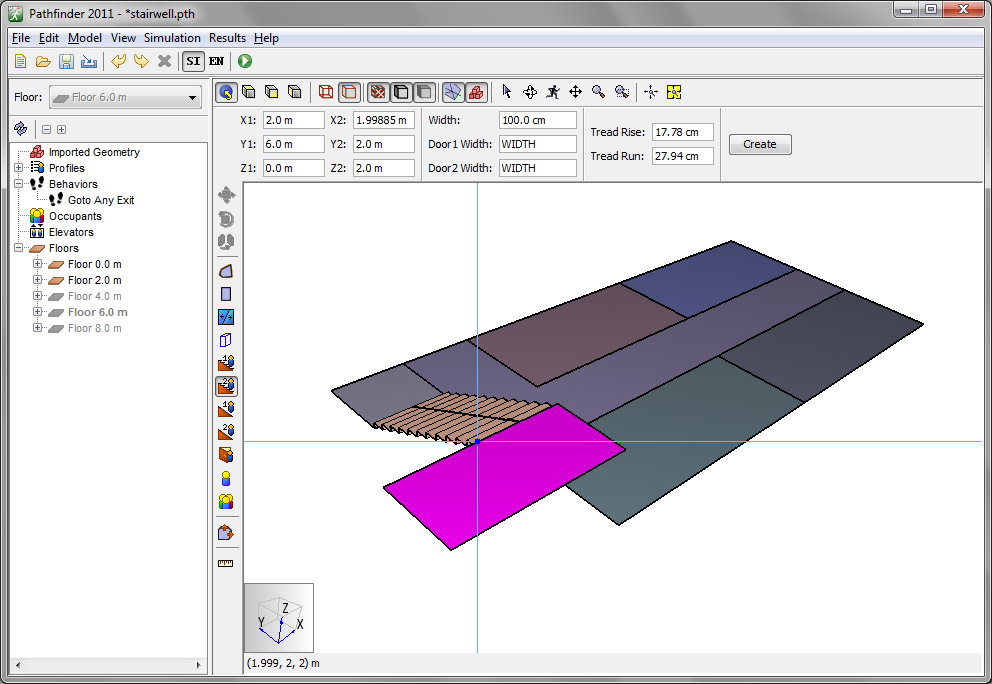
- Click Create Stairs between two edges
 .
. - In the Width box, type
2 m. - Click on the first floor landing, then click on the 2.0 m landing. Your model should resemble Figure 5.
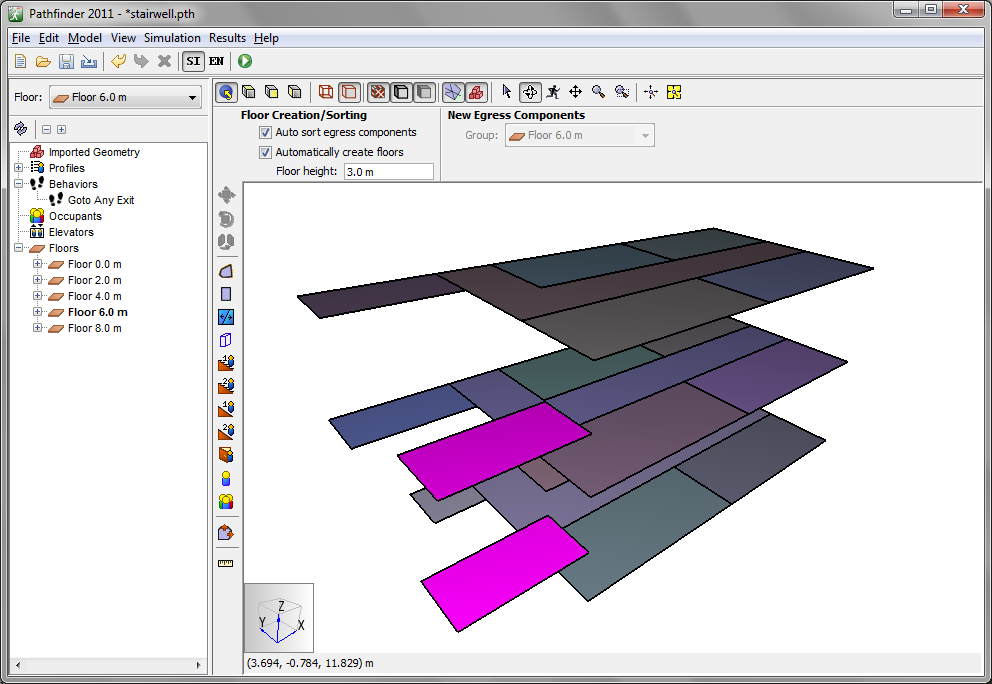
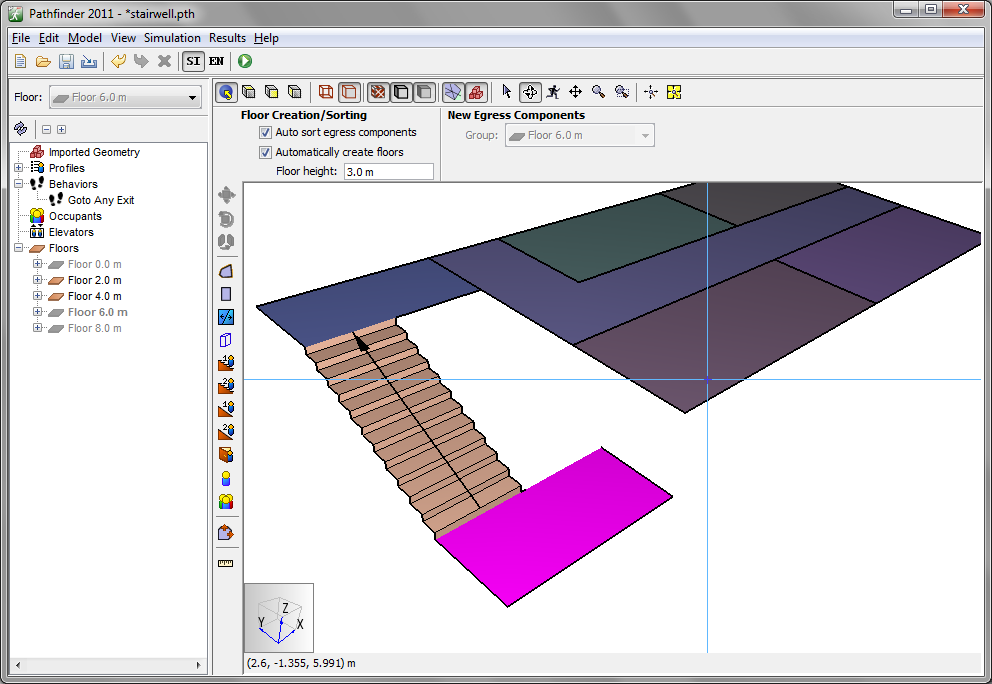
- Repeat the above steps and add stairs between Floor 2.0 m and Floor 4.0 m. These stairs are shown in Figure 6.
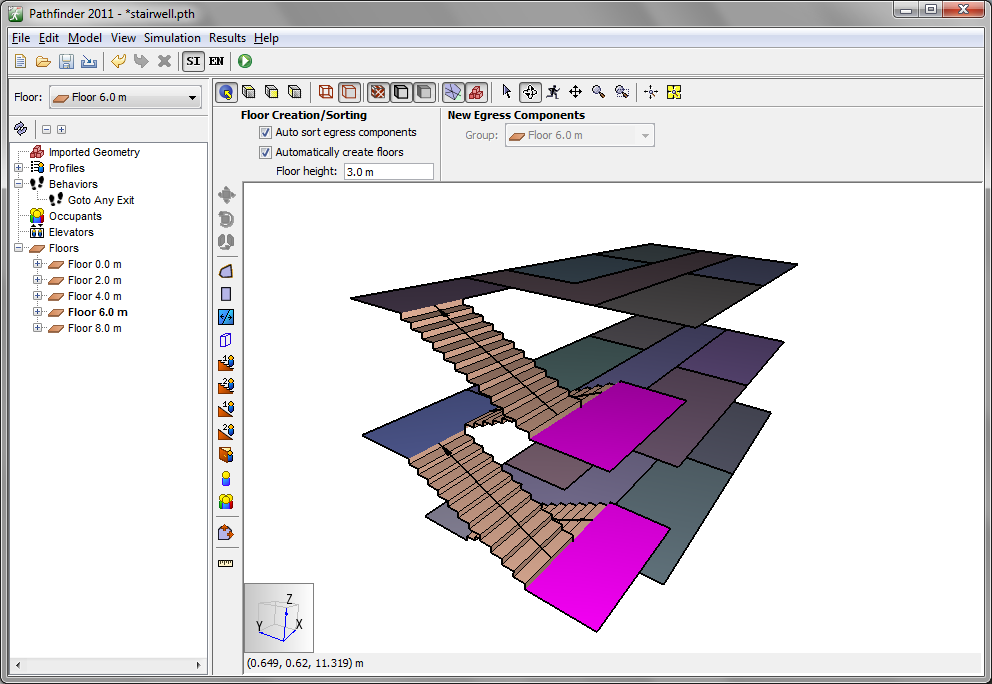
- Repeat to add stairs between Floor 4.0 m and Floor 6.0 m.
- Repeat to add stairs between Floor 6.0 m and Floor 8.0 m.
When finished, right-click on Floors in the Tree View and click Show All. The stairs should look as shown in Figure 7.
Add Doors
With the geometry finished, doors can be added. This can be done in the 3D view, but it will be easier to use the Top View and work with one floor at a time. To work in any specific floor, right-click it in the Tree View and select Set as Active Floor or select the floor from the drop-down menu above the tree view.
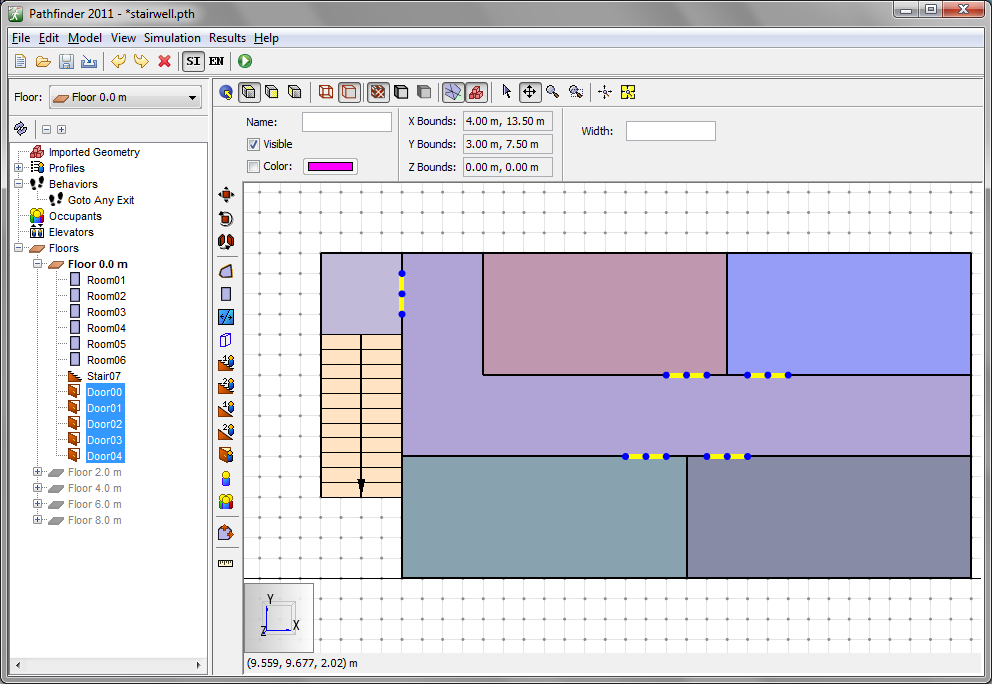
To add doors to the first floor:
- On the View menu, click Edit Snap Grid, type
0.5 mthen click OK. - Right-click on Floor 0.0 m and select Set as Active Floor.
- In the View toolbar, click Top View .
- Click Add a new Door
 .
. - To add a door from the hallway to the stairwell, click and drag from
(4, 6.5)to(4, 7.5). - Create 1 m doors to connect each room to the hallway.
Click and drag from
(9.5, 3.0)to(10.5, 3.0),(11.5, 3.0)to(12.5, 3.0),(10.5, 5.0)to(11.5, 5.0), and(12.5, 5.0) `to `(13.5, 5.0). Your model should resemble Figure 8.
Repeat for Floor 4.0 m and Floor 8.0 m.
Finally, add an exit door on the first floor (Floor 0.0 m) from (4, 8) to (6, 8).
Add Occupants
We now add occupants to each floor.
- Right-click on Floor 0.0 m and select Set as Active Floor.
- Hold the CTRL key and click on each of the four rooms on the floor to select them.
- On the Model menu, click Add Occupants.
- In the By Number box, type
20, then click OK. - In the same manner, add 50 occupants to the second floor and 30 occupants to the third floor.
To show the completed model:
- On the View toolbar, click Perspective View.
- On the View menu, under Agents, click Show as People. Your model should resemble Figure 9.
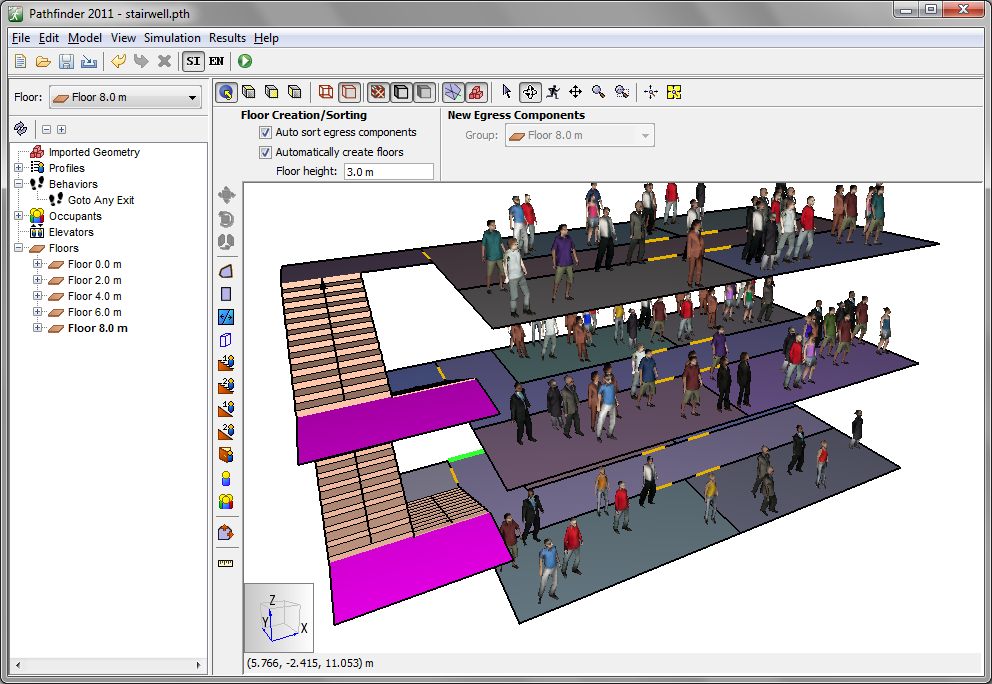
The occupants will be assigned the default Behavior, which is to leave the building using any available exit.
Run Simulation
To run the simulation:
- On the File menu, select Save As…
- Save the model to a new folder on your computer and name the file
multi_floor_stairwell.pth. - On the toolbar, click Run Simulation
 .
.
View Results
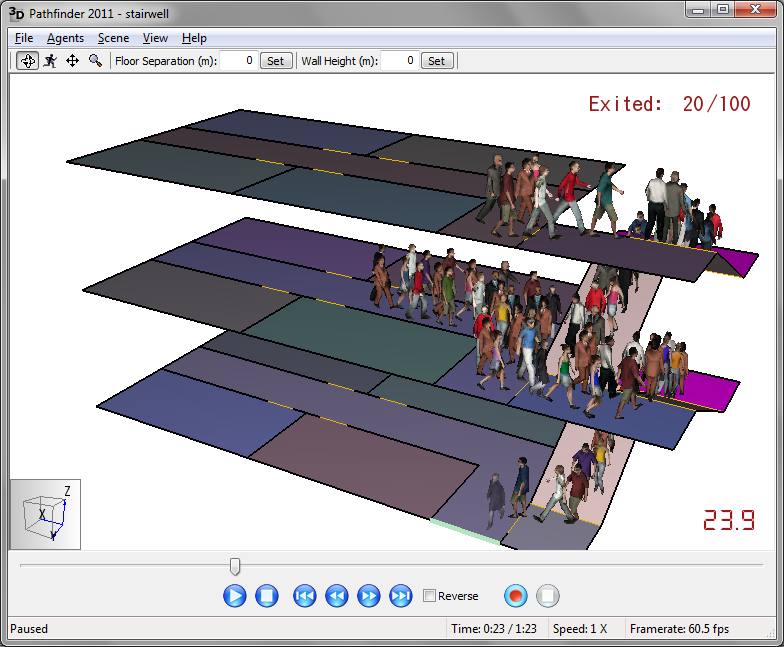
When the simulation is finished, the 3D Pathfinder results window will display.
To view results:
- Click the Play button.
- At any time click the Pause or Stop button. You can drag the time line to control the animation.
- To view occupants as people, click the Stop button, on the Agents menu, click Show as People, then click the Play button.
Detailed information for each room is provided in comma-separated value (CSV) files that can be imported to a spreadsheet. The LAST OUT time is 109.9 seconds for steering behavior.
Selecting SFPE Mode
Pathfinder provides the option to select different simulation modes. The SFPE movement mode is consistent with the assumptions used in the SFPE Engineering Guide - Human Behavior in Fire (SFPE 2019). Assumptions include:
- The occupants move toward the exits using the shortest path
- The maximum occupant speed is a function of room density
- Occupants move independently and can occupy the same space as other occupants
- Queues form at doors, with the flow rate through the door as specified by SFPE guidelines. Because multiple occupants can occupy the same space, a queue may appear as a single occupant.
To select the SFPE mode:
- On the Simulation menu, click Simulation Parameters.
- Click the Behavior tab.
- In the Behavior Mode box, select SFPE.
- In the Door Boundary Layer box, type
0cm. This removes the boundary layer from the flow calculation of the door - Click OK.
Save the model using the name multi_floor_stairwell_sfpe.pth and run the analysis.
The LAST OUT time for SFPE mode is 85.0 seconds.
Compare SFPE Calculation with Expected Result
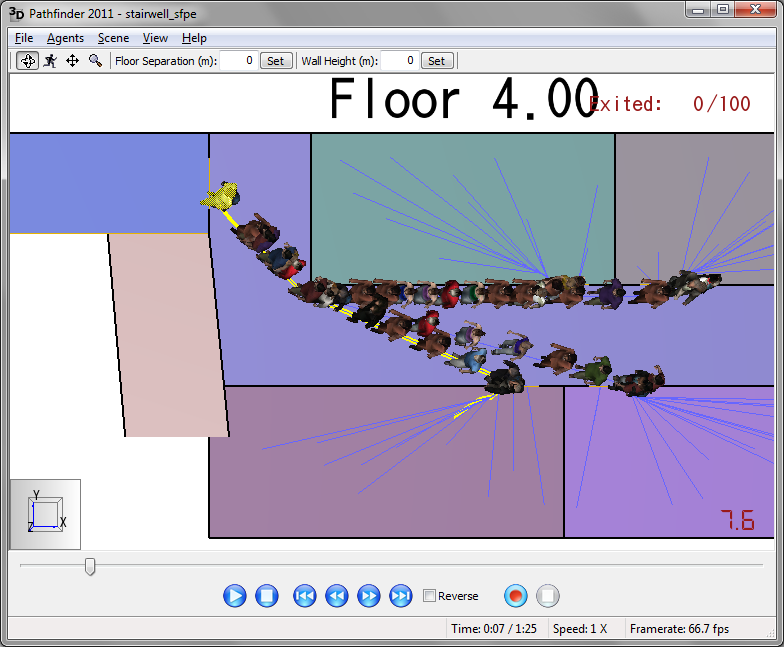
The expected SFPE mode evacuation time can be calculated by hand. The time is the time required for the first occupant from the second floor to exit plus the time for the remaining second and third floor occupants to pass through the door at the bottom of the stairs.
The speed on the stairs is 0.918 m/s.
The speed on the floor and landing is 1.19 m/s.
The flow rate through a 1.0 m door is 1.32 pers/sec.
Figure 11 shows the path of the first person on the second floor highlighted in yellow.
The length is approximately 12.9 m.
The time for the first person to exit is approximately 10.8 s to reach the landing, 5 s on the landing and exit floor, and 9.7 s on the stairs, for a total time of 25.5 s.
The time for 79 people to pass through the 1.0 m door is 59.9 s.
The total exit time is then approximately 85.4 s, which is similar to the time calculated by Pathfinder.
To download the most recent version of Pathfinder, please visit the Pathfinder Support page and click the link for the current release. If you have any questions, please contact support@thunderheadeng.com
Bibliography
SFPE. 2019. SFPE Guide to Human Behavior in Fire. 2nd ed. Springer International Publishing. https://www.springer.com/gp/book/9783319946962.
Related Tutorials
Tutorial demonstrating how to import IFC files to Pathfinder.
Video tutorial demonstrating how to avoid creating unwanted gaps in the geometry of a Pathfinder model.
Tutorial demonstrating how to distribute the use of stairs and escalators in Pathfinder.
Video tutorial demonstrating how to fix geometry problems related to DWG importation.
In this tutorial we show how to fix three problems that can occur when BIM (Building Information Modeling) or CAD (Computer-Aided Design) models into Pathfinder.
Tutorial Demonstrating how to model pressure leakage using Pyrosim
Tutorial demonstrating how to model a pressure relief vent in Pyrosim.
Tutorial to experience the fundamental features of Pathfinder